| As described earlier, SSIS bundles a suite of built-in workflow and data flow tasks that you can use to create SSIS packages. The SSIS extensibility feature enables you to create your own tasks and transformations. You can use the SSIS object model to execute a package programmatically or to change package properties dynamically at runtime. The following sections walk you through the process of designing and executing an SSIS package. But before that, let's look at the SSIS object model, expressions, and logging features. The SSIS Object Model As with DTS in SQL Server 2000, SSIS also includes an object model, which you can leveraged to do the following: Modify SSIS package properties at runtime Develop, load, and execute SSIS packages programmatically, in lieu of using the designer Extend SSIS by coding customized tasks, log providers, enumerators, connection managers, and data flow tasks
You can code against this object model inside a package itself by using the Script task or externally in .NET managed code. The Script task is preferably used for single-use, package-specific situations, such as modifying SSIS package properties during runtime. External .NET programs are usually implemented to create reusable customized code to be invoked in multiple SSIS packages, or to load, modify, or execute SSIS packages. The use of the object model to extend the functionality of SSIS (to create custom tasks and transformations) is beyond the scope of this book. An easy way to visualize the SSIS object model is to look at the Package Explorer in BIDS. The hierarchy should be traversed in code, much as it appears onscreen. An SSIS Object Model Example Let's look at an example of a simple package that loads the contents of a flat file into a SQL Server table. It is not uncommon for a flat file name, or even path, to change from one execution to another, or even within a loop in the same invocation. To resolve such issues, you can access the SSIS object model and assign task properties, using tasks such as the Script task. As shown in Figure 12.7, the tasks in this sample package include a Script task to change the source text file path, a SQL task to truncate the destination table, and a Data Flow task to copy the text file contents to the SQL Server table. Figure 12.7. This simple package uses the Script task to change the source text file path to a value specified in a package variable. 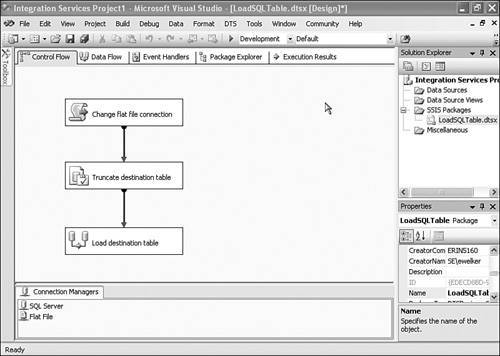
You can follow these steps to try out this sample: 1. | Unzip the ObjectModelExamplePackage.zip file provided with the source code download for this book.
| 2. | Copy the testfile2.txt text file to C:.
| 3. | Execute CreateTable.sql by using SQLCMD or Management Studio to create a table named dbo.TestTable in the tempdb database.
| 4. | Double-click the Integration Services Project1.sln solution file to open it in BIDS.
| 5. | Open the LoadSQLTable 1.dtsx package, if it is not already open in the designer.
| 6. | Double-click the JUNECTP.tempdb connection on the Connection Managers tab and update the server name to connect to your SQL Server 2005 instance.
| 7. | Double-click the Flat File connection and note the filename. It should be C:\TestSSIS.txt, a file that does not exist.
| 8. | Right-click the package designer and select Variables. Ensure that the FilePath variable is set to C:\TestFile2.txt, a file that you copied to C: in step 2.
| 9. | Execute the package by clicking the green arrow on the toolbar or by selecting Debug | Start Debugging. Notice that the Script task updates the Flat File connection to point to C:\TestFile2.txt instead of C:\TestSSIS.txt, the Execute SQL task truncates dbo.TestTable, and the Data Flow task copies the data from the flat file to the OLE DB destination (that is, into the dbo.TestTable table).
| 10. | After the package executes successfully, view the data in the dbo.TestTable table by using Management Studio or SQLCMD. You should see the data from the flat file C:\TestFile2.txt inserted into the dbo.TestTable table.
|
The Script task code should appear as follows: Public Sub Main() ' Modify the flat file connection string based on the value ' of the "FilePath" package variable. Dim DTSConnectionMgr As ConnectionManager DTSConnectionMgr = Dts.Connections("Flat File") DTSConnectionMgr.ConnectionString = CStr(Dts.Variables("FilePath").Value) Dts.TaskResult = Dts.Results.Success End Sub
This script first declares a ConnectionManager variable and initializes it by referencing the name of the flat file connection manager in the Dts.Connections property. Next, it assigns the ConnectionString property of the ConnectionManager variable to the value of the FilePath package variable. The final statement returns the status of the task execution, much as was done in the ActiveX scripts used in DTS. During the package execution, the source filename is read from the package variable instead of what is currently designated in the connection property of the flat file connection manager. Other properties of an SSIS task can be modified dynamically at runtime in the same way. SSIS Expressions While creating packages, often it is necessary to combine variable values or constants to set a property value or to use functions to cleanse or extract a meaningful value from data before loading it to the destination. You can use expressions for such purposes. An expression is a combination of operators, functions, and literals that yields a single data value. Here's an example of an expression on a variable with the string data type: SUBSTRING (variable_name, 1, 4) = "SSIS"
This expression compares the first four characters of the string to SSIS and returns a Boolean value. Based on the return value, you can perform other operations. The tasks that use expressions include Derived Column, Conditional Split, and For Loop Containers. The elements for which the SSIS expressions are useful include precedence constraints, variables, and property expressions. Property expressions are used to set the properties of tasks and containers at runtime by using expressions on variables and return values. Logging SSIS allows you to configure logging for quite an elaborate list of events, and it supports a diverse set of logging providers and commonly required information regarding package execution. You can configure logging from the SSIS designer and utilities such as the dtexecui.exe and dtexec.exe command-prompt utilities. The different log providers available include text files, the Profiler, the Windows Event log, SQL Server, and XML. In addition, you can write custom log providers. You can right-click the designer window in BIDS and select Logging to configure SSIS logs. Log options can be set either at the package level, at the level of any of its task, or at the container level. You can tune the LoggingMode property at the package, container, and task levels to customize the logging behavior. A package can write to multiple logs. You can choose different events and logged information for different tasks and containers within a package. Hence, you can set logging at a granular level. The SSIS log schema defines the set of information that you are allowed for logging. You can select any event as specified in Table 12.1 to log information in the log file. SSIS Package to Import Flat Files into Tables Now let's look at designing and executing an SSIS package to import flat files into SQL Server tables. Here is the scenario: You have implemented a data warehouse database and need to load Sales and Product data into various dimensions tables. The Sales and Product data is available in flat files in respective folders. The Sales data contains a SalesID column, with the first three numbers representing the Sales category. The sales date field needs to be converted into the appropriate data type before it is loaded into the Sales table. Here is what needs to be done to load the Sales and Product data from the flat files into the database tables: To load Sales data You need to implement a Data Flow task that will read the Sales data from the flat files, use the Derived Column transformation to transform and extract the required values using SSIS expressions, and load the data in the SQL Server table destination by using the OLE DB connection manager. Then you use the Foreach File enumerator to loop through the files. The file path can be stored to a variable. The variable value can be used to modify the connect string of the connection manager for the source adapter. To load Product data Because no transformation is required on the data, you use the Bulk Insert task to load the data from the flat files in the Products table. Here also, you use the Foreach File enumerator to loop through the files.
Because the two preceding tasks are independent, they can be executed in parallel. You need to implement those processes as separate packages and execute both the packages in parallel in the main package. Loading the Sales Data You an unzip the BookSample.zip file provided with the source code download for this book and follow these steps to load the sales data: 1. | Run the Preparation.sql SQL script file to create a database named BookDW and two tables, named Sales and Products, in this database.
| 2. | Launch BIDS and create a new Integration Services project. Rename the default Package.dtsx file LoadSalesData.dtsx.
| 3. | Drag and drop a Foreach Loop Container task from the Toolbox onto the Control Flow window. Double-click the Foreach Loop Container task to launch the Foreach Loop Editor dialog.
| 4. | In the Foreach Loop Editor dialog, select the Collections page and ensure that the enumerator type is set to For Each File Enumerator. In the Enumerator Configuration panel, select the folder that contains the Sales data flat files and select all the files (*.*). Keep the Fully Qualified radio button selected to retrieve the fully qualified filenames. Click OK to close the Foreach Loop Editor dialog. Figure 12.8 shows the Collection page on the Foreach Loop Editor dialog.
Figure 12.8. The Foreach Loop Container is used to iterate over all the files in the Sales folder. 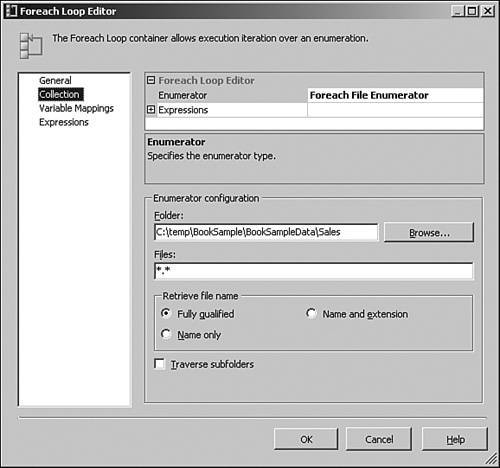
| 5. | Right-click anywhere on the Control Flow window and then select Variables to open the Variables window.
| 6. | In the Variables window, add the variable FileName of data type String within the Foreach File Container scope. To add a variable in the Foreach Loop Container scope, select the container object in the designer and then click the Add Variable toolbar button on the Variables window.
| 7. | Assign the collection value of the Foreach File to the new variable. To do this, double-click the Foreach Loop Container on the designer, select the Variable Mapping page, and select the User::FileName variable with the index 0. Click OK to close the dialog.
| 8. | Create a connection manager for the Sales data flat files. Right-click the Connection Manager window and select New Flat File Connection. Name the connection SalesFileConnection and point it to any text file under the Sales folder. Click the Columns page and then click the OK button. To assign the file path dynamically at runtime, you need to create a Script task to access the Flat File Connection Manager and set its properties programmatically.
| 9. | Drag a Script task from the Toolbox onto the Foreach Loop Container. Double-click the Script task, select the Script page on the Script Task Editor dialog, and set ReadOnlyVariables to FileName.
| 10. | Click the Design Script button to open the Microsoft Visual Studio for Applications script editor and write the following Visual Basic .NET script:
Imports System Imports System.Data Imports System.Math Imports Microsoft.SqlServer.Dts.Runtime Public Class ScriptMain Public Sub Main() Dim DTSConnectionMgr As ConnectionManager DTSConnectionMgr = Dts.Connections("SalesFileConnection") DTSConnectionMgr.ConnectionString = _ CStr(Dts.Variables("FileName").Value) Dts.TaskResult = Dts.Results.Success End Sub End Class
| 11. | Save the script, close the script editor, and return to the package designer.
| 12. | Create a Data Flow task to cleanse and load the data. Drag and drop the Data Flow task to the Foreach Loop Container. Connect the precedence constraint (that is, the green arrow) from the Script task to execute the Data Flow task.
| 13. | Double-click the Data Flow task, and it opens in the Data Flow window.
| 14. | Drag and drop a Flat File Source from the Toolbox to the Data Flow designer. Double-click Flat File Source, select SalesFileConnection as the Flat file connection manager, and then click OK.
| 15. | Drag and drop a Derived Column transformation task from the Toolbox to the Data Flow designer. Use the green arrow to connect the Flat File Source to this Derived Column task.
| 16. | Double-click the Derived Column task. Add two new columns named SalesCategory and SalesDate, as shown in Figure 12.9. The SalesCategory column uses the SUBSTRING([Column 0], 1, 3) expression to extract the first three characters from the first column in the input text files. The SalesDate column casts the third column to the date data type.
Figure 12.9. The Derived Column transformation task is used apply to expressions to transformation input columns. 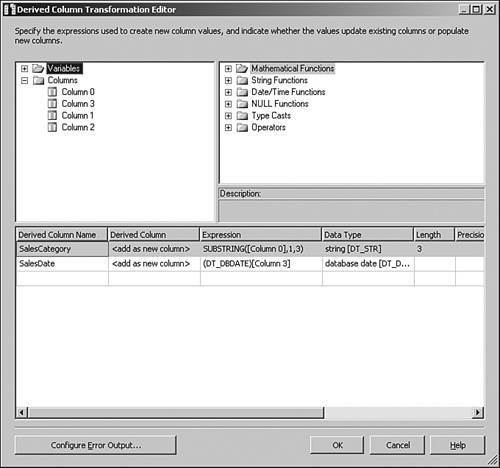
| 17. | To redirect the error rows to an error log file, click the Configure Error Output button on the Derived Column Transformation Editor dialog. For both the derived columns, change the Error column value from Fail component to Redirect row. Click OK to close the Configure Error Output dialog and the click OK to close the Derived Column Transformation Editor dialog. Figure 12.10 shows the Configure Error Output dialog.
Figure 12.10. The Configure Error Output dialog is used to redirect error rows instead of failing the component. 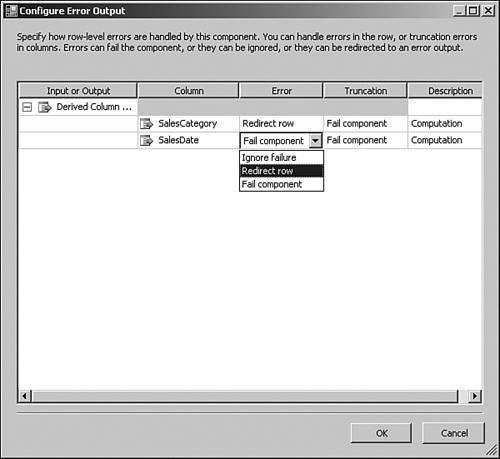
| 18. | Drag and drop a Flat File Destination component from the Toolbox to the Data Flow designer and link the error output (by using the red arrow) from the Derived Column to the flat file destination. Double-click the flat file destination and create a new flat file connection. Provide the path and name of the text file that will receive the error rows. After creating a new file connection, select the Mapping page on the Flat File Destination Editor and click OK.
| 19. | To load the successful rows into the destination Sales table, drag and drop an OLE DB Destination adapter to the Data Flow designer. Link the Derived Column success path (by using the green arrow) to the OLE DB Destination. Next, double-click the OLE DB Destination and connect it to the BookDW database created in step 1. To do this, click the New button next to OLE DB Connection Manager and create a new connection manager that uses Native OLE DB/SQL Native Client to connect to SQL Server 2005 instance containing the BookDW database. Set Data Access Mode as Table or View and then select the Sales table from the Name of the Table or the View list. Click the Mappings page. Map Column 0 to Sales ID, Column 1 to TranID, Column 2 to Customer ID, and SalesCategory and SalesDate derived columns to table columns with the same names. Click OK.
| 20. | Save the package. Figure 12.11 shows the package design in progress.
Figure 12.11. The package contains a flat file source, a derived column transformation, an OLE DB destination for successful rows, and a flat file destination for error rows. 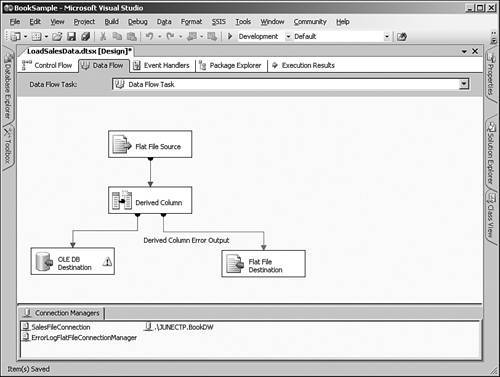
| 21. | In case you need to deploy this package to a remote machine, you need to define the file path for the Sales data directory and the destination SQL Server database connection when the package is loaded and the solution is to configure these properties in the configuration file. To configure the properties, right-click anywhere on the Control Flow window and select Package Configurations. Check the Enable Package Configurations box to enable to configurations. Click the Add button, and the Package Configuration Wizard starts. Click Next on the Welcome screen.
| 22. | On the Select Configuration Type screen, select XML Configuration File type and specify the configuration file name. Click Next.
| 23. | On the Select Properties to Export screen, for the EnumeratorProperties for the Foreach Loop Container task, select the Directory property. In the connection manager properties, select ServerName and Initial Catalog. Provide a name for the configuration and click Finish and then close the Package Configuration Organizer dialog. Figure 12.12 shows using the SSIS Package Configuration Wizard to export properties to a configuration file. Save the package.
Figure 12.12. The Package Configuration Wizard can be used to export properties to a configuration file. 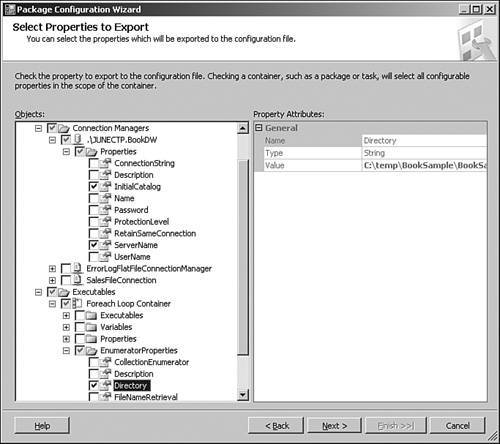
|
Let's now create another SSIS package to load product data from flat files to the table: 1. | Open Solution Explorer, right-click SSIS Packages, and click New SSIS Package.
| 2. | As with the Load Sales data package, use a Foreach Loop container to loop through the product directory and select the flat files to load. The initial steps for this package are similar to those of earlier package to load the sales data. Therefore, repeat the steps 3 through 11 from the earlier exercise to load the sales data, but specify the product directory and select a product flat file for the flat file connection.
| 3. | Because no transformation needs to be applied to the data, use the Bulk Insert task to load the data to the destination SQL Server machine. Drag and drop the Bulk Insert task to the Foreach Loop container. Double-click the Bulk Insert task, select the Connection page, and specify the source and destination connection details as shown in Figure 12.13. Remember to change ColumnDelimiter to comma (,) instead of a tab.
Figure 12.13. The Bulk Insert task provides the quickest way to copy large amounts of data into a SQL Server table or view. 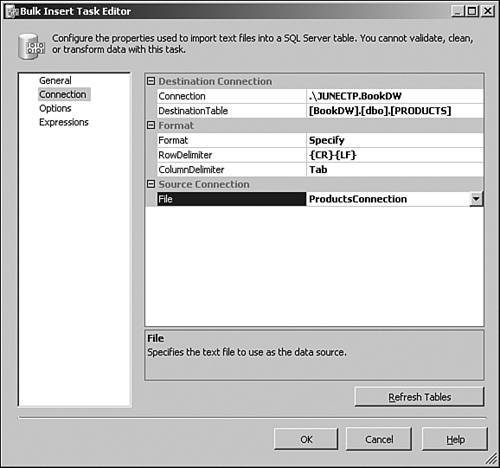
|
Figure 12.14 shows how this package looks like in the designer. Figure 12.14. A Foreach Loop Container, a Script task, and a Bulk Insert task are used inside a package to bulk load data from files into SQL Server. 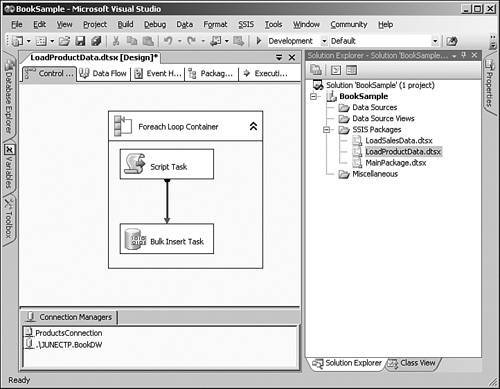
To execute these packages in parallel, you need to combine both the packages into a main package, like this: 1. | Open Solution Explorer, right-click SSIS Packages, and click New SSIS Package.
| 2. | Drag and drop an Execute Package task from the Toolbox to the Control Flow designer. Double-click the Execute Package task and select the Package page. Specify Location as File System and create a new connection that points to LoadSalesData.dtsx.
| 3. | Repeat step 2 to add one more Execute Package task to the Control Flow window and point it to the LoadProductData.dtsx package.
| 4. | To inform the administrator before the package is started, you need to use the Send Mail task. Drag and drop the Send Mail task to the Control Flow window. Double-click the Send Mail task and set the properties as shown in Figure 12.15.
Figure 12.15. The Send Mail task is used to send an email message when the package starts. 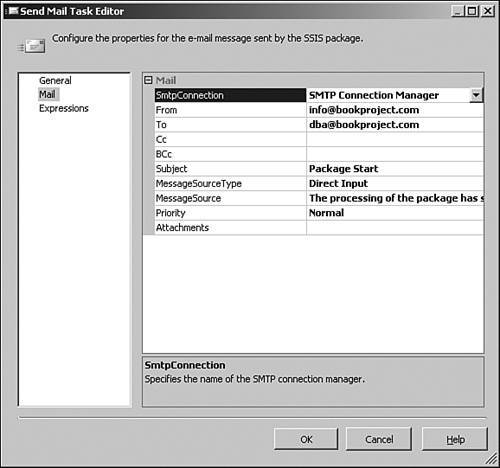
| 5. | Set the precedence constraints from the Send Mail task on success to execute the Load Sales data and Load Product data packages in parallel. Figure 12.16 shows what the main package looks like.
Figure 12.16. The main package uses the Execute Package task to run two other packages in parallel to load sales and product data, after sending an email using the Send Mail task. 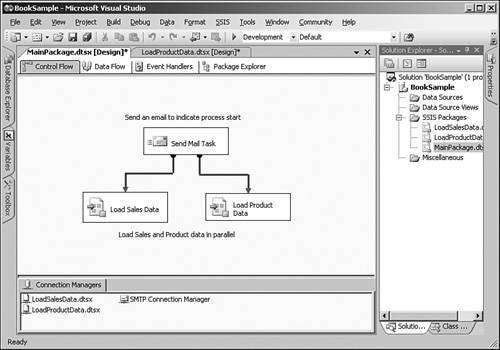
| 6. | Save the package. Right-click the package in Solution Explorer and select Set as StartUp Object.
| 7. | To monitor execution, it is a good idea to log events and monitor the progress. To log the execution results, right-click the Control Flow window and select Logging. The Configure SSIS Logs window opens.
| 8. | In the Configure SSIS Logs window, configure the events for each of the tasks as required (see Figure 12.17). You can also select the column details to be included while capturing the log events. To configure the columns, click the Advanced button on the Configure SSIS Logs window.
Figure 12.17. The Configure SSIS Logs dialog allows you to create and configure a new log to capture log-enabled events that occur at runtime. 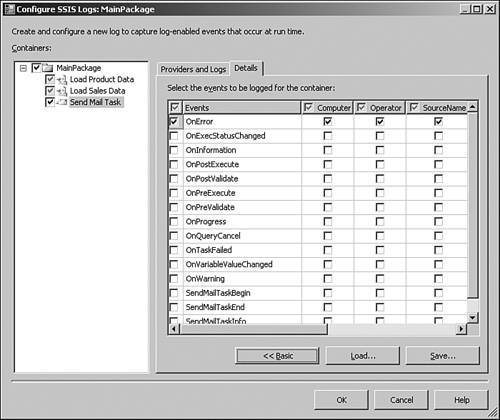
| 9. | Select Debug | Start to start the package execution in debug mode. When the package is executing, based on the color of the tasks, you can determine whether the package execution is successful or fails. As shown in Figure 12.18, the two packages are executed in parallel.
Figure 12.18. The Load Sales Data and Load Product Data packages are executed in parallel after an email message is sent. 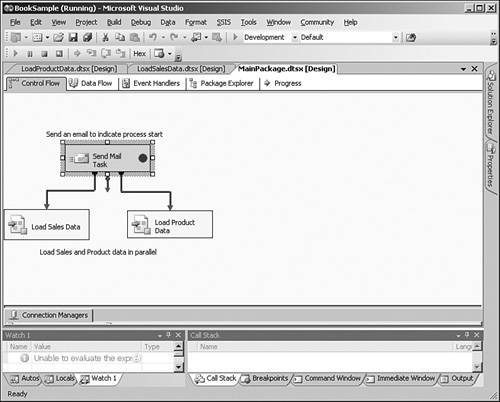
| 10. | In the Data Flow task, you can create data viewers on the data flow path to monitor the output rows. Open the LoadSalesData.dtsx package and select the Data Flow tab. Right-click the data path (that is, the green arrow) from Derived Column to OLE DB Destination and select Data Viewers, and add a new grid viewer. When the package is executing, SSIS shows a grid of rows being copied to the destination, as shown in Figure 12.19.
Figure 12.19. SSIS provides a powerful debugging capability called data viewers that can be used to display data between two data flow components during package execution. 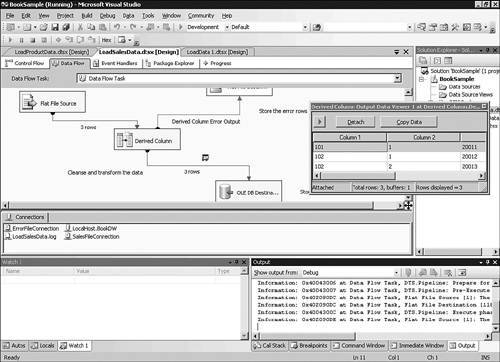
| 11. | To check whether the error rows are written to the error log output file, change the dates in one of the sales data file such that it cannot be converted to the date data type and execute the package again. Before executing the package again, truncate the rows from the Sales and Products table.
If the package is executed successfully, there will be green color-coding on all the tasks, indicating successful execution.
|
|