IPSec
IPSec has been an Internet standard for encrypted network transmissions since 1998 and is covered in RFC 2401, RFC 2402, RFC 2406, and RFC 2407, which can be found at http://www.ietf.org/rfc.html. IPSec is an extension to the ubiquitous IPv4 protocol, which adds authentication and confidentiality mechanisms to this protocol. In the next generation IP protocol, IPv6, IPSec has been incorporated into the protocol standard, and its support is mandatory. In contrast to many other networking protocols, IPSec is a suite of protocols rather than a single protocol specification. While an in-depth study of different IPSec protocols is beyond the scope of this book, this chapter will cover the most important aspects of this protocol and provide a sample use of IPSec. For further information, refer to the RFCs previously noted.
The two main protocols of IPSec are the authentication header (AH) and the encapsulating security payload (ESP). AH is an IPSec protocol that provides data integrity, data origin authentication, and anti-replay services to IP. ESP is a protocol header inserted into an IP packet to provide confidentiality, data origin authentication, anti-replay, and data integrity services to IP.
It is important that you understand the functionality provided by each of these protocols in order to be able to use them correctly. AH ensures that the IP packet has not been altered or tampered with on its way to the destination, but it does not provide any confidentiality regarding the content of the message. An eavesdropper can still read the IP packet. ESP addresses the encryption of the traffic preventing eavesdropping by third parties on the IP packets. Therefore, according to your needs, whether you want to protect your data from eavesdropping or protect your traffic from alteration by a third party, you should use ESP or AH.
IPSec provides two modes: transport and tunnel mode. Each mode can be used with AH, ESP, or both. (A detailed explanation of these modes can be found in IPSec: The New Security Standard for the Internet, Intranets, and Virtual Private Networks , by N. Doraswamy and D. Harkins.) To simplify, transport mode is used for host-to-host connections, while tunnel mode is used to include the whole IP packet into a new IP packet to be sent. The transport mode is useful when you need to protect the traffic between two individual nodes. The tunnel mode is used when the ultimate destination of traffic can be different from your end security point. This is very often the case when you want to establish a VPN between two gateways through an untrusted network to protect traffic between two subnetworks against eavesdropping and alteration. Whenever either end of the IPSec connection is a gateway, the tunnel mode is most frequently used.
The variety of functionality provided by IPSec allows its use in different scenarios. We have chosen to illustrate its use in the case of setting up a VPN connection between two gateways in tunnel mode.
One of the major software packages that implement IPSec for Linux is FreeS/WAN (http://www.freeswan.org/). There are two things to note concerning IPSec support in Linux. First, there is a new native implementation of IPSec in the new 2.6.X Linux kernels . As this implementation is new, and this kernel is not yet used in many Linux distributions, we will concentrate on FreeS/WAN in this chapter, as it is the most widely used implementation. Another thing to note is that FreeS/WAN is no longer in active development although, as is the custom in open source development, there has been a codefork to allow for continued development of the FreeS/WAN codebase in the form of Openswan (http://www.openswan.org/). In this chapter, we will use a standard configuration of FreeS /WAN to set up a virtual private network (VPN) tunnel between two gateways.
Set Up a VPN with FreeS/WAN
In the example scenario, we will show the setup of an IPSec tunnel between two gateways called Linux1 and Linux2 as shown in Figure 10-9. The goal is to provide a secure connection (encrypted tunnel) between two gateways for the IP traffic exchanged between the subnetworks A and B.
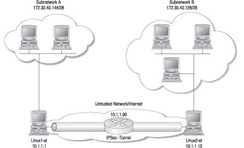
Figure 10-9: IPSec tunnel set up between two subnetworks
In this example, Linux1 protects the subnetwork A, while Linux2 protects subnetwork B. Each gateway has one network interface in the public IP domain (10.1.1.10 for Linux1 and 10.1.1.1 for Linux2) and another one in the private domain (subnetwork A for Linux1 and subnetwork B for Linux2). FreeS/WAN uses the keyword next hop to designate the default router for each gateway. In our scenario, the two gateways both forward IP traffic to the external nodes to the main router with IP address 10.1.1.90 (note that the next hop address can be different for each gateway).
This router can be your main switch in your company network or any other IP address defined by your ISP provider.
Install FreeS/WAN
If you use SLES8, the FreeS/WAN packages are already installed. On Red Hat Enterprise Linux AS 3.0, you need to install it using RPMs. You can download the RPMs from the FreeS/WAN web site on ftp://ftp.xs4all.nl/pub/crypto/freeswan/binaries/RedHat-RPMs. Do not forget to download both the freeswan-module RPM and the user land tools freeswan-userland RPM.
Install RPMs by typing the following:
$rpm -ivh freeswan-*
| Heads Up | Be sure to pick up the right RPM corresponding to the Linux kernel running on your system, otherwise FreeS/WAN will not work. You can find out the Linux kernel version of your system by using $ uname -a . |
In this example, FreeS/WAN 2.0.5 on a Red Hat machine was used, but the behavior of FreeS/WAN is identical among distributions.
The next step is to activate the ipsec daemon. To do this on a RHEL AS 3.0 machine, run the following:
$service ipsec start
On SLES8, do the following:
$/etc/init.d/ipsec start
| Heads Up | Be careful: upon initialization the ipsec daemon filters all connections not defined in the IPSec configuration policy (explained below). This means that if you work on your system through a remote session, you can lose connectivity when you start the ipsec daemon. To avoid this problem, you should be on the local console when activating the ipsec daemon. |
Generate Authentication Keys for Your Gateways
After you installed FreeS/WAN, you need to run ipsec newhostkey on both gateways to generate the authentication keys. This creates a pair of RSA public/private keys and stores them in /etc/ipsec.secrets file. This file contains the secrets necessary to protect your IPSec installation. You should not disclose this file to any untrusted party. Remove read and write permissions for other than root by doing the following:
$chmod go-rwx ipsec.secrets
Configure FreeS/WAN
The most convenient way of configuring FreeS/WAN is through the ipsec.conf file located in the /etc directory. In the following listing, we modified the default FreeS/WAN configuration file to implement the scenario described previously:
# /etc/ipsec.conf - FreeS/WAN IPsec configuration file # RCSID $Id: ipsec.conf.in,v 1.11 2003/06/13 23:28:41 sam Exp $ # This file: /usr/local/share/doc/freeswan/ipsec.conf-sample # # Manual: ipsec.conf.5 # # Help: # http://www.freeswan.org/freeswan_trees/freeswan-2.05/doc/quickstart.html # http://www.freeswan.org/freeswan_trees/freeswan-2.05/doc/config.html # http://www.freeswan.org/freeswan_trees/freeswan-2.05/doc/adv_config.html # # Policy groups are enabled by default. See: # http://www.freeswan.org/freeswan_trees/freeswan-2.05/doc/policygroups.html # # Examples: # http://www.freeswan.org/freeswan_trees/freeswan-2.05/doc/examples version 2.0 # conforms to second version of ipsec.conf specification # basic configuration config setup # Debug-logging controls: "none" for (almost) none, "all" for lots. # klipsdebug=all # plutodebug=dns # Add connections here. # sample VPN connection conn grumm # Left security gateway, subnet behind it, next hop toward right. left=10.1.1.1 # Gateway Linux1 leftsubnet=172.30.40.144/28 # sub-network protected by Linux2 leftnexthop=10.1.1.90 # next hop to the right from left # RSA 3584 bits Linux1 Wed Apr 21 13:31:33 2004 leftrsasigkey=0sAQNrBIuTQuDXGlw.. # left RSA public key for Linux2 # Right security gateway, subnet behind it, next hop toward left. right=10.1.1.10 # Gateway Linux2 rightsubnet=172.30.40.128/28 # sub-network protected by Linux1 rightnexthop=10.1.1.90 # next hop to the left from right # RSA 2064 bits Linux2 Wed Apr 21 11:59:07 2004 rightrsasigkey=0sAQNfhF2pEN7. # right RSA public key for Linux1 # To authorize this connection, but not actually start it, at startup, # uncomment this. auto=start
For this example, we defined our tunnel in the section starting with conn grumm and ending with auto=start . grumm is the name of the only VPN tunnel we define in this configuration file. Be careful when entering extra spaces or characters as indentation is important in this file.
To define your own tunnel, you should replace grumm with the name you would like to use. Then you need to define the specifications for either end of your tunnel, designated as left and right in the configuration file. The designation of which network is right and left is arbitrary and not dependent on IP address or other factors. In the example used in this chapter, the left is Linux1 as it was on the left side of the figure. The important part of the selection of subnetworks is to be consistent with the definition in both IPSec configuration files on both gateways: subnetwork A is defined as the left subnetwork, and subnetwork B is defined as the right subnetwork. You should now define different network specifications for each subnetwork:
-
left The gateway for the left subnetwork (here Linux1).
-
leftsubnet The subnetwork protected by the gateway (here subnetwork A).
-
leftnexthop The first hop on the untrusted public IP network, to which the left gateway forwards external IP traffic (here 10.1.1.90).
-
leftrsasigky The public part of your RSA key on the left gateway. To obtain it, go to the left gateway and run ipsec showhostkey -left , then copy and paste the result in the ipsec.conf file.
For the right network, you would follow the same steps previously listed.
The auto=start line in /etc/ipsec.conf authorizes the connection to be established automatically and is determined by the needs of your connection.
After the /etc/ipsec.conf file has been configured on one of your gateways, you will need to securely copy the file to the other gateway so that both configuration files match.
Establish the VPN
Before trying to establish the connection, check whether the IP forwarding is enabled on both gateways, as discussed in Chapter 3. You can enable the IP forwarding by running the following command:
$echo "1" > /proc/sys/net/ipv4/ip_forward
Also, be sure that the ports UDP 500 (used for IPSec for management) and ESP (IP protocol 50) are allowed through your firewall (also discussed in Chapter 3).
| Heads Up | FreeS/WAN does not support Network Address Translation and masquerading for the tunneled traffic. Therefore, you should disable NAT and masquerading on your gateways for the traffic you want to tunnel between gateways. |
To set up the VPN connection, start by logging into your gateways and running the following command:
$ipsec auto - -up grumm
A successfully established connection will have output similar to
112 "grumm" #6: STATE_QUICK_I1: initiate 004 "grumm" #6: STATE_QUICK_I2: sent QI2, IPsec SA established {ESP=>0x9ac0b107 <0x8bfd214e} The previous lines of output indicate that the VPN connection named grumm using an ESP type connection has been successfully established. Now all IP traffic between subnetworks A and B, exchanged between the gateways Linux2 and Linux1, will be encrypted.
To be sure that the traffic is really encrypted, you can use tcpdump or Ethereal to monitor the traffic (as discussed in Chapter 11). All traffic between the nodes in subnetworks A and B must be of type ESP now (encrypted). The following output is generated by tcpdump on one of the gateways, which shows the traffic generated from a node on subnetwork A going to a node on subnetwork B. As you can see, the traffic is of type ESP between the two nodes (and therefore encrypted).
16:31:02.691787 Linux2 > Linux1: ESP(spi=0xa7f12200,seq=0x1a) ......... 16:31:03.691674 Linux2 > Linux1: ESP(spi=0xa7f12200,seq=0x1b) 16:31:03.691976 Linux1 > Linux2: ESP(spi=0x5319a0bb,seq=0x15) 16:31:04.691511 Linux2 > Linux1: ESP(spi=0xa7f12200,seq=0x1c) 16:31:04.691811 Linux1 > Linux2: ESP(spi=0x5319a0bb,seq=0x16) .........
If you need to take down your VPN connection , you can disable IPSec using the following command on RHEL AS 3.0:
$service ipsec stop
On SLES8, do the following to disable IPSec:
$/etc/init.d/ipsec stop
This command can be very useful when debugging your setup.
Some other VPN software products available for Linux are
-
Openswan http://www.openswan.org/
-
VPN with SSH and PPP http://tldp.org/HOWTO/VPN-HOWTO/
-
Virtual Tunnel http://vtun. sourceforge .net/
Building Linux Virtual Private Networks , by Oleg Kolesnikov and Brian Hatch, is a highly regarded book dedicated to the subject of Linux VPNs.
| |
Double-check your setup by verifying your access paths between two subnetworks. Trace the route between the gateways and nodes on different subnetworks A and B, using the ping -R command (or traceroute ). This command not only verifies the connectivity of the other node, but also shows the access path between two nodes. Verify if this path corroborates your view of the network defined in /etc/ipsec.conf file.
| |
Setting up your own VPN server should not be taken lightly. It requires knowledge of your network and the requirements of your users, as you will often have to reconfigure your firewalls to allow for VPN traffic to pass through, as well as configuring end-client machines. With that said, Linux offers some easy-to-use and full-featured VPN products for free that will fit most needs.
Securing communications within Linux is not a difficult task, and there are many choices for securing your systems. We have covered a few of the more popular tools for hardening communications on your Linux machine, and we recommend reviewing the resources listed in the appendix of this book to find more resources on hardening network communications.
EAN: 2147483647
Pages: 113