Examine Systems for Evidence of Compromise
Perform the following steps to determine if the system is clean and not under attack.
-
Terminate unauthorized users.
-
Identify and shut down unauthorized processes.
-
Check log files for evidence of intrusion attempts.
-
Check for potential file system damage.
Terminate Unauthorized Users
Unauthorized users can originate from inside or outside the organization. Unauthorized external system access must be terminated with extreme urgency, particularly if the user appears to be hiding his or her identity. Unauthorized internal users may necessitate disciplinary action depending on the nature of the access.
Our hypothetical server is at IP address 10.0.0.95. Follow these steps now:
-
Log in at the console to the server as the user root.
-
Execute the following command:
linux:~ # w
The listing in Figure 1-1 is obtained. The w command produces a listing of all users currently logged in. It lists the source of the login and shows the process currently being run. In this case we see a user called l33t (most likely meant to be pronounced as elite ), who could be a cracker.
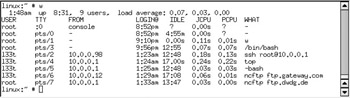
Figure 1-1: Output of w command
The fact that this user has logged in from three different systems on our internal network, one of which is the external gateway machine, demands investigation. The login from the system at IP address 10.0.0.98 has subsequently logged onto our gateway to the Internet. This is potentially alarming.
The login from the system at IP address 10.0.0.12 has an outgoing FTP connection to ftp.gateway.com. We do not know what this user may be doing. The connection may be being used to download or upload software we do not want to have anything to do with.
It is apparent that the user is also using the utility called top to monitor who is on the system. Immediate action should be taken to cut the user off, but it would appear that this potential intruder may already have compromised our gateway machine and at least two internal systems. The safest solution is to log into the gateway system to see if this user has originated from an external Internet location. This is the action we follow and it reveals the following line in the output from running the w command:
l33t pts/93 dang.xployt.us 1:34am 0.00s 1.12s ssh 10.0.0.95
This means that our gateway machine, which should have no user accounts at all, has been compromised by an intruder who has created an account called l33t and who is using it to intrude further on internal systems. It is now clear that we must take immediate drastic action. The intruder may have replaced system executable files so that he has control of the machine at all times. We know that he has logged in as the user root from our gateway machine and is using it to access an FTP server at ftp.dwdg.de, so this means that he has root level access on the gateway server.
This situation demands that the gateway connection to the outside world must be shut down until it has been again secured. Additionally, we must now investigate all servers and clients on our internal network to identify what damage may have been done.
The action warranted by anyone who is paranoid about security would be to immediately reinstall the gateway system and secure it before reopening our connection to the Internet. By shutting off the connection to the Internet, we have immediately frozen the intruder s activities. If possible the gateway machine should be replaced so that the compromised system can be examined to identify what the intruder may have been doing. Intrusion evidence that demonstrates unauthorized system access should be reported to the police in case criminal activity may have taken place.
To avoid all risk, it is likely that we will reinstall all critical internal servers, but that decision should wait until the issue has been more fully investigated.
Had no unusual activities been noted on the machine, the next step would be to check for abnormal accounts.
As a precautionary move, all suspect accounts should be locked by executing
linux:~ # passwd -l username
Duplicate accounts in /etc/passwd that have the same UID should also be disabled this way. It is not uncommon for an intruder to set up an account that has UID=0 (a duplicate of the root account) so that he or she can access the system with root level privilege and yet minimize the risk of early detection. In many cases this would warrant suspicion of serious system compromise. This would again be treated in a manner consistent with the gravity it deserves .
When a system intrusion has occurred, it is important that essential evidence is recorded before deleting unauthorized accounts. Be careful not to destroy evidence you may later need in order to be able to prosecute an intruder.
Another useful tool for identifying unauthorized user logins is the tool called last . A sample of its use is shown in Figure 1-2. This shows the logins by the users l33t and drule . A check of the user account for drule reveals suspicious facts. The user s UID is 0, and the home directory is /var/adm/drule. This could well be a backdoor account and must be blocked until its ownership and purpose can be determined.

Figure 1-2: Example output from the last log file
The last utility reports activity from the /var/log/wtmp file. Every system user access is recorded in this file. Smart crackers will often delete the /var/log/wtmp file to remove evidence of their activities. They will frequently also delete any history file they may have created. In both cases, evidence that this may have happened is present when logs show a logout without a matching login record. If this is found, you must immediately raise suspicion and alarm until investigation clears the air.
In the event that no unusual activity is noted and no unusual accounts are found, simply move on to the next steps. You can be thankful that the Linux system does not currently appear to be under threat, but do not breathe easy just yet. Lurking beneath harmless-looking parts of the system software could be something more sinister than a currently logged-in user, so get ready for the next steps.
Identify and Shut Down Unauthorized Processes
Once a Unix or Linux system has been compromised, any application can be made to appear as a standard system utility. Applications can be downloaded to the system either in ready-to-execute form or in cleverly disguised source code form later to be compiled and run on the system.
| On a system that had been compromised, someone found a harmless-looking file in the /usr/lib directory. This started a process of investigation that ultimately found a backdoor to the system as well as how it was being initiated. For some days, the administrator was perplexed that shortly following a system reboot a process called sndme was running. A system scan found no file by that name on the system. When the command netstat -ap was run, the following line was present in output: udp 0 0 *:32145 *:* LISTEN 1118/sndme This means that the process called sndme was waiting for something to happen on UDP port 32145. It had been easy to identify the fact that this unusual process was running, but it took a little genius to find how this exploit was able to hide from view. The key to unlocking the mystery was the finding of a file called sendmail.txt. A careful search of startup files isolated a shell script being called during startup that did the following:
The sndme process was waiting for a specific UDP message that would open a root exploit to the system. The frightening part of this exploit is that, according to system logs, it went undetected for over six months. Someone had obviously penetrated the Unix system and had opened the door for a future revisit . What the intruder had done remains a mystery to this day. The server ran an application that held very sensitive data. No damages could be found to the database, as a printout of the data matched printed records. Management of that company do not know whether their sensitive customer information has fallen into enemy hands or not. The moral: Unauthorized processes may originate from any source. They may be Trojan horses that have been planted by an intruder, or they can be legitimate processes that should not be running or that should not have been executed by a particular person. |
As an administrator you should run the ps utility and validate that every process found running is legitimate. You should execute the netstat -ap utility to find which processes are active on particular TCP/IP ports. Each such process should be validated. If a process is not known, raise the alarm at once. If an unknown process involves network activity, disconnect the Linux system from all external sources of system access until it has either been killed off or validated as a legitimate service.
Check Log Files for Possible Evidence of Intrusion Attempts
The main system log file can be a gold mine of information. It is an essential first port of call in the search for evidence that might demand an answer. One such source is the file /var/log/messages. An example log file fragment is shown in Figure 1-3.
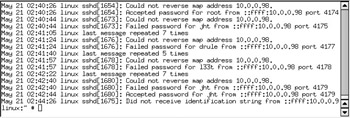
Figure 1-3: Example var/log/ messages file entries showing attempted failed intrusions
This file should be scanned for two keywords: fail and repeat . The following commands can be used to do this:
[root@linux /] # grep fail /var/log/messages [root@linux /] # grep repeat /var/log/messages
A positive response for either keyword must be investigated. The example shows repeated failed login attempts. It also shows a successful login shortly following a failed one. The successful root login at the start of the log file fragment could have been done by a legitimate user who logged out to leave the terminal. But the sequence of failed logins compels investigation due to the fact that the Linux system may have been compromised.
Any Linux system found in this condition should immediately be presumed to be in need of recovery or reinstallation. Do your homework before jumping to unwarranted conclusions. Contact the users who experienced an apparent login problem if they can recall the incident. If not, you may need to dig deeper to find the right answer. When it appears that the cost of elucidating what really happened seems to get out of control, consider each option and its cost. It may be more cost effective to reinstall the system, or to replace it, than to find a totally conclusive answer to why or how the log entries may have occurred.
Check for Potential System File Damage
You can breathe a little easier now that you have found no early immediate evidence of system intrusion or compromise. Both Red Hat Linux and SUSE Linux use a system software management system known as the Red Hat Package Manager (RPM).
There were several precursors to RPM that permit software to be packaged in a manner that facilitates system maintenance. The RPM packaging method creates and maintains a database of all files that it installs . This database contains vital information from which RPM can determine which files have been changed since installation. It is therefore also possible to compare the list of files that are on the system with the list of known files. From this, a listing of non-system files can be obtained. This is in part what is done by the SUSE YaST2 backup tool to create a system backup.
Find out now which files and file system settings are no longer as they were when the system was installed. This method works the same on Red Hat Linux as it does on SUSE Linux. Log in as the root user, then execute the following command:
[root@linux /] # rpm -Va > /tmp/rpmVa.log
The output from running this command consists of a line for each file RPM has installed on the system. The format of each line consists of an eight-character status field followed by a space, a letter c denoting a file, another space, then the file or directory name. The eight-character field contains the following characters only if a change has been noted:
-
S File size has changed.
-
M Mode (permissions and file type) has changed.
-
5 The MD5 checksum has changed.
-
D The characteristics of a device node have changed.
-
L A symbolic link has been changed.
-
U The owner of the file/directory/device node has changed.
-
G The group owner of the file/directory/device node has changed.
-
T The modification timestamp has changed. If a file is found to be missing, the word missing is printed in place of the status field.
Examine each line of the report that RPM generated to identify what types of changes may have been made. Configuration files will have changed during system configuration. Binary files must never change. Binary files are placed in well-known locations such as /bin, /sbin, /usr/bin, /usr/sbin, /usr/X11R6/bin, and so on. Changes in binary files must be treated with great alarm. If the change cannot be clearly identified as one implemented by deliberate action taken during installation or as part of system administration, the file should be replaced from its original binary source RPM package.
An example of immediately actionable output would be an entry that says
.M...... /usr/bin/write
which means that the executable file called write has been modified. This is unlikely to have occurred if the system has been properly maintained by installation only of RPM updates.
Where a binary file must be updated or changed, the safe and normal method of change involves installation of an update via RPM. This keeps the RPM database up to date. You could reinstall the RPM package that provides the modified binary file.
| Heads Up | Seasoned Linux administrators often generate a snapshot report using this tool as soon as system configuration is complete. This reference snapshot is then stored in a safe location, typically on a floppy disk or on another network file system. At a future time the original reference copy can be compared with a freshly generated report to isolate files that may have changed. It is easier to deal with reports of incremental change to save having to wade through long listings. Fortunately, a typical report from a freshly installed system will seldom be more than 400 lines long. |
If a binary file is found to differ from the RPM database record, immediately reinstall the package it came from. The originating RPM package name can be found by executing
[root@linux /] # rpm -qf fully_qualified_path_and_file_name
Assuming that the report generated by rpm -Va indicates that /bin/splash has changed, its source binary package can be found by executing
[root@linux] # rpm -qf /bin/splash bootsplash-1.0-71
This means that reinstallation of the package bootsplash-1.0-71-i586.rpm will restore this file to its original contents. Always take a backup copy of the modified file for later analysis and so it can be produced as evidence in court in case the ability presents itself later to prosecute an intruder or a perpetrator of an unauthorized change.
The file RPM package can be reinstalled by executing the following from a directory containing the source binary RPM:
[root@linux /] # rpm -Uvh --nodeps --force bootsplash-1.0-71-i586.rpm
Hopefully the report will have generated no alarm. There are two final steps to complete before commencing the process of hardening the entire system.
EAN: 2147483647
Pages: 113