Creating a Dialog-Based Subscriber
| |
In many cases, the subscriber for the events generated by a COM+ application is an application. One of the most common examples is the stock ticker, but you can use subscriber applications for a number of tasks . Any event that you can imagine can become part of a subscriber application solution. For example, its conceivable that you could create a high-priority e-mail system using such as setup. Administrators could use a subscriber application that provides alerts about server conditions. Its possible that some applications could even provide some type of alarm information for a business or other entity.
The dialog-based subscriber application for this example is going to be a lot more complex than the other elements youve seen so far. The subscriber will need to react to events that the publisher generates. For the sake of simplicity, well generate a simple dialog box again with the understanding that you could do a lot more. Subscriber applications normally provide a user interface and the means to interact with the user to filter and otherwise manage the data. The filter is also a requirement for applications that generate a large number of events, such as the stock-ticker application.
The application will also have two different subscribe buttons . The first will create a subscription of the type we discussed in the Creating a Component Subscriber section. This first subscription is a permanent subscription because it survives a reboot of the server. It also shows up in Component Services, so you can manage it as you would any other subscription. Components and local applications usually use permanent subscriptions because you want them to be able to get back to work immediately after a server reboot. In addition, because the component is local to the server and the application connects through a LAN connection, there isnt any need to worry about a sudden disconnection.
The second subscribe button will create a transient subscription for the application user who spends time accessing the subscription from the road. A nonlocal application will normally use a transient subscription because it isnt connected the to the server 24 hours a day. In addition, if the server is down for any reason, you dont want to load up the server immediately with client requests after a reboot. In most cases, you want to be sure the server will stay online before you begin accepting requests from remote clients. Finally, clients do disconnect without removing their subscription. Transient subscriptions are easier to remove and are therefore a lot less work for the network administrator.
| Note | If you havent removed the subscription created in the Creating a Component Subscriber section, youll want to remove it before you proceed with this section to ensure the message box you see is generated by this application. While it isnt necessary to disable the SimpleSubscriber COM+ application, you might want to do so to keep the test environment clean. Be sure you retain the SimpleEventApp COM+ application because well need it for this example. |
This example relies on the same component we used in the Creating a Component Subscriber section. In this case, well use the component locally rather than as part of a COM+ application. To begin this example, youll need to create a form for a C# client. The example uses an application name of AppSubscribe, but you can use any name desired. Figure 10-9 shows what this form looks like. Well add code for the buttons in the sections that follow. The complete listing for this example appears in the \Chapter 10\AppSubscribe folder of the source code.
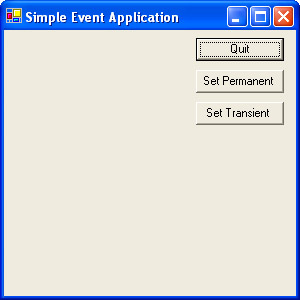
Figure 10-9: Use this client to add and remove subscriptions programmatically.
Youll also need to add a reference to the COM+ 1.0 Admin Type Library to the application, as shown in Figure 10-10. As mentioned in the An Overview of the COM+ Catalog section of the chapter, this type library provides the management functions we need to control both permanent and transient subscriptions.
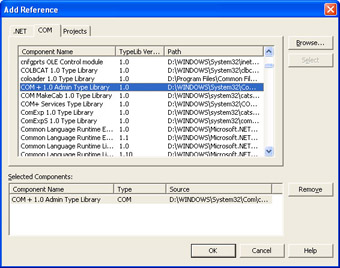
Figure 10-10: Add the COM+ 1.0 Admin Type Library to your application to obtain access to the required management functions.
Before we go on to the subscription-specific code, you need to create some applicationwide variables , initialize one of them in the application constructor, and provide a method for releasing them when the application exits. Not setting these COM objects to null could result in a memory leak in your application (not to mention other problems). Listing 10-4 shows the code used by both subscription techniques.
| |
//Declaretheadministrationobjectsusedinthisapplication. //COMAdministrator privateCOMAdminCatalogClassComAdmin; //ApplicationCollection privateICatalogCollectionAppCollection; //ComponentCollection privateICatalogCollectionCompCollection; //SubscriptionCollection privateICatalogCollectionSubCollection; //ASingleEntryWithinaCollection privateICatalogObjectCatalogObject; //TransientSubscriptionIdentifier privateObjectTransID; //PermanentSubscriptionIdentifier privateObjectPermID; publicfrmMain() { //RequiredforWindowsFormDesignersupport InitializeComponent(); //Initializetheadministrationobject. ComAdmin=newCOMAdminCatalogClass(); } privatevoidfrmMain_Closed(objectsender,System.EventArgse) { //CleanuptheCOMobjectsbeforetheapplicationexits. TransID=null; PermID=null; CatalogObject=null; AppCollection=null; CompCollection=null; SubCollection=null; ComAdmin=null; } | |
Youll learn later that accessing the COM+ catalog can mean navigating through three levels of collections: application, component, and subscription. Each of the ICatalogCollection objects handles a specific need. In general, youll want to allocate the number of ICatalogCollection objects required for all levels of a given task so that you can easily go to previous levels as needed.
The single ICatalogObject object is enough for most applications because you dont want to manipulate more than one catalog level at a time. In addition, its important not to store a specific object for too long because another application might change it. (This problem can also occur when working with the ICatalogCollection objects, but is far less likely to in that situation.)
This application lets you work with both permanent and transient subscriptions. In fact, you can work with them simultaneously if you want. Thats why the global variables include two subscription variable identifiers. In general, the code must have these identifiers to determine whether it has found the correct subscription prior to removing it from the subscription list. Now that we have the global concerns taken care of, lets look at the two subscriptions.
Creating a Permanent Subscription
The permanent subscription example has the advantage of creating a visible subscription (one you can verify), and it shows how to parse the COM+ catalog hierarchy. In many cases, its better to create a permanent subscription first, move the code to the location you want to use for creating a temporary subscription, and make the required temporary subscription changes. (See Listing 10-6 for comparison purposes.) Listing 10-5 contains the code required to parse the COM+ catalog to look for a particular application and a component within that application. The second part of the code creates a new subscription for the target component. Youll find this code in the FrmMain.cs file in the Chapter10\AppSubscribe folder of the books companion content.
| |
privatevoidbtnPermanent_Click(objectsender,System.EventArgse) { StringIDVal;//TemporaryPermID //Obtainthecurrentapplicationcollectionandthenpopulate //theapplicationcollectionobjectwithmembersofthat //collection. AppCollection= (ICatalogCollection)ComAdmin.GetCollection("Applications"); AppCollection.Populate(); //Locatetheapplicationwe'reinterestedinsubscribingto. for(intCounter=0;Counter<AppCollection.Count;Counter++) { //Getthecurrentcatalogobject. CatalogObject= (ICatalogObject)AppCollection.get_Item(Counter); //Determineifthisisthecorrectapplication. if((String)CatalogObject.Name== "SimpleSubscriber") { //Obtainthecurrentcomponentcollectionforthe //targetapplication. CompCollection= (ICatalogCollection)AppCollection.GetCollection("Components",CatalogObject.Key); CompCollection.Populate(); break; } } //Locatethetargetcomponent. for(intCounter=0;Counter<CompCollection.Count;Counter++) { //Getthecurrentcatalogobject. CatalogObject= (ICatalogObject)CompCollection.get_Item(Counter); //Determineifthisisthecorrectcomponent. if((String)CatalogObject.Name== "SubscriberComponent.SendMsg") { //Obtainthesubscriptioncollectionforthetarget //component. SubCollection= (ICatalogCollection)CompCollection.GetCollection("SubscriptionsForComponent",CatalogObject.Key); SubCollection.Populate(); break; } } //Dependingonthecurrentsubscriptionstatus,we'll //eithergetanewsubscriptionorfreeanexisting //subscription. if(btnPermanent.Text== "SetPermanent") { //Addanewsubscriptiontothepermanentsubscription //collection. CatalogObject=(ICatalogObject)SubCollection.Add(); //Setthecatalogobjectvalues.Thislistrepresentsa //minimalimplementation. CatalogObject.set_Value("EventCLSID", "{6A121716-471A-479f-B1DE-97858FE95483}"); CatalogObject.set_Value("Name", "PermanentSubscription"); CatalogObject.set_Value("MethodName", "FireBroadcastMsg"); CatalogObject.set_Value("InterfaceID", "{0E4DB900-60F3-4354-A89A-C90A962F468C}"); CatalogObject.set_Value("Enabled",true); //Savethechangeswe'vemadetothetransientsubscription //collection. SubCollection.SaveChanges(); //Changethebuttoncaptiontomatchthecurrentsubscription //status. btnPermanent.Text= "ReleasePermanent"; //SavethesubscriptionIDforlateruse. PermID=CatalogObject.get_Value("ID"); } //Weneedtoreleaseanexistingsubscription. else { //Populatethesubcollectionwithexistingsubscription //information. SubCollection.Populate(); //Checkeachofthesubscriptionitemsinturn. for(intCounter=0; Counter<SubCollection.Count; Counter++) { //Getthecurrentcatalogobject. CatalogObject= (ICatalogObject)SubCollection.get_Item(Counter); //Seeifthisisthecorrectcatalogobject. IDVal=(String)CatalogObject.get_Value("ID"); if(IDVal==PermID.ToString()) { //Removethesubscriptionfromthelist. SubCollection.Remove(Counter); SubCollection.SaveChanges(); //Exittheloop. break; } } //Changethebuttoncaptiontomatchthecurrentsubscription //status. btnPermanent.Text= "SetPermanent"; } } | |
The example begins by creating the AppCollection object. Notice that we have to convert the Object output of the GetCollection() function to an ICatalogCollection object. Once the code obtains access to the collection, it uses the Populate() method to fill AppCollection with the collection data. Failure to populate the collection will cause any operation you try to perform with it to fail. The application will compile just fine, so this particular error is extremely difficult to locate. Just remember that every time your code contains GetCollection() , it must also contain Populate() .
| Note | All the ComAdmin methods produce plain objects as output, so youll find that you have to convert almost everything you do. Contrast this to working in the unmanaged environment where the code doesnt need to perform a conversion in most cases. Make sure you perform all required conversions to ensure your code compiles and works properly. |
The code uses a for loop to look for the application of interest. Most developers might wonder why the code doesnt use a foreach statement instead. Youll find that a COM collection is different than a .NET collection in that the COM collection normally lacks a true indexer. The technique shown in the example assures proper application function. Once the code finds the proper application, it creates the CompCollection object using the same technique used for the AppCollection object. Youll notice that creating the SubCollection object follows the same pattern.
At this point, weve parsed the COM+ catalog for an application, and then for a component within the application, and then for the subscription collection for the component. The next step determines whether the application needs to create a new subscription or remove a previously created subscription. The btnPermanent.Text value provides a convenient method for assessing this need.
If the application needs to create a new subscription, it begins by using the Add() method to create a new CatalogObject . The CatalogObject is empty at this pointit doesnt point to anything and, in fact, is only a local copy of the object. If the application failed at this point, COM+ would never know the CatalogObject existed.
To create a complete CatalogObject , the code assigns values to various CatalogObject properties using the set_Value() method. Some of the values, such as Name , are relatively straightforward, and you dont need to worry too much about the value assigned. However, the code must assign a correct value to the EventCLSID property. This value comes from the SimpleEventObject.SendMsg GUID. If you dont assign a permanent GUID to the object (something that you should always do), you can obtain this GUID from the SimpleEventObject.SendMsg Properties dialog box shown in Figure 10-11. (You can get to this dialog box from within Component Services.) Unlike the subscriptions you might have created for the unmanaged environment, youll find that the InterfaceID and MethodName properties also take on new meaning when working with managed components. If you dont assign these values, the component will receive the event but never do anything with it. Finally, the Enabled property is essential for transient subscriptions, but you can always use the Subscription Properties dialog box in Component Services to enable a permanent subscription after creating it.
At this point, you have a complete CatalogObject entryone that will work for this application. (You can set other properties, but they arent essential in this case.) The code makes the subscription complete by using the SubCollection.SaveChanges() method. The code also makes the proper change to the btnPermanent.Text property and saves the subscription identifier for future use.
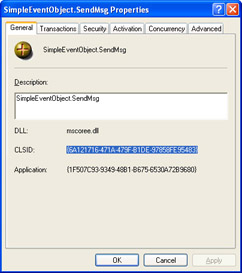
Figure 10-11: Use the SimpleEventObject.SendMsg Properties dialog box to obtain a GUID for your application if no other approach is available.
Lets move on to the process for removing a subscription. The code still parses the COM+ catalog for the application, component, and subscription information. In this case, the code continues by populating the subscription collection so that it can search for the subscription ID saved earlier. The most reliable way to perform this search is to convert both the CatalogObject.get_Value(ID) output and the PermID value to strings.
Once the code locates the subscription the application created, it removes the subscription from the local copy of the subscription collection using the Remove() method. The code saves the changes to the collection using the SaveChanges() method. The final step is to set the btnPermanent.Text value. As you can see, removing a subscription is much easier than creating it.
Testing the Permanent Subscription
Testing the permanent subscription is relatively easy because you can see the results and perform comparisons to the subscription we created manually. Start the application, and click Set Permanent. After a few seconds, the button caption will change to Release Permanent. Look in Component Services at the SubscriberComponent.SendMsg component subscriptions. Figure 10-12 shows what youll see if you left the manual subscription in place and added this new subscription using the application.
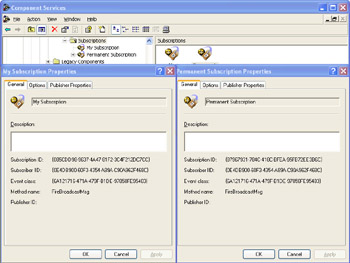
Figure 10-12: Creating a permanent subscription enables you to view and compare the automated and manual subscription methods.
Notice that both subscriptions use the same Subscriber IID, Event Class, and Method Name property values. However, because each subscription is unique, each subscription has a different Subscription ID property value. Select the Options tab in the Permanent Subscription Properties dialog box, and youll notice that it is set to Enabled. (The Enabled check box in the Options tab of the My Subscription Properties dialog box should be disabled for the following test.)
Use the Simple Event Publisher application to send a message. Youll see the same dialog box as before. The difference is that Permanent Subscription has reacted to this event. To test this hypothesis, click Release Permanent on the Simple Event Application. The Permanent Subscription entry should disappear from Component Services. (Use the Refresh command to refresh the display.) Click Publish in the Simple Event Publisher application and youll notice the message box doesnt appear because there arent any active subscribers.
Creating a Transient Subscription
The transient subscription portion of the example relies on a local copy of the component weve used in the past. However, except for the use of the local component, most of the process for creating a subscription is the same. Compare the content of Listing 10-6 with Listing 10-5 and youll see many similarities.
| |
privatevoidbtnTransient_Click(objectsender,System.EventArgse) { StringIDVal;//TemporaryTransID //Getthetransientsubscriptioncollection. SubCollection= (ICatalogCollection)ComAdmin.GetCollection("TransientSubscriptions"); //Createanobjectofthecorrecttype. SendMsgSM=newSendMsg(); //Dependingonthecurrentsubscriptionstatus,we'll //eithergetanewsubscriptionorfreeanexisting //subscription. if(btnTransient.Text== "SetTransient") { //Addanewsubscritpiontothetransientsubscription //collection. CatalogObject=(ICatalogObject)SubCollection.Add(); //Setthecatalogobjectvalues.Thislistrepresentsa //minimalimplementation. CatalogObject.set_Value("EventCLSID", "{6A121716-471A-479f-B1DE-97858FE95483}"); CatalogObject.set_Value("Name", "TransientSubscription"); CatalogObject.set_Value("MethodName", "FireBroadcastMsg"); CatalogObject.set_Value("InterfaceID", "{0E4DB900-60F3-4354-A89A-C90A962F468C}"); CatalogObject.set_Value("SubscriberInterface",SM); CatalogObject.set_Value("Enabled",true); //Savethechangeswe'vemadetothetransientsubscription //collection. SubCollection.SaveChanges(); //Changethebuttoncaptiontomatchthecurrentsubscription //status. btnTransient.Text= "ReleaseTransient"; //SavethesubscriptionIDforlateruse. TransID=CatalogObject.get_Value("ID"); } //Weneedtoreleaseanexistingsubscription. else { //Populatethesubcollectionwithexistingsubscription //information. SubCollection.Populate(); //Checkeachofthesubscriptionitemsinturn. for(intCounter=0; Counter<SubCollection.Count; Counter++) { //Getthecurrentcatalogobject. CatalogObject= (ICatalogObject)SubCollection.get_Item(Counter); //Seeifthisisthecorrectcatalogobject. IDVal=(String)CatalogObject.get_Value("ID"); if(IDVal==TransID.ToString()) { //Removethesubscriptionfromthelist. SubCollection.Remove(Counter); SubCollection.SaveChanges(); //Exittheloop. break; } } //Changethebuttoncaptiontomatchthecurrentsubscription //status. btnTransient.Text= "SetTransient"; } } | |
Lets discuss the differences between the two techniques. The first thing youll notice is that this method doesnt parse the COM+ catalog as muchit simply retrieves the TransientSubscriptions collection. The code also creates a local copy of the SubscriberComponent.SendMsg object. This object is essential for creating a transient subscription, as well see later.
Creating the CatalogObject is essentially the same. However, notice that this version of the code creates a value for the SubscriberInterface property. The property contains a pointer to the local copy of the SubscriberComponent.SendMsg object. The common language runtime automatically creates the proper interface for you, so you dont need to worry about passing the managed object. The Enabled property is mandatory for this portion of the example since you cant use Component Services to modify this value.
Testing the Transient Subscription
Testing this portion of the code is easy. Begin by clicking Set Transient in the Simple Event Application window. Send a message using the Simple Event Publisher application. You should see a message box displayed with the published message. Click Release Transient, and send the message again. This time you wont see a message box.
To ensure the permanent and transient subscriptions are truly separate, click both Set Permanent and Set Transient. This step creates two subscriptions. Now publish a message. Youll see one message box from the permanent subscription and a second message box from the transient subscription. (Youll have to dismiss the first message box before youll see the second one.) Click Release Permanent, and then Release Transient. Publish a message, and youll notice that no message boxes appear.
| |
EAN: 2147483647
Pages: 140