A Simple Component Example
| |
The simple component has the advantage of being easy to write, using few resources, and providing the smallest number of interfaces to decipher. It truly is a simple way of working with components . This is the technique to use for something like financial calculations or simple data manipulation. Its also one of the easiest ways to learn how to work with COM+ from .NET.
The downside of this development strategy is that the simple component also lacks essential interfaces that the .NET Framework requires to allow certain types of component development. For example, a simple component lacks the IDisposable interface, so it cant use unmanaged resources. In fact, its best to restrict simple component development to situations where an application makes a method call and the component provides a simple reply that doesnt require the use of any unmanaged resource.
Now that you have some idea of why the simple component is one of several good component-building options, lets look at an example. The following sections will take you through the entire process of creating a COM+ application, from building the component to testing the client. Normally, well just discuss the essentials for application building, so this is the only time youll see the whole process at work.
Creating the Simple Component
Listing 8-1 shows a simple component example. In this case, the component performs the desired math operation on two input numbers and returns a result. This is a good example of a simple component because it accepts simple input, provides simple output, and doesnt require use of any unmanaged resources. Note that I removed the comments from the listing in the interest of saving space. Youll find the complete version of the code in the Chapter08\MyMath folder in the books companion content. You can download the companion content from the books Web site at http://www.microsoft.com/mspress/books/6426.asp .
| |
using System; using System.Runtime.InteropServices; namespace MyMath { [Guid("EA82646C-2531-42ff-AABF-55028FE0B0B5"), InterfaceType(ComInterfaceType.InterfaceIsDual)] public interface IMathFunctions { Int32 DoAdd(Int32 Value1, Int32 Value2); Int32 DoSubtract(Int32 Value1, Int32 Value2); Int32 DoMultiply(Int32 Value1, Int32 Value2); Int32 DoDivide(Int32 Value1, Int32 Value2); } [Guid("0C4340A2-C362-4287-9A03-8CDD3D1F80F6"), ClassInterface(ClassInterfaceType.None)] public class MathFunctions : IMathFunctions { public Int32 DoAdd(Int32 Value1, Int32 Value2) { return Value1 + Value2; } public Int32 DoSubtract(Int32 Value1, Int32 Value2) { return Value1 - Value2; } public Int32 DoMultiply(Int32 Value1, Int32 Value2) { return Value1 * Value2; } public Int32 DoDivide(Int32 Value1, Int32 Value2) { return Value1 / Value2; } } } | |
The code for this example is easy to understand. Youll remember from the Using .NET Components from COM Client Code section of Chapter 4 that any component you want to export includes an interface. This code begins by defining an interface for the component. Notice the use of the [Guid] and [InterfaceType] attributes. This chapter already explained use of the [Guid] attribute in the The Importance of Using GUIDs section.
The [InterfaceType] attribute defines how COM interacts with the interface. In this case, the component will provide a dual interface so that both Microsoft Visual C++ and Microsoft Visual Basic applications can access it. More important, the interfaces and methods for the component wont show up in the application folder for the COM+ application in the Component Services console (an administrative tool located in the Administrative Tools folder of the Control Panel) until you add the [ClassInterface] attribute.
The class code begins as you might expect. Again, notice the use of the [Guid] and [ClassInterface] attributes. The [ClassInterface] attribute is important because it tells CLR how to interact with the component.
Unlike the example in Chapter 4, this component is encased in a namespace. A local component might not require a namespace because it appears only on a single machine. However, when you begin working with COM+ applications, the probability that someone has named their component the same as your component increases . Consequently, you should encase the component in a namespace to ensure the component name is unique. Of course, this means you also have to add code to the unmanaged application to access the components type library and provide support for the namespace. Heres a typical entry for Visual C++:
//Importthetypelibraryandusetheassociatednamespace. #import "MyMath.TLB" named_guids usingnamespaceMyMath;
Registering the Component on the Server
As mentioned in Chapter 2, you need to register your component on the server before you can use it. Registering the component includes making the appropriate registry entries, creating the COM+ application, and importing the component into the application. Once you perform these three steps, the server knows how to access the component should a client make a request.
Using the GUI Method
There are two methods for registering a component on a server. We explored the GUI method of registering a component in the Creating COM+ Applications and Installing Components section of Chapter 2. This is the easiest technique and the one you should use whenever possible. The GUI method provides instant access to all features of the COM+ application and the components that it hosts .
The problem is that this technique works well only on Microsoft Windows XP machines because, in most cases, Windows XP machines have COM+ version 1.5 installed on them. The COM+ 1.0 installation found on Windows 2000 machines can prove problematic . Unfortunately, according to the COM+ 1.5 Web site at http://msdn.microsoft.com/library/default.asp?url=/ library/en-us/cossdk/htm/complusportal_9o9x.asp , you cant upgrade Windows 2000 machines to COM+ 1.5. This site also explains a number of features that COM+ 1.5 provides. Windows Server 2003 will ship with this newer version of COM+.
Using the RegSvcs Utility
The .NET Framework Services Installation Utility (RegSvcs.exe) helps you register a COM+ application from the command line. To use this utility, you must derive the component from the ServicedComponent class. Otherwise, the RegSvcs utility will complain that it cant find a service to register. Heres the usage syntax for the RegSvcs utility:
REGSVCS[options]AssemblyName
The AssemblyName entry contains the name of the DLL you want to register. You must include the DLL extension. Table 8-1 shows a list of the options you can use with this utility.
| Option | Description |
|---|---|
| /? or /help | Displays a help message that contains usage instructions and a typical list of options. |
| /appdir: < path > | Sets the application root directory to specified path. Normally, RegSvcs assumes you want to use the current directory as the root directory. |
| / appname : < name > | Uses the specified application name when creating the COM+ application. When working with a .NET component, you can also set this option using the [ApplicationName] attribute. |
| /c | Creates the target application, and displays an error if it already exists. Normally, the RegSvcs utility will simply add a component to an existing application. Because you might want to avoid overwriting an existing application, this switch provides a safety feature of sorts. |
| /componly | Creates a component entry that configures the component only. The resulting entry wont contain any methods or interfaces. In general, youll want to avoid this switch when creating standard COM+ applications because you want to provide access to the methods and interfaces. |
| /exapp | Creates an addition to an existing application. If the application doesnt exist, youll see an error message. This switch provides a safety feature by installing the component only with other components of the same application. Normally, RegSvcs will create a new application if one doesnt exist. |
| /extlb | Uses an existing type library instead of creating a new one. The only time to use this switch is if you create a custom type library. Otherwise, using this switch could result in a mismatch between the type library and the component, which means the application will never work as anticipated. |
| /fc | This is the default application creation switch. It tells RegSvcs to create a new application or use an existing application to install the component. |
| /nologo | Suppresses the logo output. Useful for batch operations. |
| /noreconfig | Suppresses reconfiguration of an existing target application. This is a safety switch that prevents RegSvcs from changing the configuration of an existing application. |
| /parname: < name > | Uses the specified name or ID for the target partition. When working with a .NET component, you can specify this value using the [ApplicationID] attribute. |
| /quiet | Suppresses both the logo output and the success output. Useful for batch operations. |
| /reconfig | Reconfigures the existing target application as needed to add new components. This is the default setting. |
| /tlb: < tlbfile > | Creates a type library for the application as part of the registration process. |
| /u | Performs an uninstall of the target application. |
You can easily use this utility from a batch file. It always creates a COM+ 1.0 application, so it always works with Windows 2000. However, because RegSvcs creates a COM+ 1.0 application, you lose the benefits of using COM+ 1.5 to build your application. Of course, youd lose these benefits by using Windows 2000 for your server, so its not something that most developers will miss until Microsoft Windows Server 2003 is deployed on a number of machines. In general, youll want to avoid using RegSvcs on Windows XP machines because it doesnt provide the full range of functionality you can obtain by using the GUI method discussed in Chapter 2.
Another disadvantage of using the RegSvcs utility is that it produces a library application you cant export as a proxy. However, you can overcome this problem by manually changing the Activation Type option on the Activation tab of the application Properties dialog box from Library Application to Server Application. Making this change will also modify the security setup and could affect other application settings.
One of the more important issues in using the RegSvcs utility is that it implements any attributes you add to the component. For example, if the RegSvcs utility sees an [ApplicationName] attribute in the assembly, it will give the COM+ application that name. The GUI method has the disadvantage of not observing these attributes for the most part, which means you might spend more time manually configuring the resulting application.
Exporting the Application
As with every other COM+ application, youll need to export a proxy of this application as a minimum. We discussed the basics of this process in the Exporting COM+ Applications section of Chapter 2. In general, you can export either a proxy (for use on a client) or a server (for use in a cluster) version of the COM+ application.
You need to consider a few nuances , however, when working with multiple operating system types. Notice the Save Application In COM+ 1.0 Format option at the bottom of the dialog box shown in Figure 8-1. If youre exporting an application from a Windows XP development workstation to a Windows 2000 machine, youll want to check this box. Otherwise, the installation will fail with an error message.
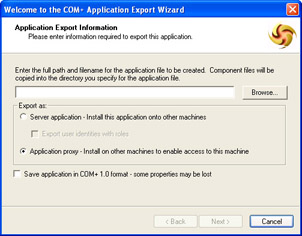
Figure 8-1: Make sure you select the correct export options for your application.
The export process produces both a Windows Installer (MSI) file and a CAB file. You must place both files on the target machine to install them. Make sure both files appear in the folder you want to use for the application. To begin the installation process, right-click the MSI file and choose Install from the context menu. When the installation process completes, youll see a new entry in the COM+ Applications folder of Component Services.
Creating the Client
The goal of creating a component (at least in most cases) is to use it eventually in a client. The sample client application discussed in this section enables the user to access all four math functions provided by the MyMath component. The client application is named MyMathTest and uses a dialog box interface. Youll find the source code for this application in the Chapter08\MyMathTest folder of the source code.
The code for this client looks similar to code you might have created for an application in the past. The code in Listing 8-2 from MyMathTestDlg.cpp contains the essential elements of the client code. It includes only the code for the adding function of the MyMath component because the code for the other functions is similar. Note that Ive eliminated the normal error-trapping code for the sake of clarityyoud normally place this code within a trycatch statement to ensure that the application traps any errors.
| |
voidCMyMathTestDlg::OnBnClickedAdd() { IMathFunctions*pMath;//Pointertomathobject. CStringTempString;//Temporarydatastring. longInput1;//Input1value. longInput2;//Input2value. longOutput;//Outputvalue. //InitializetheCOMenvironment. CoInitialize(NULL); //Createtheobject. CoCreateInstance(CLSID_MathFunctions, NULL, CLSCTX_ALL, IID_IMathFunctions, (void**)&pMath); //Gettheinputvalues. m_Input1.GetWindowText(TempString); Input1=atoi(TempString.GetBuffer()); TempString.ReleaseBuffer(-1); m_Input2.GetWindowText(TempString); Input2=atoi(TempString.GetBuffer()); TempString.ReleaseBuffer(-1); //Performtheoperation. Output=pMath->DoAdd(Input1,Input2); //Displaytheresult. itoa(Output,TempString.GetBuffer(10),10); TempString.ReleaseBuffer(-1); m_Output.SetWindowText(TempString); //UninitializetheCOMenvironment. CoUninitialize(); } | |
The code begins by initializing the COM environment. It instantiates the object next . The IDE creates the CLSID_MathFunctions and IID_IMathFunctions values as part of importing the MyMath.tlb file. Youll find these values in the MyMath.tlh and MyMath.tli files located in the output folder for this example. Once the code creates the object, it obtains the current input values from the application dialog box. Calling the DoAdd() method comes next. The code displays the output value on screen and then uninitializes the COM environment. In short, you wont find anything too surprising in the client code.
The reason the client code looks similar to any client code you created in the past is that the COM+ application proxy appears as a local component. The application creates the same registry entries and acts in all other ways as a standard local COM component. Of course, the component code actually executes on the server, as does any other COM+ component. The .NET component is still called by using the COM Callable Wrapper (CCW). As far as the .NET component is concerned , its working with a local .NET applicationit has no idea that its actually part of a COM+ application thats servicing the needs of an application on another machine.
Testing the Application
Its time to test the application weve created. The mechanics of this application are simple. Start the client application, enter two numbers, and click one of the four math buttons . Figure 8-2 shows the output of the application when the Add button is pressed.
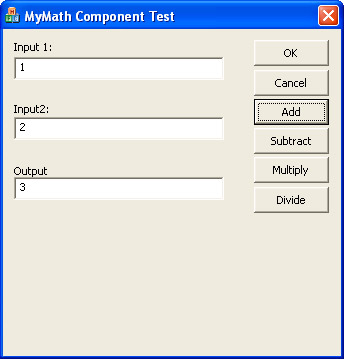
Figure 8-2: The sample application presents the output youd expect when one of the buttons is pressed.
Depending on your setup, the application could almost feel as if it were using a local component or generating the output value internally. This is the feeling you want a COM+ application to havethe user should not be concerned about where the functionality for an application resides. The fact that the application works and provides the required functionality is all that the user needs.
As a developer, youre probably a little more interested than the user in precisely how this application works. If you used a two-machine setup for testing (always the best choice for COM+ application development), you can verify COM+ application execution on the server. Open the COM+ Applications folder in the Component Services console shown in Figure 8-3. When you click one of the buttons on the client application, youll notice that the ball within the MyMathApp application begins to rotate.
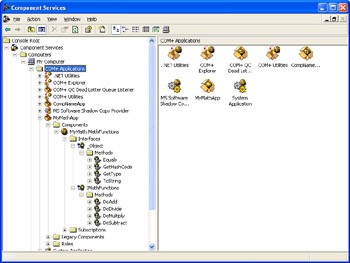
Figure 8-3: Use the entries in the Component Services console to verify COM+ application responses.
If conditions are correct, youll also be able to track component and even individual method operation from within the console. In most cases, the ball will rotate one time for each call to a component and method. (This example works so quickly you might not actually see the ball rotate for component and method invocations, but later examples will take enough time for you to clearly see the ball rotate.)
At this point, you could also test elements such as security. For example, you could log in as an unauthorized user and attempt to use the COM+ application. The application will display an error message saying that the target user isnt authorized to use the application. In fact, this is one reason you want to trap errors in the component and client applicationan authentication problem will show up as an exception that you can trap and recover from gracefully.
| |
EAN: 2147483647
Pages: 140