| The mouse pointer is part of the user interface over which designers have limited control. Although you can control the pointer's appearance to a limited degree (see "Changing the Mouse Pointer's Appearance" in Chapter 8), you're stuck with the pointers provided by the browser. By using a bit of DHTML, however, you can create a layer that follows the mouse on the screen. In browsers that let you set the pointer's appearance to none, you can thus replace the pointer with a graphic of your own. In this example (Figure 17.5), the background color is set to black with black text on top. However, a white circular image below the text can be controlled with the mouse. The effect looks like a flashlight making the black text appear wherever it is in the window. Figure 17.5. This technique can be used to create a flashlight effect. 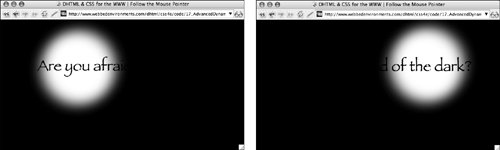
To create an object that follows the mouse pointer: | | 1. | function initPage() {...}
Add initPage() to the JavaScript (Code 17.5).
Code 17.5. A global event handler lets you track the path of the mouse and move an object along with it using the followMe() function.| [View full width] <!DOCTYPE html PUBLIC "-//W3C//DTD XHTML 1.0 Strict//EN" "http://www.w3.org/TR/xhtml1/DTD/  xhtml1-strict.dtd"> <html xmlns="http://www.w3.org/1999/xhtml"> <head> <meta http-equiv="Content-Type" content="text/html; charset=utf-8" /> <title>DHTML & CSS for the WWW | Follow the Mouse Pointer</title> <script type="text/javascript"> function initPage() { document.onmousemove = followMe; } function followMe(evt) { var evt = (evt) ? evt : ((window.event)? window.event : null); var object = document.getElementById ('spotLight'); object.style.left = evt.clientX - (object.offsetWidth/2) + 'px'; object.style.top = evt.clientY - (object.offsetHeight/2) + 'px'; return; } </script> <style type="text/css" media="screen"> body { margin: 8px; color: black; background-color: black; cursor: crosshair; } #spotLight { position: absolute; width: 300px; height: 300px; background: url(spotLight.gif) black no-repeat; z-index: 0; top: 20px; left: 20px; } #content { font: bold 40px fantasy; position: absolute; z-index: 100; top: 100px; left: 100px; } </style> </head> <body onload="initPage();"> <div ></div> <div >Are you afraid of the dark?</div> </body></html> xhtml1-strict.dtd"> <html xmlns="http://www.w3.org/1999/xhtml"> <head> <meta http-equiv="Content-Type" content="text/html; charset=utf-8" /> <title>DHTML & CSS for the WWW | Follow the Mouse Pointer</title> <script type="text/javascript"> function initPage() { document.onmousemove = followMe; } function followMe(evt) { var evt = (evt) ? evt : ((window.event)? window.event : null); var object = document.getElementById ('spotLight'); object.style.left = evt.clientX - (object.offsetWidth/2) + 'px'; object.style.top = evt.clientY - (object.offsetHeight/2) + 'px'; return; } </script> <style type="text/css" media="screen"> body { margin: 8px; color: black; background-color: black; cursor: crosshair; } #spotLight { position: absolute; width: 300px; height: 300px; background: url(spotLight.gif) black no-repeat; z-index: 0; top: 20px; left: 20px; } #content { font: bold 40px fantasy; position: absolute; z-index: 100; top: 100px; left: 100px; } </style> </head> <body onload="initPage();"> <div ></div> <div >Are you afraid of the dark?</div> </body></html>
|
This function sets up an event handler that is bound to the entire page (see "Binding Events to Objects" in Chapter 12); whenever the mouse moves, the followMe() function executes.
| 2. | function followMe(evt) {...}
Add followMe() to the JavaScript.
This function moves a specific object (in this example, spotLight), so the center of the object follows the mouse as it moves.
| 3. | #spotLight {...}
Set up the CSS rule for the object you'll be controlling with the mouse's movement, making it absolutely positioned. The initial top and left positions don't matter, because they'll change as soon as the visitor moves the mouse pointer. However, you can use the background property to place whatever image you want to use,
| 4. | onload="initPage();"
When the page loads, the default events need to be initialized, so place an onload event handler in the <body> tag to run the initPage function.
| 5. | <div >...</div>
Set up the layer that will be moved by the mouse movement. Although this example places a background image in this layer, you can use HTML text, GIF animations, or anything else that can go in a CSS layer.
|
 Tips Tips
Although you can place anything you want in the layer to be moved, larger objects take longer for the computer to draw and redraw, so their movement will appear slower and choppier than that of smaller items. Notice that I set the cursor value to crosshair. Most browsers do not support cursor:none, and crosshair is generally the most inconspicuous cursor. You can combine this technique with a variety of other techniques for some stunning effects. You could use layers in different z-indexes (see "Stacking Objects in Chapter 7) to create a puzzle Web page (Figure 17.6). Or you can use a PNG graphic to create a crosshair target (Figure 17.7). Figure 17.6. The screen is a mass of overlapping text, until you pass the cursor over the link. 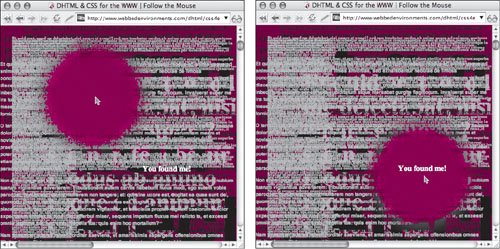 Figure 17.7. The crosshair moves over the intended target. 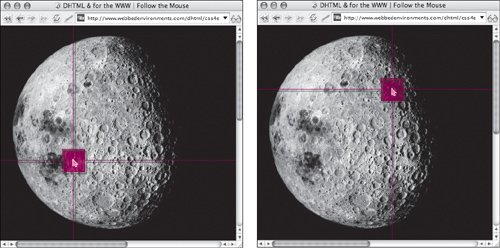
|