Resultant Set of Policy (RSoP)
|
|
Resultant Set of Policy is a technology of gathering group policy settings applied to the user and computer objects located at various levels (including local GPOs) in the Active Directory object hierarchy — from site to organizational unit. It uses Windows Management Instrumentation (WMI) to retrieve data from the Common Information Management Object Model (CIMOM) database.
Administrators can use this technology through the following features:
-
The GPResult command-line tool (described above)
-
The built-in HTML report generator
-
The Resultant Set of Policy snap-in
Planning and Logging Modes
The Resultant Set of Policy (RSoP) data can be obtained in one of the following modes:
-
The planning mode allows administrators to simulate use of group policies applied to the user and computers objects through different GPOs, even if the target users and computers have not been specified. For example, this mode can answer the question: "What policy settings will be applied to those users whose accounts are located in the OU named AllUsers if they are logged on to computers located in the AllComputers OU?"
-
The logging mode can only be used to determine already existing policy settings for a user logged on to a computer.
| Note | In both modes, the target users and computers can belong to different domains, even to different forests. The planning mode is permitted for any applicable directory object: domain, OU, user, and computer. It is obvious that the logging mode can only be used with user and computer objects (only a user can be logged on to a computer). See additional explications in the "Analyzing RSoP Data in Domain" section. |
HTML Report on Group Policy Settings
On Windows XP- and Windows .NET-based computers, you can quickly determine group policy settings and save them to a file. Here are the steps necessary on a computer running Windows .NET (on Windows XP systems, the steps will be similar):
-
Open the Help and Support Center and click Tools in the Support Tasks group.
-
Click Advanced System Information.
-
Click View Group Policy settings applied.
An updatable report will be generated, containing RSoP data for the local computer and currently logged on user. You can save current data as a HTML file. It is possible to run the Resultant Set of Policy snap-in directly from that report and obtain more detailed information.
Using the Resultant Set of Policy Snap-in
The Resultant Set of Policy (RSoP) snap-in can be started as a standalone snap-in from an MMC console or be configured from either the Active Directory Users and Computers or Active Directory Sites and Services snap-in. Let us first discuss the former option.
You can run the RSoP snap-in on any domain client computer running Windows XP or Windows .NET. Necessary steps will be the same on both systems; the only difference is how the snap-in is configured:
-
On Windows XP, the snap-in is configured (targeted) before it is added to an MMC console. Therefore, the snap-in's settings cannot be changed afterwards. It runs in the logging mode only, and operates best of all for the local computer and the currently logged on user. The RSoP data are updated at the snap-in's startup.
-
On Windows .NET, the snap-in is configured after it has been added to an MMC console, and the RSoP data query can be changed after the MMC console has been saved. The snap-in operates in both the logging and planning modes, and the RSoP data can be updated directly from the console.
To start the RSoP snap-in on a computer running Windows .NET:
-
Start an MMC console (empty or custom) and add the Resultant Set of Policy snap-in to it.
-
In the tree pane, right click the snap-in name and select the Generate RSoP Data command from the context menu. The Resultant Set of Policy Wizard will be started; it will help you to prepare an RSoP query. Click Next.
-
On the "Mode Selection" wizard page, choose either Logging mode or Planning mode. Suppose you want to determine the policy settings for a user that is currently logged on to a domain client computer.
-
On the "Computer Selection" page, click Another computer, then Browse. The standard Select Computer window will help you to find a computer in the forest object tree. Enter or select a computer name, and click Next.
-
On the "User Selection" page, you will see the list of users that already have the RSoP data on the selected computer. You may select a user from that list only. Select a user name and click Next.
-
On the next wizard page (Fig. 15.1), you can verify all settings made. To start a query, click Next.
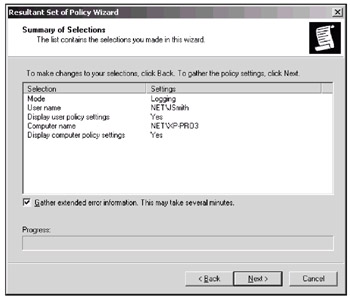
Fig. 15.1: An RSoP query will be executed for the selected user and computer -
When the wizard collects all the required data, click Finish.
In a MMC console, you will see an RSoP snap-in window that contains all group policy settings applied to the selected computer and user.
The main snap-in's window (Fig. 15.2) resembles the main window of the Group Policy Object Editor snap-in and contains all standard GPO nodes. Right click the snap-in name (it is composed from the user and computer names) and notice the first two commands on the context menu. At any moment, you can click Change Query and re-define the snap-in's configuration with the help of the Resultant Set of Policy Wizard. The Refresh Query command allows you to regenerate RSoP data if the domain or other GPOs have been changed. Just do not forget to update new group policies applied to a computer or a user with the GPupdate command!

Fig. 15.2: The main window of the Resultant Set of Policy snap-in
Now you can analyze the obtained data in the RSoP snap-in's window. You can expand any tree node and view group policies applied to the computer or user. If some policies have not been defined, the corresponding node will be empty or absent. It is not possible to change policies from that window.
In our example, you could obtain the same results that the RSoP snap-in displays with the help of the following command:
C:\>gpresult /S xp-pro3.net.dom /USER JSmith /z
You can compare results produced by both tools and select a tool that is the most convenient for your needs.
Fig. 15.3 contains an example view of various group policies. As you can see, these policies come from different GPOs linked to nested organizational units. Only GPOs with the highest priority are shown in this window. These GPO define the resulting settings of the listed policies.
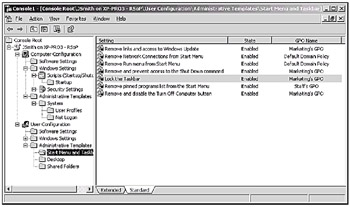
Fig. 15.3: Viewing policy settings defined in different GPOs affecting the selected computer or user
To see whether a policy has been defined on other levels in the GPO hierarchy, double click a policy and open the Precedence tab in the policy Properties window (Fig. 15.4). As you can see in the sample window, the selected policy is defined at every GPO affecting the selected user, and the resulting state is "Enabled".
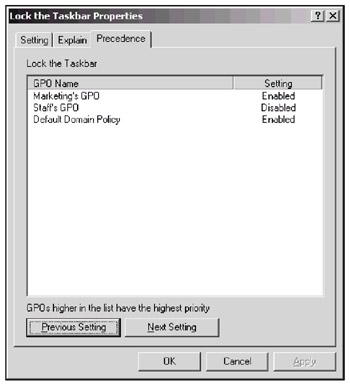
Fig. 15.4: Precedence of GPOs
Analyzing RSoP Data in Domain
From the Active Directory Users and Computers snap-in, you can obtain the RSoP data for any user, computer, and OU. The Active Directory Sites and Services snap-in will help you to run an RSoP query on a site. In all cases, the Resultant Set of Policy Wizard is used to prepare a query. There is nothing difficult in testing groups policy settings, and you will see this yourself if you run the wizard two or three times.
Using an example, let us discuss how to prepare an RSoP query for a domain or an OU object (this is the most generic type among RSoP queries.) The preparation procedure is the same for any other query types.
-
Open the main window of the Active Directory Users and Computers snap-in and right click an OU object in the tree pane. Select the All Tasks | Resultant Set of Policy (Planning) command from the context menu.
-
On the first page of the Resultant Set of Policy Wizard (Fig. 15.5), you should specify user and computer objects. In fact, you have four options here - you can simulate policy settings for the following objects:
-
Any user and any computer in the specified containers
-
Any user in the specified container logged on to a selected computer
-
A selected user logged on to any computer in the specified container
-
A selected user logged on to a specified computer
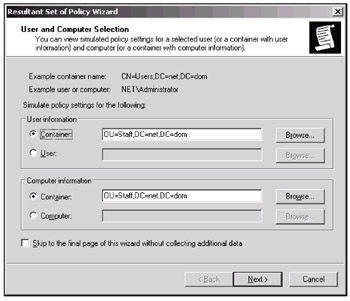
Fig. 15.5: Selecting user and computer objects for which policy settings will be simulatedIf you select a specific user and/or computer object, you may also specify a container (OU) different from the container where the user and/or computer are really located. Therefore, you can determine what policy settings (directly defined and inherited) would be applied to the user and/or computer if they were placed into the specified container(s). At the same time, it is not necessary to really move the selected objects to the target container(s). This opportunity is essentially what the words "planning mode" imply. Thus, it is possible to plan and test various combinations of placement of the user and computer objects at once.
All other wizard pages are optional, and you may set the Skip to the final page... flag. Do not use this flag unless you are familiar with how the wizard works.
-
-
Suppose you want to test a specific user's policy settings when he or she is logged on to the computers located in the selected OU. Set the User switch in the User information group and enter the user name in the "Domain\User" format; otherwise, click Browse and select the user from the domain object tree. Click Next.
-
As a rule, you can skip settings show on the Advanced Simulation Options wizard page; however, you should select a site if there are GPOs linked to the site object.
-
The wizard page shown in Fig. 15.6 will only be displayed if you have selected a specific user and/or computer objects. The User location field contains the name of the container where the selected user is currently located. You can choose any other container and test the user policy settings for a target container (OU). The Restore to Defaults button restores the real paths to the user and/or computer objects.
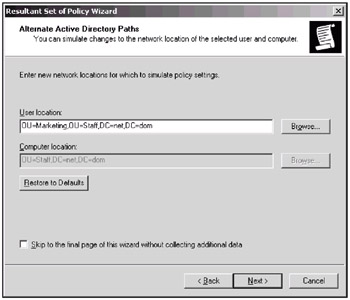
Fig. 15.6: This page initially displays existing paths to the selected user and/or computer objects; you can change these paths -
The next wizard page (Fig. 15.7) displays all security groups where the selected user is a member. This is important if group filtering is used for one or more GPOs, since filtering affects the resulting policy settings applied to the user object. You may add groups to that list and simulate another group membership for the selected user. Otherwise, simply click Next. A similar page will be displayed for computer objects.
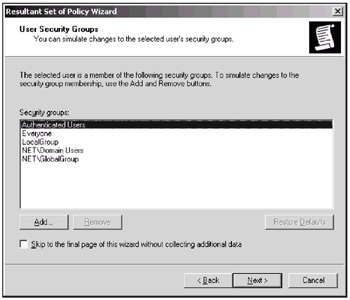
Fig. 15.7: Current group membership of the selected user -
The next two wizard pages allow you to specify WMI filters linked to GPOs. Either skip them or make the necessary selections.
-
The "Summary of Selections" wizard page contains all options you have selected. Verify them and click Next to start the process of gathering the RSoP information.
-
Close the wizard window by clicking Finish.
You will see the standard window of the Resultant Set of Policy snap-in; in that window (see example in Fig. 15.2), it is possible to view policy settings for the objects selected. All features of this snap-in have been discussed earlier in the "Using the Resultant Set of Policy Snap-in" section. Now, you can:
-
Close window
-
Save the window as a custom MMC console for subsequent use
-
Change the query and test the other settings
Preparation steps and results for the logging mode will be the same as described above; the only difference is that the target computer must be online and the user selected should have the RSoP data on that computer (i.e., it must be logged on to that computer at least once).
|
|
EAN: 2147483647
Pages: 154