Active Directory Migration Tool (ADMT)
|
|
Active Directory Migration Tool is the most powerful utility among migration facilities supported on Windows 2000 and Windows .NET systems. Besides that, ADMT is the only GUI tool among them. You can download it freely from the Microsoft website (see Appendix A).
ADMT is easy to use if you are acquainted with such migration tools as MoveTree and ClonePrincipal. In addition, all operations in ADMT are performed with the help of various wizards that significantly decrease the probability of errors in entered parameters.
ADMT can migrate all objects, which ClonePrincipal supports, as well as computer accounts (not domain controllers) and domain trusts. In addition, ADMT helps administrators to merge groups and "transfer" access rights from source domain accounts to migrated ones.
| Note | Some Options described below only relate to ADMT version 2.0. This primarily concerns intra-forest migration, scripting the tool operations, and password migration. |
| Note | The Active Directory Migration Tool snap-in can be added to any custom MMC console. |
| Note | Some ADMT operations, such as Security Translation, Reporting, or Group Mapping and Merging, "remember" and use results of previous operations. Therefore, you should perform all migration operations according to a considered plan and avoid un-necessary tool runs. |
| Note | The computer accounts in the source domain will not be deleted or disabled after the computer migration has been performed. Keep in mind that fact. |
The main window of the tool (Fig. 13.5) only displays various reports if you have generated them. All operations are started from the Action menu, and their results are displayed in special pop-up windows and log files. This menu illustrates all general features of ADMT.

Fig. 13.5: The main window of ADMT
We will not discuss how to use ADMT 2.0 from the command prompt or batch files. This is not a difficult topic if you have mastered ADMT as a GUI tool and know all the environmental requirements. To view ADMT 2.0 command-line operation parameters, enter admt at the command prompt or find the "ADMT Command-line Reference" section in the ADMT Help file. You can also view a sample script, TemplateScript.vbs, which is located in the ADMT installation folder.
To demonstrate ADMT features and methods of preparation of migration operations, we will consider a user migration operation in explicit detail. All other operations are performed in a similar way, and a specific wizard will be used for each operation.
General Considerations
ADMT should be installed in a target domain only. Most of migration environment requirements for using ADMT are the same as for ClonePrincipal (see the "Configuring Migration Environment" section). You must fully comply with all the requirements described (without any exceptions); otherwise, migration operations will fail. The requirements are only slightly less strict when you perform intra-forest migration. In that case, TcpipClientSupport registry setting and audit local group are not necessary.
| Important | Make sure that the domain controller acting as the Infrastructure Master is accessible, since it is responsible for updating the group-to-user references. Otherwise, you can get problems with the accounts names. |
When performing inter-forest migration, you must run ADMT on a domain controller that belongs to the target domain. When intra-forest migration is performed, run ADMT on the RID Master in the target domain.
Before running ADMT, you should break any existing connections (like mapped network drives, etc.) between the source DC and the target DC. Otherwise, a migration operation fails due to a "credentials conflict" error.
ADMT agent (used when the computer accounts are migrated or security translation is performed) can operate on any Windows NT systems from Windows NT 3.51 to Windows .NET Server family. It automatically uploads to migrated computer(s) and performs necessary operations (including system rebooting).
ADMT supports a log file for each operation. These files are located in the Logs folder residing in the ADMT installation folder. If a migration operation fails, you should look through one of the logs, and correct your actions or rearrange domain objects in some way.
Migrating Users
-
Start ADMT and select the User Account Migration Wizard command from the Action menu. Click Next in the welcome wizard's window.
-
Select the operation mode; you have two options here:
-
Test the migration settings and migrate later
-
Migrate now
Choose the necessary option and click Next.
-
-
In the next window, specify the source and target domain names (Fig. 13.6). You can enter domain names in the corresponding fields; however, it is better to choose them from the lists because these lists should already contain the names of all domains "visible" to the target domain. Therefore, you will select only valid names. Click Next.
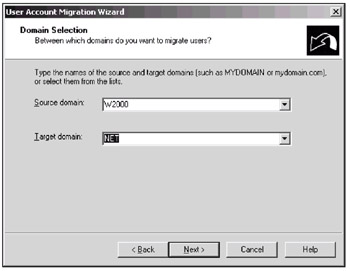
Fig. 13.6: Select the source and target domains -
On the "User Selection" wizard page, click Add. You can enter user names directly in the Select Users window; however, you can also choose them from a source container, and this is a more convenient way. To do so, click Advanced.
-
In the advanced Select Users window (Fig. 13.7), click Locations and select an applicable container (OU) in a object tree browse window. In our example, we have chosen the Sales OU. To find users, you can use common queries or simply click Find Now and view all users in the specified OU. Select necessary users or all of them, and click OK. To continue the operation, click OK in the initial Select Users window and Next on the "User Selection" page.
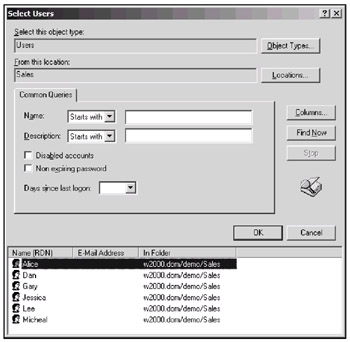
Fig. 13.7: In this window, you can easily select necessary user objects in a source container or in the entire domain -
In the next window, enter the distinguished name of the target OU, or click Browse and select it in the target domain's object tree. Click Next.
-
In Fig. 13.8, you can see three options that ADMT supports for user passwords. If ADMT creates new passwords, it saves them in a specified file. Select the necessary option and click Next.
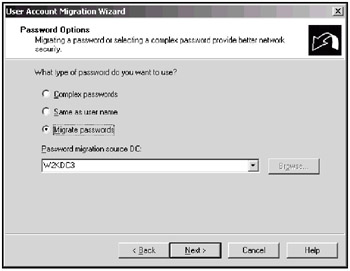
Fig. 13.8: With ADMT, you can either create new passwords for user accounts or migrate the existing passwordsImportant To migrate passwords between domains, you should ensure that the 128-bit high-encryption pack has been installed on both source and target domains. This requirement implies that you have the following systems: Windows NT 4.0 with Service Pack 5 or later; Windows 2000 with the 128-bit high-encryption pack installed (SP 2 or later is acceptable); and Windows .NET Server family.
To enable password migration, you must carry out all operations described in the "Password migration" section in the ADMT Help file. These operations cover both the source and target domains. Keep in mind that you must add the Everyone group from the command prompt rather than by using the Active Directory Users and Group snap-in!
-
In the next window (Fig. 13.9), you can select the state of both source and target accounts, as well as enable/disable SID migration. (The default settings are shown; they do not require any special comments.) If you have chosen to migrate SIDs to the target domain, you must provide credentials of a user with appropriate privileges in the following window. This user must have Administrator's rights in both domains. Be careful, since the credentials entered are not verified at the current step!
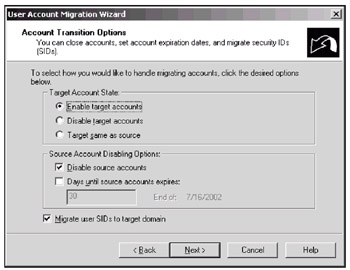
Fig. 13.9: Selecting state of accounts and enabling SID migration -
On the next wizard page (Fig. 13.10), you can specify which user options are to be migrated and how ADMT should treat migrating account names. You can enable migration of the groups whose members are involved in the current operation. By default, this option is disabled, and the Migrate associated user groups flag is cleared.
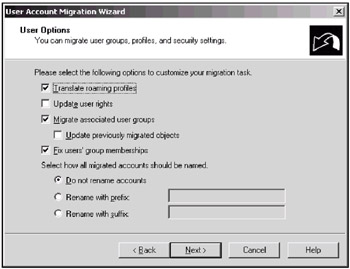
Fig. 13.10: Defining options for migrating accounts -
In contrast to ClonePrincipal, ADMT 2.0 can migrate all Active Directory properties of user, group, and InetOrgPerson objects. Such behavior is defined by default. You can control this process and exclude some properties. Edit the property list on the "Object Property Exclusion" page (Fig. 13.11), or skip this step.
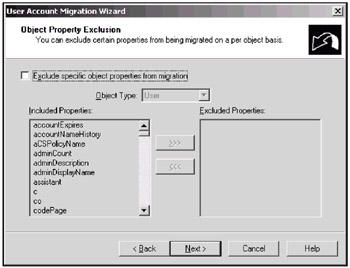
Fig. 13.11: You can exclude some object properties from migration process -
In the next window (Fig. 13.12), you should specify what ADMT will do if account name conflicts will occur. In the example shown, a rename option has been selected: if a migrating account name conflicts with an existing name, the new name will be prefixed with "net-" token.

Fig. 13.12: Define ADMT's behavior in the case of name conflicts -
On the final wizard page, you can review the requested task, revise it (by clicking Back and changing settings), and confirm it if all parameters have been set properly. To start the operation, click Finish.
-
The migration process is monitored in the Migration Progress window (Fig. 13.13). In our example, the operation was completed with non-critical errors. To view all migration events, click View Log. The current operation results are written into the Migration.log file. The "Migration XXXX.log" files contain the results of previous migration operations.
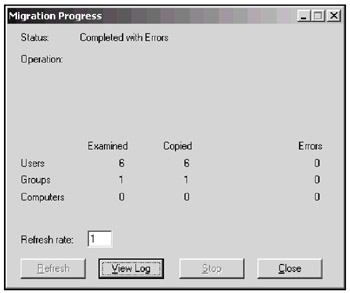
Fig. 13.13: In this window, you can monitor events occurred during migration as well as view the operation results -
Click Close and return to the main ADMT window.
Security Translation
The Security Translation option will allow you to modify access permissions on various system objects (files and folders, shares, registry, etc.) assigned to the migrated users and groups. These objects reside on computers (including domain controllers) that belong to the source domain.
Let us consider a scenario. Suppose some users and groups have access rights to folders and files located on computers in the source domain. You have migrated these user accounts and want for new users to have the same rights to the source domain resources. Start Security Translation Wizard and select a translation of access rights for just migrated accounts. There are three options:
-
Replace — new accounts will have the same rights as the accounts in the source domain that lose their access rights.
-
Add — both accounts from the source domain and their clones (accounts migrated to the target domain) will have the same access rights to a resource on the computers specified.
-
Remove — neither original accounts nor their clones will have access rights granted earlier to the source domain accounts.
You should specify the computers where the resources are located, and the ADMT agents will be dispatched to them. All agents' activity can be monitored in the Active Directory Migration Tool Agent Monitor window (Fig. 13.14) that is opened automatically. On the Summary tab, you can watch how the agents start on remote computers.
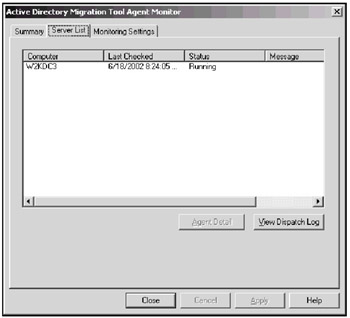
Fig. 13.14: In this window, you can monitor the activity of all agents dispatched to remote computers
When security translation is completed, you can migrate groups and repeat the translation operation for group accounts.
As a result, all migrated users and groups will have the same access rights to all system resources defined for them earlier within the source domain.
Group Mapping and Merging
The Group Mapping and Merging Wizard helps administrators to reorganize groups and can perform the following operations:
-
Assign group members' rights to a target group.
-
Copy SIDs of selected groups from different source domains to a target group (you can perform this operation manually by using the SIDHist.vbs script).
-
Add all users that are members of source groups to a target group.
The last operation should be performed only after migration of all member accounts.
Migrating Domain Trusts
Let us now discuss, with an example, what domain trust migration is. Suppose the NT4DOM domain trusts the W2000 domain. We want to copy this trust relationship to the target domain NET. This means that the NT4DOM domain will also trust the NET domain. (We are considering one-way trusts; however, two-way trust can also be migrated.)
Start the Trust Migration Wizard, and select the source and target domains. Fig. 13.15 shows an ADMT window for our example. As you can see, the selected trust does not exist for the target domain ("No" in the last column).
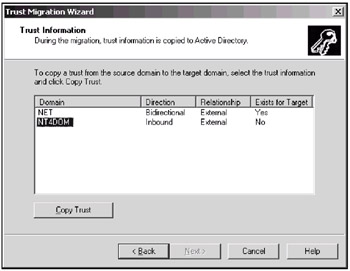
Fig. 13.15: Migrating domain trusts
Click Copy Trust. In the following window, enter an administrator's credentials for the trusting domain (NT4DOM) and click OK. The new trust will be created, and you will see "Yes" in the Exists for Target column.
Overall, this operation is simple and helpful. The operation results (whether or not they are successful) are written into the trust.log file.
|
|
EAN: 2147483647
Pages: 154