Chapter 8: Common Administrative Tasks
|
|
This chapter deals with some typical administrative tasks related to Active Directory (some operations have already been considered in the previous chapter). These tasks in no way cover all the objectives which an administrator accomplishes every day.
The tasks discussed below are carried out using administrative snap-ins or different utilities from the Windows .NET Support Tools or the Windows 2000 Resource Kit.
Using the RunAs Command
Due to security requirements, it is not recommended that you be permanently logged on to the system (domain) with a user account that has full administrative privileges. Windows 2000/XP/.NET offers a very helpful command — RunAs. This command allows a system administrator to carry out common tasks using an account with restricted (or "normal" user) rights, and to start a specific command on behalf of a "power" user (this can be an administrator account or an account with some additional rights). Thus, it is not necessary to repeatedly re-register into the system.
Let us consider how to use this command with the administrative snap-ins.
| Note | If the RunAs command fails, make sure that the Secondary Logon service (seclogon; in Windows 2000, it is called RunAs Service) is running on the computer (run the Services snap-in and check the status of the service). |
Running Administrative Tools from the Context Menu
You can select an administrative tool in one of the following ways:
-
Select the tool in the Start | Programs | Administrative Tools menu (or Start | All Programs | Administrative Tools).
-
Open the window that contains all the tools. Click Start | All Programs | Administrative Tools, and select either Open or Open All Users in the context menu. (The former command will open the window that only contains the tools created by the user, while the latter opens the window that contains all tools installed by default.) Select the tool in the open window.
-
Copy (drag and drop) icons of the necessary tools to the desktop. (You may also create one or more folders on the desktop, and copy the icons to them.)
Then, for any administrative snap-in, you can open the context menu and select the Run as command. (There are some limitations on computers running Windows 2000.) You will see a window similar to the one shown in Fig. 8.1.
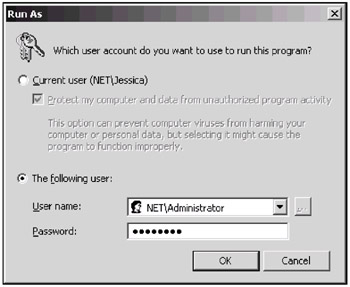
Fig. 8.1: By entering proper credentials in this window, you can start a program on behalf of another user
The upper (default) switch allows you to start the tool on behalf of your current account (i.e., with your current privileges). The other option (shown) — The following user — will allow you to enter an administrator's credentials, and start the tool in the "privileged" mode. Both the domain and user names should be used in this window (this covers Windows 2000 domains, too): you can specify either a full SAM account (pre-Windows 2000) name (as shown on the screenshot) or, in Windows .NET, a UPN name (e.g., JSmith@net).
| Note | The procedure described above can be used with any EXE- or MSC-file, and not only with administrative tools. (See the next section.) |
In addition, you can open any administrative tool's Properties window, click Advanced on the Shortcut tab, and set the Run with different credentials flag. In Windows 2000, you should check the Run as different user box on the Shortcut tab. After this operation is performed, the system will always propose that you start the tool as another user.
| Note | Notice also the Author command on the context menu of administrative tools. This command allows you to start a snap-in in author mode and then to modify it. By default, all tools are saved in User mode — full access, and the Do not save changes in this console box is not checked. To prevent users from changing the administrative snap-ins, you may use the user administrative templates in the Group Policy Object Editor snap-in. |
Starting a Tool from the Command Prompt
Using the RunAs command, it is possible to start any executable file — EXE, COM, CMD, BAT, MSC; shortcuts to programs (LNK); and Control Panel items (CPL) — on behalf of a different user. Let us discuss some examples. (You can get complete information on RunAs in the Help and Support Center or by running runas /?)
| Note | RunAs cannot be used with some items, such as Windows Explorer, the Printers folder, and desktop items. |
| Note | Usually, it is much more convenient to start MMC tools with RunAs from the command prompt rather than from the Run window, because in the first case, you will be able to see possible errors. For frequently used commands, you may want to create shortcuts on the desktop. |
Example 1. Work in the Same Domain
Suppose you are currently logged on to the net.dom domain with a "normal" user account, and want to configure the domain controller security settings, which requires administrative privileges (see Table 8.1). In the Run window or at the command prompt enter the command:
| Tool name | Snap-in's name | Necessary privileges |
|---|---|---|
| | ||
| Active Directory Domains and Trusts | domain.msc | User |
| Active Directory Schema | userCreatedName.msc | User |
| Active Directory Sites and Services | dssite.msc | User |
| Active Directory Users and Computers | dsa.msc | User |
| Computer Management | compmgmt.msc | User |
| Distributed File System | dfsgui.msc | User |
| DNS | dnsmgmt.msc | User |
| Domain Controller Security Settings | dcpol.msc | Administrator |
| Domain Security Settings | dompol.msc | Administrator |
| Group Policy (see below) | gpedit.msc | Administrator |
| Local Security Settings | secpol.msc | Administrator |
| Routing and Remote Access | rrasmgmt.msc | Administrator |
| Services | services.msc | User |
| Snap-ins that aren't displayed on the Administrative Tools menu | ||
| Device Manager | devmgmt.msc | User |
| Disk Management | diskmgmt.msc | User |
| Local Users and Groups | lusrmgr.msc | User |
| Shared Folders | fsmgmt.msc | Administrator |
runas /user:administrator@net.dom "mmc dcpol.msc"
Administrator is the name of a user that is a member of the Domain Admins group. Enter the administrator's password when prompted.
Example 2. Administering Another Domain
Now you want to create a user in the subdom.net.dom domain using the Active Directory Users and Computers snap-in (i.e., you would like to work in a domain, other then the domain where you are logged on). Enter the following string:
runas /netonly /user:SUBDOM\administrator "mmc dsa.msc"
| Note | As you can see, it is possible to use two formats for representing a user account: a UPN format, and a standard SAM format — DOMAIN\USER. Both formats are acceptable, but in the last case, you must use the SAM format, or the snap-in will be running for the domain in which you are currently logged on. |
Example 3. Verifying User Permissions
RunAs can be very helpful for setting up user permissions on a file or Active Directory objects. To set the necessary permissions for a user, you may start a tool using administrative privileges. At the same time, it is possible to open the command prompt or start a program on behalf of this user and check the resulting permissions. You need not either repeatedly log on to the system using different accounts or use several computers.
File Names of Administrative Snap-ins
To use administrative tools with RunAs, you should know the names of the corresponding snap-ins. Also, some tools can only be used with administrative privileges. Table 8.1 contains information on some important tools.
| Note | All installed snap-ins can be found in the %SystemRoot%\system32 folder. |
Running GPO Editor
By default (when started without any parameters), the Group Policy Object Editor snap-in is focused on the local GPO stored on computer. Generally, you have two options:
-
Run this snap-in with a preconfigured GPO. You can use either the standard snap-ins (gpedit.msc, dompol.msc, and dcpol.msc) or custom MMC consoles with the Group Policy Object Editor snap-in.
-
Specify a GPO when the snap-in runs.
In the first case, you can create a custom MMC console, add the Group Policy Object Editor snap-in to it, link the snap-in to a necessary GPO (stored on a remote computer or in Active Directory), and save the console with any name you like. Then you can start the console by its name. This is the "static" approach.
By using the second method, you are exploiting the fact that the Group Policy Object Editor snap-in (the gpedit.msc file) allows you to change its focus (the "dynamic" approach). For example, the following command allows you to open a GPO stored on a remote computer (even the local computer specified with the /gpcomputer parameter is considered to be a "remote" one!):
C:\>gpedit.msc /gpcomputer:"netdcl.net.dom"
| Attention | You cannot view and manage the Security Settings extension (except for the IP Security Policies) of a remote computer's GPO. The Software Installation and Folder Redirection extensions are never displayed for local GPOs. |
You can also run gpedit.msc and specify the distinguished name of any GPO stored in Active Directory. The following approach will help the user to do this most effectively.
At the command prompt, carry out a search operation by using the Search.vbs script (Ldp.exe and DsQuery.exe can also be used) with parameters similar to:
C:\>search "LDAP: //DC=net, DC=dom" /C: (objectCategory=GroupPolicyContainer) /S: subtree /P:AdsPath, displayName
On the screen, you will see the list of all GPOs stored in the domain, for instance:
<LDAP://DC=net, DC=dom>; ((objectCategory=GroupPolicyContainer)); AdsPath,displayName;subtree Finished the query. Found 5 objects. AdsPath 1 = LDAP://CN={31B2F340-016D-11D2-945F-00C04FB984F9}, CN=Policies,CN=System,DC=net,DC=dom displayName 1 = Default Domain Policy AdsPath 2 = LDAP://CN={6AC1786C-016F-11D2-945F-00C04fB984F9}, CN=Policies, CN=System, DC=net, DC=dom displayName 2 = Default Domain Controllers Policy ... The DsQuery command shown below will produce the same result:
C:\>dsquery * -filter (objectCategory=GroupPolicyContainer) -attr distinguishedName displayName
You can easily select a necessary policy by its friendly name and use its DN as the parameter. (Don't forget about the copy-and-paste feature of the command prompt window.) For example, to open the Default Domain Policy shown above, use the following command (the quotes are mandatory):
C:\>gpedit.msc /gpobject:"LDAP:// CN= {31B2F340-016D-11D2-945F-00C04FB984F9}, CN=Policies, CN=System, DC=net, DC=dom" This command used with the RunAs will have the following syntax: C:\>runas /user:net\administrator "mmc gpedit.msc /gpobject:\"LDAP://CN={31B2F340-016D-11D2-945F-00C04FB984F9}, CN=Policies, CN=System, DC=net, DC=dom\""
|
|
EAN: 2147483647
Pages: 154