| Flash Communication Server MX is available in three different editions. Each edition offers no limitation in basic functionality; however, the Professional Edition offers some additional features for deploying multiple high-volume applications on a single server. Editions are defined specifically by their bandwidth and simultaneous connection ceilings (or limits). We discuss each in turn . The Developer Edition The Developer Edition is a great way to get started with communication applications. It's a free download from www.macromedia.com. Here are the highlights and limitations of this edition: -
Used for learning Flash Communication Server MX -
Used for authoring communication applications -
Has no functionality limits -
Can be "chained together" to increase ceilings -
Should not be used to deploy real-world communication applications -
Cannot accept Capacity Packs The Personal Edition The Personal Edition has the following benefits and limitations: -
Can be used with medium-volume applications -
Can be used with limited-bandwidth users -
Can be used with streaming audio and sound (you will run out of bandwidth in streaming solutions without optimizing your media) -
Up to five additional Personal or Professional Edition licenses can be added to increase capacity -
Can be "chained together" to increase ceilings -
Does not accept Capacity Packs The Professional Edition The Professional Edition can be used with or by the following: -
High-volume applications -
Applications using a large number of simultaneous users -
Applications using a large streaming requirement -
Application Service Providers (ASP) who plan to offer services to developers -
Up to five additional Personal or Professional Edition licenses to increase capacity -
Chaining to increase ceilings Unlimited Capacity Packs Capacity Packs let you temporarily upgrade a Professional Edition to remove all bandwidth and user ceilings. They are available for a 90-day period from the point of install. These are great for short- term events such as corporate sales events, general meetings, or live entertainment events. Supported Server Environments Flash Communication Server MX can be installed on any Windows server software (Windows Advanced Server is preferred) or Linux Red Hat 7.3 or 8.0. Using Flash Remoting, Flash Communication Server MX can interact with J2EE servers, such as Macromedia ColdFusion MX, IBM WebSphere, WebObjects, Apache, or Windows servers running .NET. In the following step sequence, you will use asynchronous messaging combined with broadcast messaging over a stream to record an activity log of a client. The log will be recorded as a Flash video file and then played back. There will be no video in the step sequence, only the messages recorded into the stream. When the recorded log file is played , message handlers are called and they will display the information on the Flash Stage. Specific topics you will discover in this step sequence include the following: -
Calling functions remotely on the Flash Player from Flash Communication Server MX -
Publishing a stream -
Broadcasting messages over a NetStream -
Playing a prerecorded stream -
Handling messages within a stream -
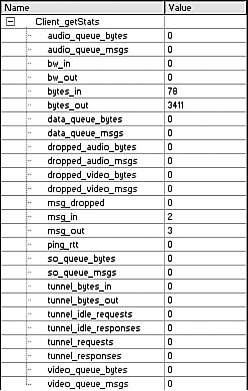
Playing an MP3 file SSAS SSAS has one important responsibility. It calls a remote function on all the Flash Players every two seconds. This call sends an ActionScript object containing all statistics for each client. Figure 15.8 shows a detailed list of all statistics available on each connection. Every two seconds, this object contains new information. This is the information that will be recorded into the Flash video stream. The subsequent step sequence in this chapter will create the SSAS required for this application. Figure 15.8. The full listing of statistics available for each connection.  |
-
In Flash, create a new ActionScript communications file by selecting Select > New. Immediately save this file as main.asc in the FCS-AS2 folder, which you created in the first step sequence in this chapter. -
Create a function that calls the Flash Player. This function will be called by a setInterval function when the application starts. The for statement loops around the application. clients property. This property contains an array of the client instances on the server. On each iteration of the loop, the current client is loaded into a local variable, and is used to return the stats and call the client. doCallClient = function() { trace("calling all Clients:::::" + application.clients.length); for (index=0; index < application.clients.length; index++) { var currentClient = application.clients[index]; var stats = currentClient.getStats(); currentClient.call("handleServerCall", new retObject, stats); } } } Strong Data Typing You cannot use strong data typing with SSAS variables as you did in Flash ActionScript 2.0. For example, the following SSAS to set a string variable does not work: var myVar: String = "something"; . Remember that SSAS is not ActionScript 2.0-compliant. The correct statement in SSAS would be: var myVar = "something";. |
The call statement calls the handleServerCall function that will be scripted in ActionScript. That function will return an object back to SSAS and will be handled by a new return object ( retObject ). The ActionScript object, stats , will be sent to the client. This object contains all the statistics about the client. -
Create a return object that handles a call back from the client. The onResult function handles the call back, and the onStatus function handles any errors. retObject = function () { this.onResult = function(result) { trace("FlashPlayer> "+result); }; this.onStatus = function(infoObj) { trace("error> "+infoObj.description); trace("error> "+infoObj.code); }; }; -
Create the application.onAppStart event. This event runs only once per instance of the application. Here it will set an interval to call the function, doCallClient , every 2000ms (two seconds). application.onAppStart = function() { callClient = setInterval(doCallClient,2000); } -
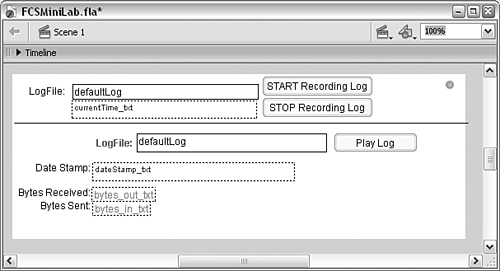
Save the main.asc file. The Flash UI is divided into two sections. The top section controls the publish stream, and the bottom section controls the playback stream, as shown in Figure 15.9. Figure 15.9. Use this as a guide to construct our sample application.  In the following step sequence you will create the Flash UI for the exercise. You will use components from the Flash UI Component library installed with Flash MX Professional 2004. -
Open Flash MX 2004 Professional and create a new Flash Document by selecting File > New > Flash Document. Immediately save the document as FCSMiniLab.fla in the folder FCS-AS2 you created earlier in this chapter. On the Flash Stage, create the upper section of the interface with the elements listed in Table 15.1. Table 15.1. Add These UI Components and Objects to the Flash Stage | F LASH S TAGE S YMBOL | P ROPERTIES | | Two button components | Name (1): startLog_button Label(1): START Recording Log Name(2): stopLog_button Label(2): STOP Recording Log | | One connectionLight component | Name: connectionLight_mc | | One dynamic text box | Name: currentTime_txt | | One input text box | Name: pubName_txt | -
Create the lower section of the interface with the objects in Table 15.2. Table 15.2. Add These UI Components and Objects to the Flash Stage | F LASH S TAGE S YMBOL | P ROPERTIES | | One button component | Name: play_button Label: Play Log | | One connectionLight component | Name: connectionLight_mc | | Three dynamic text boxes | Name: dateStamp_txt Name: bytes_in_txt Name: bytes_out_txt | | One input text box | Name: playName_txt | -
Create the text labels as shown in Figure 15.9. The Flash ActionScript connects the Flash Player to Flash Communication Server MX automatically. You will know a connection is successful when the connection light component turns green. In the following step sequence, you will create ActionScript to handle the server calls, publish and record a live stream, and subscribe to the live (and prerecorded) data stream. At the end, ActionScript will start an MP3 stream so that you can monitor data transfer with the server. -
Connect the Flash Player and instance to the application as myInstance : var my_nc:NetConnection = new NetConnection(); connectionLight_mc.connect(my_nc); my_nc.connect("rtmp://localhost/FCS-AS2/myInstance"); -
Start publishing and recording the stream: function doPublishLog() { trace("recording Log"); logOut_ns = new NetStream(my_nc); logOut_ns.publish(pubName_txt.text, "record"); } -
Handle the calls from the server. This function will be called every two seconds from Flash Communication Server MX. The dataObject it receives will contain the statistics of the connection. In this function, the current date/time will be accessed. The send function will send a message over the stream logout_ns . The message will contain two arguments, the date and the entire status object received from the server. my_nc.handleServerCall = function(dataObject) { trace("received"); var currentDateTime:Date = new Date(); logOut_ns.send("onMessage", currentDateTime, dataObject); currentTime_txt.text = currentDateTime; return "Thanks!"; }; When the function completes, it will return a string, thanking the server. -
Handle the event, startLog_button.onRelease . When the user clicks the startLog button, the event will begin publishing the stream by calling the doPublishLog function. startLog_button.onRelease = function() { doPublishLog(); }; -
The event stopLog_button.onRelease will stop publishing the stream and close the NetStream connection: stopLog_button.onRelease = function() { trace("closing Log"); logOut_ns.publish(false); logOut_ns.close(); }; -
The playbutton.onRelease handler is the most complex handler in this step sequence. When the user clicks the button, the event will instance the NetStream object to the variable play_ns . The play statement uses the input from playName_txt as the stream name. The last function within this event defines the onMessage event handler. This custom function defined within the play_ns instance will be called when a stream sends a message. This is the function called to display the log information: play_button.onRelease = function() { trace("playing Stream: "+playName_txt.text); play_ns = new NetStream(my_nc); play_ns.play(playName_txt.text); play_ns.onMessage = function(dateStamp, message) { trace(dateStamp); dateStamp_txt.text = dateStamp; bytes_in_txt.text = message.bytes_in; bytes_out_txt.text = message.bytes_out; for (var i:String in message) { trace(i); } }; }; -
Play an MP3 stream. Playing an MP3 stream will push data through the stream so that you can see the bytes in and out increase as the stream plays. Add the following ActionScript to the bottom of the Actions panel. It will attach an audio stream to the root timeline. var MP3_ns:NetStream = new NetStream(my_nc); MP3_ns.setBufferTime(2); MP3_ns.play("mp3:bRodeo"); this.attachAudio(MP3_ns); -
Copy an MP3 file into the streams folder of the application. Create a folder within the FCS-AS2 folder called streams. Within that folder, create another folder called myInstance and place the MP3 file inside. The name of your MP3 file must be entered into the play statement without the .mp3 extension. In the preceding code, there is a reference to an MP3 file called bRodeo.mp3; notice the omission of the extension .mp3. -
Save your movie as MXMiniLab.fla in the FCS-AS2 folder. Testing your application can be done very easily, as shown in the following step sequence: -
With Flash Communication Server MX running, test your movie by selecting Control > Test movie. The light will turn green after the connection has been established. -
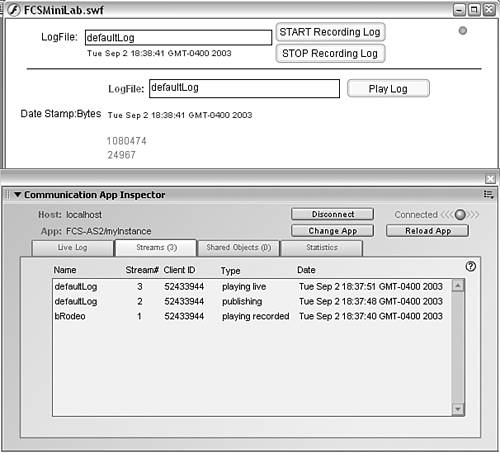
Click the Start Recording Log button. Notice that the time appears below the input text box. Click the Play Log button. The time and date of the date stamp field should be synchronized. This means that you are playing the live stream. Figure 15.10 shows the result of Step 2 and the three streams in the Communication App Inspector. Figure 15.10. The completed application, with the Communication App Inspector showing the three streams playing.  -
Now let's play the recorded stream. Click the Stop Recording Log button, and then click the Play button again. Notice that the time and dates are different and that the bytes received/sent are ramping up. The messages that were sent in the live stream are encoded into the FLV stream. -
Have a look in the streams\myInstance folder into which you placed the MP3 file. There will now be a FLV file and its index (IDX) counterpart . You can save and replay this file anytime you like. |


