| In this task, you will use a ZipCodeValidator class to check whether a postal code is a valid U.S. ZIP code or Canadian postal code. Using a CreditCardValidator, you will also check whether a credit card number is valid during the checkout process. 1. | Open BillingInfo.mxml from the views/ecomm directory.
This is the file that displays the billing information for the end user. It includes their name, address and postal code.
| | | 2. | Immediately after the <mx:Model> tag, add an <mx:ZipCodeValidator> tag, and assign it an id of zipV. Set up a binding to the source property as the billingZip input text box. Specify the property as text and specify the domain attribute as the US or Canada.
<mx:ZipCodeValidator source="{billingZip}" property="text" domain="US or Canada"/>
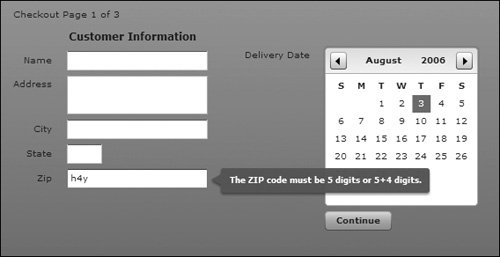
The <mx:ZipCodeValidator> validates that a string has the correct length for a five-digit ZIP code, a five digit + four digit U.S. ZIP code, or a Canadian postal code. The source attribute is simply the name of the control being validated and where the error message will appear. The property attribute is where the actual information that should be validated is stored.
| 3. | Save and compile the application.
Click the Checkout button; enter some letters for the ZIP code in the billing information screen. When you exit the field, you should see a red highlight around the text field; when you hover the mouse cursor over the text field, you will see the default error message appear.
 | 4. | Open CCInfo.mxml from the views/ecomm directory.
This is the next step of the billing process: the user enters credit card information after filling out billing information.
| | | 5. | Modify the dataProvider for the cardType ComboBox control. Change the data property of the data Provider items to "American Express", "Diners Club", "Discover", "MasterCard", "Visa".
<mx:ComboBox > <mx:dataProvider> <mx:Object label="American Express" data="American Express"/> <mx:Object label="Diners Club" data="Diners Club"/> <mx:Object label="Discover" data="Discover"/> <mx:Object label="MasterCard" data="MasterCard"/> <mx:Object label="Visa" data="Visa"/> </mx:dataProvider> </mx:ComboBox>
These constants that you have assigned indicate the type of credit card to be validated. In the next step, you will access these constants from the Validator, which indicate which algorithm should be applied when using the Validator.
| 6. | Immediately after the <mx:Model> tag, add an <mx:CreditCardValidator> tag and assign it an id of ccV. Set up a binding between the CardTypeSource property and the cardType. selectedItem of the ComboBox control. Also specify the cardTypeProperty as data.
<mx:CreditCardValidator cardTypeSource="{cardType.selectedItem}" cardTypeProperty="data"/>
The type of card is being stored in a ComboBox control in the data property of the selectedItem. You specify the control in which the object is being stored by using the cardTypeSource property. In the last step, you specified that the information is being stored in the data property.
| 7. | Still in the <mx:CreditCardValidator> tag, add another property with the name of cardNumberSource and set up a binding to the cardNumber text field. Specify the cardNumberProperty attribute as text. The final CreditCardValidator class should look as follows:
<mx:CreditCardValidator cardTypeSource="{cardType.selectedItem}" cardTypeProperty="data" cardNumberSource="{cardNumber}" cardNumberProperty="text"/>
The cardNumberSource property is the input text field in which the user has typed in the credit card number. The number is stored in the text property of the input text field, which is why you specify the cardNumberProperty attribute.
| | | 8. | In the <mx:Script> block, import the mx.events.ValidationResultEvent and declare a variable with the name of vResult as a ValidationResultEvent.
import mx.events.ValidationResultEvent; private var vResult:ValidationResultEvent;
ValidationResultEvent will return either valid or not for the CreditCardValidator class. You must import these events to use them. If the credit card is valid, you want the user to continue with the checkout process. If it is not valid, you want the user to enter the appropriate credit card number.
| 9. | In the <mx:Script> block, immediately inside the process() method, assign vResult to the value returned from the validate() method on the ccV validator. Surround thecurrent code in the process() method with conditional logic that checks to see whether the vResult.type property is equal to the ValidationResultEvent.VALID. If it does match, place the code that continues the checkout process within the if statement. Add an else statement that will do nothing if the condition is not met.
[View full width] vResult = ccV.validate(); if (vResult.type==ValidationResultEvent.VALID){ var o:ObjectDataEvent=new ObjectDataEvent  ("ccInfoReturn",checkoutInfo); dispatchEvent(o); } else { } ("ccInfoReturn",checkoutInfo); dispatchEvent(o); } else { }
The validate() method, which is part of the CreditCardValidator class, executes an algorithm that checks if a valid credit card number has been entered. The algorithm checks only that a valid card number was entered, not whether that card is actually active. After the validation is done, the method will return a ValidationResultEvent with a property of type set to the constant ValidationResultEvent.VALID if it looks like a credit card number. (You are adding logic that will test for this.) If so, continue with the checkout process; otherwise, do not continue.
| 10. | Save and compile the application.
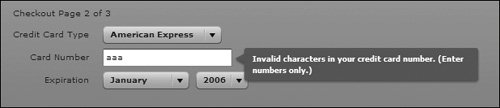
Click the Checkout button. Click the Continue button in the billing information screen to advance to the credit card section. Enter some letters into the credit card field and click the Continue button. You will see the text field display a red outline; roll over the text field and note the error message.
|
 |