| You can insert objects such as bitmap images, Excel spreadsheets, and Word documents into Access forms and reports. There are three important questions to consider: Should the control into which the object is inserted be bound or unbound? If the control is unbound, should you use an Image control or an Unbound Object Frame? Should the object be embedded or linked?
Significantly, both bound and unbound controls can be either embedded or linked. Given the various options of bound versus unbound, image control versus unbound object frame, and embedding versus linking, you might confront a sufficiently complex matrix of choices when attempting to answer all three questions that you might need some help. Let's start by distinguishing bound and unbound controls and proceed from there. Bound and Unbound Controls Just as there are two kinds of egotists (those who admit it, and the rest of us), there are two kinds of Access pictures. Some change as you move from record to record, and some don't. Pictures that change from record to record are displayed in a bound control, which has a field in an underlying table as its source. Pictures that don't change from record to record are in an unbound control, which does not have a field in an underlying table as its source. Bound Controls The Northwind database provides ready-made examples of both types of controls. Let's first look at a bound control. 1. | Choose Help, Sample Databases, Northwind Sample Database.
I won't be asking you to make any changes to the database, so you should be okay if you use Northwind.mdb as is. But to be sure you have an unblemished Northwind file handy, it's always a good idea to make a copy. In Access 2003, you can make a backup by opening the database and choosing File, Back Up Database.
| 2. | Open the Categories table in Design view.
The table contains data about the various food categories into which Northwind's products are classified.
Note that the Picture field has the data type OLE Object, which is used for storing images.
| 3. | Click the View button at the far left end of the toolbar to go to Datasheet view.
The Picture field shows the same entry for each record: Bitmap Image. Actually, each value is completely different, as you'll see presently.
| 4. | Double-click Bitmap Image in the first row, the Beverages record.
An image of beverages opens in a new window (see Figure 12.1). Close the window.
Figure 12.1. Although the values in the Picture field appear to be text, they are actually pictures. 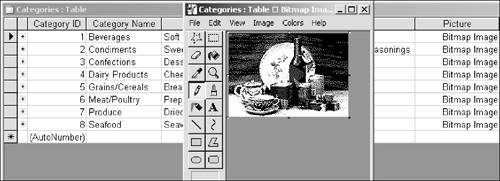
| 5. | Double-click Bitmap Image in the second row, the Condiments record.
An image of condiments opens in a new window. Close the window.
| 6. | Close the table. With the Categories table selected in the Database window, choose Insert, AutoForm.
The new form has all the fields from the Categories table, including Picture.
| 7. | Using the Next Record button in the navigation bar at the bottom of the window, view the first few records.
The picture changes from record to record to match the category. In the first record, you see an image of beverages; in the fourth record, you see an image of cheeses (see Figure 12.2). Although the images in the Picture field are stored in the table, within Access they can be displayed only in other objects, most notably a form.
Figure 12.2. The pictures stored in the table can be viewed in a form. As you move from record to record, the picture changes to the image stored for that record. 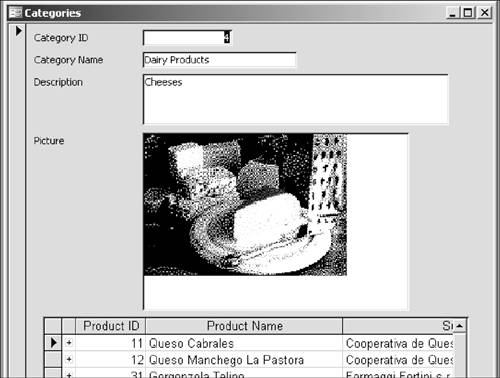
| 8. | Click View to go to Design view.
| 9. | Right-click the rectangular box to the right of the Picture label and choose Properties.
The title of the property sheet is Bound Object Frame: Picture. In a bound object frame, the data comes from a field in an underlying table.
| 10. | Click the Data tab in the property sheet.
The Control Source is Picture, which is the field in the underlying Categories table. In other words, Picture is a bound control that uses the Picture field in the Categories table as its source.
| 11. | Close the form without saving it.
|
Q&A | Q1: | Okay, I understand how pictures are stored in a table. But how do I insert them in the first place? | | A1: | In the appropriate record, click in the Picture field (which, because you're entering items into your database, is more likely to be in a form than a table). Choose Insert, Object and the dialog box shown in Figure 12.5 appears. When I discuss that dialog box a little later, I'll focus on other objectives; but you'll be able to use the same basic techniques to insert a picture in a field. Figure 12.5. In the Microsoft Office Access dialog box, you can create a new object to insert or use an object stored in an existing file. 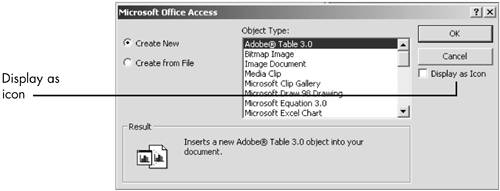
|
|
Unbound Controls Now that you've seen how images in a bound control work, let's take a look at a picture in an unbound control. 1. | In the Database window, click Reports.
| 2. | Open the Catalog report.
In the center of the report is the Northwind logo.
| 3. | Click View to go to Design view.
| 4. | Select the control with the Northwind logo. If necessary, choose View, Properties to open the control's property sheet.
The title of the control is Image: LargeLogo.
| 5. | View the Data tab of the property sheet (see Figure 12.3).
Figure 12.3. The logo in the unbound Image control is not stored in the field of an underlying table. 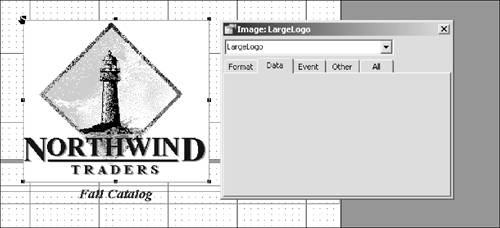
The Data tab is blank. Unlike the pictures in the previous example, the control isn't bound to a field in an underlying table.
| 6. | Click the Format tab in the property sheet.
In the Picture property, the setting is (bitmap). An image has merely been inserted into this control to be displayed in the report; no image is stored in an underlying table.
| 7. | Click in the Picture property. Click the ellipsis (…) button to open the Insert Picture dialog box.
You use this dialog box to find and insert the picture file in the form.
| 8. | Click Cancel in the Insert Picture dialog box.
| 9. | Click in the Picture Type property. Open the drop-down list and note that there are two choices: Embedded and Linked. Embedded is currently chosen.
I'll discuss embedding versus linking presently.
| 10. | Close the property sheet, close the form, and close the database.
|
Comparing Bound and Unbound Controls As you saw, you use a bound control when each image is specific to each record. The picture in the bound object frame changes from record to record to display the value from the underlying tablejust as, say, street addresses in a text box of a Customers form would change from customer to customer. An unbound control merely displays the image in the object and remains unchanged as you move from record to record. Both bound and unbound controls can appear in any section of a form or report. You're more likely to have a bound control in the Detail section, which is used primarily to display records. Unbound controls have uses throughout your form or report. I want to emphasize that the distinction between bound controls and unbound controls doesn't apply only to images. Any control that is tied to a field in an underlying table or query is bound. Thus, text boxes that show the data from a field are bound. Any control that doesn't have a data source is unbound. Thus, the accompanying label of a label/text box combination is unbound, as is a label used as a title for a form or report. Graphical elements such as lines and rectangles are also unbound. Image Versus Unbound Object Frame In the previous example, you used an image control to display the picture as an unbound control. You can also add objects in an unbound object frame. What's the difference between them, and when do you each type of control? The following example helps answer these questions. You'll insert a small Excel worksheet into a bare-bones form in the Nifty Lions database using an unbound object frame. You'll then display the same file in an Image control. 1. | Copy the NiftyLionsChap12.mdb, Surcharge_Chap12.xls, NiftyLionsOrders_Chap12.ppt, and Kenya_Money_Lion_ Chap12.jpg files to a convenient folder on your hard drive.
You need only NiftyLionsChap12.mdb and Surcharge_ Chap12.xls for this particular example; the other files you'll use later in the chapter.
| 2. | Open NiftyLionsChap12.mdb. Click the Forms button and open frmOrders in Design view.
| 3. | In the toolbox, click the Unbound Object Frame button (see Figure 12.4 for its location).
Figure 12.4. You can draw a rectangle for an unbound object frame, but it's probably easier to simply click where you want the top-left corner of the frame and do any resizing after you insert the object. 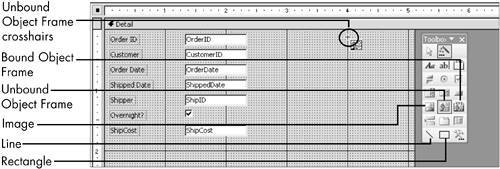
| 4. | Drag the crosshairs 4 inches from the left and two rows of dots from the top (see Figure 12.4). Click to open the Microsoft Office Access dialog box (see Figure 12.5).
Notice that you can insert a wide variety of objects in an unbound object frame, including bitmap and Paintbrush pictures.
| 5. | Select Create from File and click Browse.
| 6. | Navigate to Surcharge_Chap12.xls and double-click it. Click OK.
| 7. | Maximize the form window. Right-click the Excel worksheet and choose Properties. Click the Data tab.
The property sheet title includes Unbound Object Frame. The OLE Class property includes Microsoft Office Excel.
| 8. | Close the property sheet.
| 9. | Click View to go to Form view. Scroll through a few records and note that, as you move from record to record, the worksheet remains unchanged.
| 10. | Click View to return to Design view.
| 11. | Double-click in the center of the unbound object frame.
Note that the Excel formula bar is now in view. You can now edit the worksheet.
| 12. | Click the Overnight Surcharge cell for Apollo Shipping. In the formula bar, edit the value to $11.95 (see Figure 12.6). Press Enter.
Figure 12.6. When you use an Unbound Object frame, you can edit the program in its native format. Here you can use the Excel formula bar to edit a value in an Excel spreadsheet. 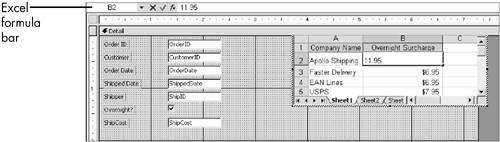
| 13. | Click anywhere outside the control to deselect it. Click View to see the change in the form, and click View to return to Design view. Save your changes and close the form.
| 14. | Open the Surcharge_Chap12.xls file. Note that the edit you made is not reflected in the underlying file. Close Excel.
| 15. | Open the frmOrders form in Design view.
| 16. | Right-click the control with the Excel worksheet and choose Change To, Image. Click Yes to confirm.
| 17. | Double-click in the middle of the control.
Instead of opening the worksheet in Excel, only the Image Control property sheet opens. You cannot edit the spreadsheet in an image control.
| 18. | Close the property sheet and press Delete to delete the control.
|
As you can see, an unbound object frame lets you edit the objectpicture, Excel spreadsheet, and so onwithin Access. An image control does not. The obvious question: Why not choose the more flexible unbound object frame over an image control all the time? The answer: Image controls load more quickly than unbound object frames. The upshot: If you don't think need you'll need to edit the object, then use an Image control. For standalone pictures such as logos, an Image control makes sense. But if you need to update the content of the object, use an unbound object frame. For an Excel worksheet whose numbers change frequently, an unbound object frame often makes sense. Embedding Versus Linking You can make an object available to an Access object in your report or form in two ways: You can embed the item or you can link the item. When you embed an item, the object is stored within Access itself. When you link the file, it is stored externally in its native format. Let me express that one other way: When you embed, you insert the object itself into the form or report and it becomes wholly part of your database. When you link, you provide the location where Access can get the object when it needs it. When you embed the object and make changes to it, those changes are not included in the original file. When you link the file and edit it, however, you are also editing the underlying object; any changes you make in the underlying file will be reflected in the linked object. Both embedding and linking have their drawbacks. Stored images in Access tend to take up a lot of room, resulting in database bloat. On the other hand, with a linked object, if you change the file's location, you need to tell Access where it has moved to. Determining the net trade-off between embedding and linking can help you decide which to choose. Try this example that inserts a PowerPoint presentation in an Access form. (Don't worry if you know nothing about PowerPointthe exercise requires minimal PowerPoint skills.) 1. | In Design view of the frmOrders form, click Unbound Object Frame in the toolbox.
| 2. | Drag the crosshairs 3 inches from the left and two rows of dots from the top. Click to open the Microsoft Office Access dialog box.
| 3. | Select Create from File and click Browse.
| 4. | Locate the NiftyLionsOrders_Chap12.ppt file you downloaded and double-click it. Click OK.
| 5. | Click View to see the PowerPoint page and return to Design view.
| 6. | With the control still selected, right-click and choose Properties. On the Data tab, note that the OLE Type setting is Embedded. Close the property sheet.
| 7. | Right-click the control and choose Presentation Object, Edit.
| 8. | Select Spring 2006 in the presentation and edit it to Fall 2006. Click outside the control to deselect it.
| 9. | Open the NiftyLionsOrders_Chap12.ppt file. Note that the date has not been changed. Close the file and close PowerPoint.
| 10. | Delete the control with the PowerPoint presentation.
| 11. | In the toolbox, click Unbound Object Frame.
| 12. | Drag the crosshairs 3 inches from the left and two rows of dots from the top. Click to open the Microsoft Office Access dialog box.
| 13. | Select Create from File.
| 14. | Click the Link check box to select it.
| 15. | Click Browse. Locate NiftyLionsOrders_Chap12.ppt and double-click it. Click OK.
| 16. | With the control still selected, right-click and choose Properties. On the Data tab, note that the OLE Type is Linked. Close the property sheet.
| 17. | Right-click the control and choose Linked Presentation Object, Edit.
| 18. | In PowerPoint, click Spring. Edit the date to Summer 2006.
| 19. | Close PowerPoint and save your changes. The file itself has been edited.
I think it's obvious that you just edited the actual file. But if you want, you can open NiftyLionsOrders_Chap12.ppt to confirm.
| 20. | Switch to frmOrders. The control has been edited as well (see Figure 12.7).
Figure 12.7. When you link, changes you make in an Access control are reflected in the underlying file. 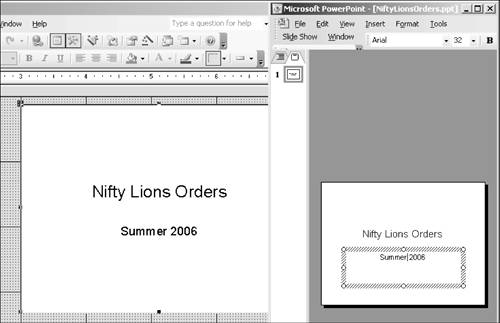
| 21. | With the control selected, right-click and choose Linked Presentation Object, Convert.
| 22. | Click Display as Icon and click OK.
You can save much space by displaying objects as icons.
| 23. | Choose File, Save to save your changes.
|
Background Picture Another type of graphic is the background picture, which places an image (such as a logo) behind the text in a form or report. I recommend taking a conservative approach to using background pictures: Sometimes they just make the text more difficult to read and serve no crucial purpose. But occasionally they are valuable, such as in a "confidential" warning displayed throughout a page so that there's no question the reader will see the warning (see Figure 12.8). Figure 12.8. A background picture is occasionally an effective tool for communicating information to readers. 
The key thing to remember about a background picture is that it's a form or report property, not a control in either object. So when you want to insert a background picture, head for the form or report property sheet, not the toolbox. Here's how to add a background picture: 1. | In Design view of the frmOrders form, choose Edit, Select Form. With the form now selected, choose View, Properties to open the form's property sheet.
| 2. | On the Format tab on the property sheet, click in the Picture property.
| 3. | Click the three-dot ellipsis on the right to open the Insert Picture dialog box.
| 4. | Navigate to Kenya_Money_Lion_Chap12.jpg, the file you earlier copied. Double-click the file to insert it. Three properties should be set as follows:
- Picture Size Mode: Clip
- Picture Alignment: Center
- Picture Tiling: No
These properties are discussed in the next section.
| 5. | Click View to go to Form view. Scroll through a few records to see the background picture in each record of the form (see Figure 12.9).
Figure 12.9. You can also use a background picture merely as a decorative element. 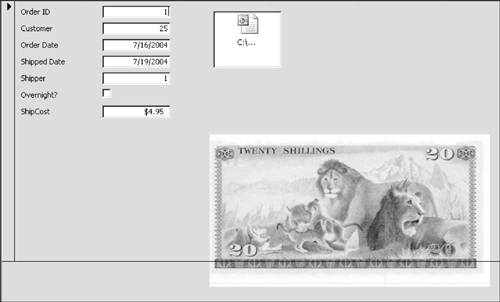
| 6. | Click View to return to Design view. Choose File, Save to save your work.
|
Picture Properties Various properties change the placement and appearance of a background picture. Trial and error could be the wisest strategy for using them, but if you get confused about which property does what, these descriptions might help: Picture Size Mode This property has three settings. Clip displays the image at its actual size (see Figure 12.10). If there isn't sufficient space for the image, it's truncated. Stretch fills the entire page with the image, but often at the cost of greatly distorting it (see Figure 12.11). Zoom manages to maintain the image's original proportions, but it can fill only the height or width of the available space, not both (see Figure 12.12). Figure 12.10. Clip. 
Figure 12.11. Stretch. 
Figure 12.12. Zoom. 
Picture Alignment This property positions the image within the control. The settings include Center, Top Right, and Bottom Left. In forms you'll also have a Form Center setting. Choose this selection if you want the picture centered horizontally in relation to the width of the form and vertically in relation to the height of the form. All other settings, by contrast, are set in relation to the form window. Picture Tiling When the setting is Yes, the picture is tiled across the entire form window or report. If Picture Alignment is set to Form Center and Picture Tiling is Yes, the background picture of a form is tiled across the form, not across the Form window. Picture Pages You can choose to display the image on all pages or the first page only. You can use the No Pages setting to hide the image.
TIP As you create forms, you might find that the property sheet continues to be visible in Form view. If you want the property sheet to be available in Design view only, in the Form property sheet, click the Other tab. In the Allow Design Changes property, change the setting to Design View Only.
|