| Policies are assigned in the ZENworks Control Center through direct or indirect assignments. Regardless of whether a policy is assigned indirectly or directly, the policy is sent to the device and applied to the managed device. Direct Assignment Directly assigned policies are policies that have been assigned directly to a managed device. Indirect Assignment Indirectly assigned policies are policies that are effective for the device and have been assigned through a group membership or containment. Assigning a Policy Several ways of assigning a policy to a device are available in the ZENworks Control Center. The following describes the different ways that you can assign a policy to a device: As part of the policy creation wizard. As an action in the standard ZENworks Control Center lists. During review of the details of a folder, policy, or device. In the command line on the managed device.
Assigning a Policy with Creation Wizard All policies are created through a policy creation wizard. Each wizard page is customized for the particular policy that is being created. Regardless of the type of policy created, all wizards present the same pages to allow for the assignment of the policy to managed devices, folders, or groups. After the policy is defined in the wizard and you are viewing the summary page, you may either finish the policy definition by pressing the Finished button on the page or you may proceed in the wizard to select an assignment of the policy by pressing the Next button (see Figure 9.1). Figure 9.1. Wizard page that allows policy assignments. 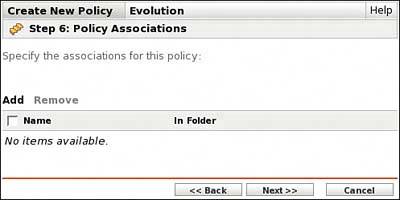
When you are viewing the Policy Assignment page, you can select devices, groups, or folders that are assigned the created policy. Complete the following steps to assign the policy: 1. | Press the bold Add menu item in the middle of the screen.
| 2. | The Select Assignments dialog box appears on the screen (see Figure 9.2).
Figure 9.2. The Select Associations pop-up dialog box. 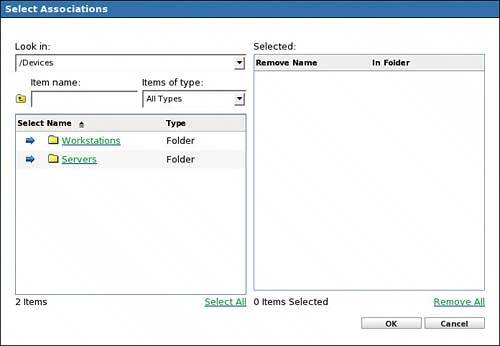
| 3. | Select the devices, groups, or folders to which you want to assign the policy. To drill into folders, select the green, underlined folder name. You can select the item by pressing the blue arrow to the left of the object name. When you select the item, it is displayed on the right pane of the dialog box (see Figure 9.3).
Figure 9.3. Selected items in the Select Associations pop-up dialog. 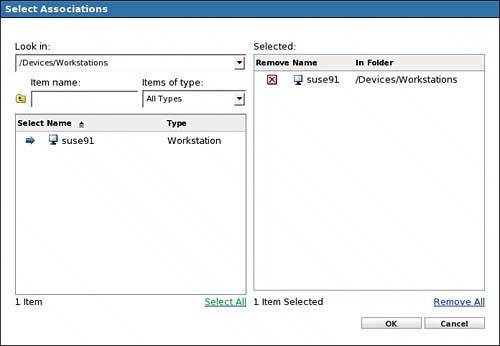
| 4. | If you want to remove a selection that you have previously selected, click the red boxed X. This removes that item from the assignment list.
| 5. | After you have completed your selections, press the OK button to make your assignments.
| 6. | Complete the wizard by finishing the remaining pages.
|
Assigning a Policy Through List View While in the ZENworks Control Center and under the Devices folder you are presented with the Workstations and Servers folders. If you select either folder, the ZENworks Control Center drills into that folder and displays all the devices and subfolders. From any of these lists you may assign a policy to a device or folder. Complete the following to assign a policy to a device in the ZENworks Control Center list view: 1. | Select the Devices folder in the ZENworks Control Center (see Figure 9.4).
Figure 9.4. Devices folder in the ZENworks Control Center. 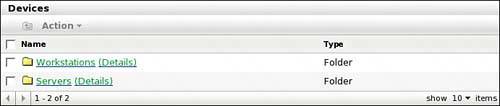
| 2. | Select either the Workstations or Servers folder to drill into the folder and view any devices or subfolders (see Figure 9.5).
Figure 9.5. List view of the Workstations folder. 
| 3. | Select all the devices to which you want to assign the policy. Do so by selecting the selection box next to the device. When one or more devices are selected, the Action menu item is activated.
| 4. | Select the Action menu item to bring up the pop-up menu list.
| 5. | Select the Assign Policy menu item. This brings up the Assign Policy wizard.
| 6. | The first page of the Assign Policy wizard displays the devices that are to be assigned (see Figure 9.6). From this wizard page you may add additional devices by selecting the Add menu. You can also remove devices on this wizard page by selecting the selection box next to the devices and selecting the Remove menu item. Press Next when you are finished with the selected devices.
Figure 9.6. First page of the Assign Policy Wizard: Devices to Be Assigned 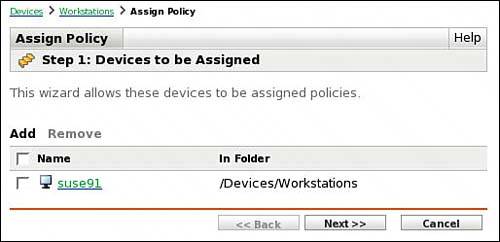
| 7. | Step 2 of the Assign Policy Wizard enables you to select the policies that you want assigned to the selected devices in the previous step. Press the Add menu item and select the desired policies from the Select Objects dialog (see Figure 9.7).
Figure 9.7. Select Objects dialog. 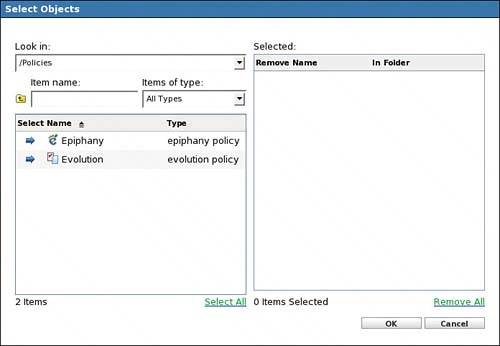
| 8. | After you have selected the set of policies to assign, press OK in the Select Objects dialog.
| 9. | The assigned policies are listed on the Step 2: Policies to Be Assigned page. From here you can continue to add policies or you can remove the policies from the list. Remove by selecting the selection box next to the policy and then pressing the Remove menu choice. After the list of policies is complete, press Next.
| 10. | The next page of the Assign Policy Wizard enables you to select the schedule within which the policy will become effective. When the schedule occurs, the policy is placed on the workstation. If None is selected for the schedule type, the policy will never be enforced on the assigned devices. When you have completed the scheduling administration, press Next.
| 11. | The summary page is displayed next, listing the policies and the devices, folders, or groups to which they have been assigned. Additionally, the page displays the schedule type and any details about the schedule. Press Finish to complete the wizard.
|
Assigning a Policy in Folder Details When you assign a policy to a folder, all the devices in that folder or any subfolder are assigned the specified policy. To assign a policy to a folder, complete the following steps: 1. | Browse to the listing that presents the desired folder. For example, Figure 9.8 shows the Devices folder, which contains two subfolders: Workstations and Servers.
Figure 9.8. Devices folder listing. 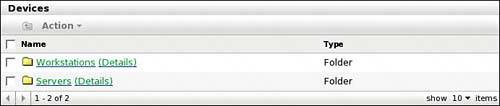
| 2. | Press the check box next to the desired folder. This should cause the Action menu item to be activated.
| 3. | Press the Action menu and choose Assign Policy from the pop-up menu.
| 4. | This takes you through the Assign Policy Wizard, as described in the previous section.
|
You may also assign a policy to a folder by entering the folder's details. You enter a folder's details by pressing the Details link next to the folder name. Within that folder's details is an Effective Policies snapshot. You can use this method to assign policies in the same way as described in the following "Assigning a Policy in Policy Details" section. When a policy is assigned to a folder, all devices in that folder and any subfolders receive that policy. This "inheritance" of a policy through a folder above can be overwritten by assigning a policy closer, in a hierarchical fashion, to the device. For example, if PolicyA were assigned to Folder1, any devices in Folder1 and Folder1.1 would have PolicyA applied if they met the system requirements for that policy. If a separate PolicyA (called PolicyA1) were applied to Folder1.1, the devices in Folder1.1 would get PolicyA1 and would not get PolicyA. To discover which policies will be applied to a device, you can pretend to enter ZENworks at the location where the device is in the object store. Then walk up the folders searching for a policy. When you find a policy, you stop searching for that particular type of policy. You may continue to search up the folder hierarchy looking for other policies, but you will not apply any policy of the type that you had previously found. The only exception to this rule is the Generic GNOME policy. This policy is cumulative, meaning that it is a merge of all the effective Generic GNOME policies that are associated to the device or a group or container of the device. Assigning a Policy in Policy Details Within the ZENworks Control Center you can view the details of any policy. Within the details of the policy you can view or edit all the settings for the policy. Additionally, you can assign the policy to any device, group, or folder. Figure 9.9 shows a policy details page. Figure 9.9. Details page for a policy. 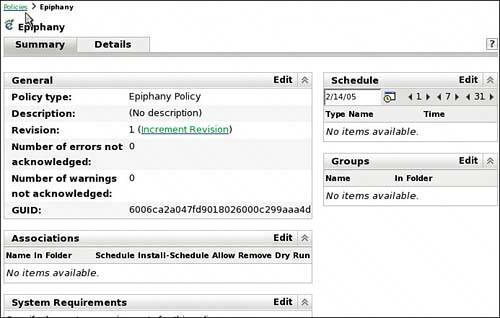
To assign the displayed policy, complete the following steps: 1. | Scroll to the Associations snapshot on the page.
| 2. | Press the Edit menu item on the Associations snapshot. This opens the snapshot into full-screen mode and allows editing of the Associations list (see Figure 9.10).
Figure 9.10. Associations list in Edit mode. 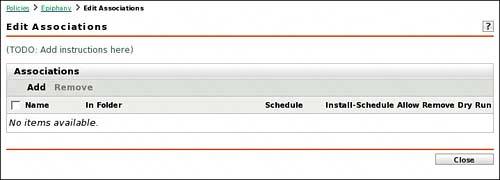
| 3. | To add additional devices, groups, or folders to be assigned the policy, press the Add button. This brings up the Assign Policy Wizard as described earlier in the "Assigning a Policy Through List View" section.
| 4. | When the addition is completed, press the Close button.
| 5. | To remove assignments, select the devices, groups, or folders from the list by checking the check box next to the item. This should activate the Remove menu item.
| 6. | Press the Remove menu item to remove the assignment.
| 7. | Press the Close button when finished.
|
Assigning a Policy in Device Details Within the ZENworks Control Center you can view the details of any device. Within the details of the device you can view or edit all its settings. Additionally, you can assign any policy to the device. To assign a policy to the displayed device, complete the following steps: 1. | Locate the Effective Policies snapshot on the page. Figure 9.11 shows an example of this snapshot.
Figure 9.11. Effective Policies snapshot on a device details page. 
| 2. | Press the Edit menu item on the snapshot. This opens the snapshot in full-page mode. Figure 9.12 displays a sample of this page.
Figure 9.12. Effective Policies in full-page mode. 
| 3. | To assign a policy to this device, press the Add menu item. This brings up the Assign Policy Wizard as described earlier in the "Assigning a Policy Through List View" section.
| 4. | When the addition is completed, press the Close button.
| 5. | To remove assignments, select the policies from the list by checking the check box next to the item. This should activate the Remove menu item.
| 6. | Press the Remove menu item to remove the assignment.
| 7. | Press the Close button when finished.
|
Assigning a Policy Through the Command Line When ZENworks Linux Management is installed, an additional command-line tool is also installed on the primary and secondary servers. This tool is zlman and is located in the /usr/bin directory. This command-line tool enables you to perform almost any administrative function that can be done via the web browser interface. To assign a policy using the command-line zlman tool, complete the following: 1. | Log in to one of the ZENworks servers.
| 2. | Use the following command:
Zlman workstation-add-policy <options> <workstation> <policy>
| 3. | Optionally add the following options:
user=<name>, enter an administrator user name password=<string>, enter password for the user specified
|
Add additional options as desired. These can be found in Appendix A, "Commands." |