Chapter 9: Collaborative Publishing and Interactivity
In addition to allowing you to repackage and redistribute text pages in a flexible format, Acrobat provides a wide variety of interactive features, including collaborative publishing tools and multimedia capabilities.
Guiding Your Viewers with Bookmarks
PDF documents can serve as a very flexible work-in-progress document format. With Acrobat s collaborative publishing tools you can lead your collaborators though a document, make comments and suggestions, share comments, track document versions, and even use digital signatures to track and protect your work s progress.
| Note | You need Acrobat, not just Adobe Reader, in order to use the collaborative publishing features described here. |
If you would like to direct your PDF viewer to various parts of your document and focus on specific sections, then Bookmarks is the tool to use. Here s how it works:
-
Open the PDF document you would like to bookmark. I ll use a first draft of a chapter of this book as a sample file; I ve included it on the companion CD (in the Chapter 9 folder) as Chapter8Sample.pdf in case you d like to follow along with the illustrations here.
Note The CD also includes a final version of that file, named Chapter8SampleCommented.pdf , full of comments and media.
-
Click the Bookmarks tab. A bookmarks panel will appear to the left of the current (first) page.
-
Navigate to the page and the zoom/magnification level you would like to capture as a bookmark. In Figure 9.1, I have zoomed into the lower-right margin of page 3.
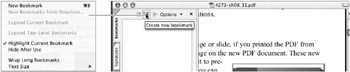
Figure 9.1: Bookmarking toolsNote For speed reasons, I like to use keyboard shortcuts to navigate to the pages and zoom levels I prefer.
 Chapter 6, Using Acrobat and Navigating PDFs, for some tips on how to zip around PDF documents quickly.
 -
Create a bookmark of this view by doing one of the following:
-
Click the Create New Bookmark icon.
-
Select New Bookmark from the Options menu.
-
Press
 /Ctrl+B.
A new bookmark symbol will appear in the Bookmarks tab, labeled Untitled.
-
-
Label your newly created bookmark in a logical fashion. I used the caption of the obvious illustration visible here to name this bookmark (Figure 8.2 PDF Page With Unwanted Border).
Note If you select some text in the bookmark area before making the bookmark, this copy will be used to label the bookmark.
-
If, like mine, the bookmark name is too long to appear in a single line and you would like to see the entire name, then right-click/Control+click the bookmark and select Wrap Long Bookmarks from the context menu, as shown in Figure 9.2. This will wrap the bookmark names so they fit within the Bookmarks tab. (You can also use this context menu to rename, delete, and set the properties of your bookmarks.)

Figure 9.2: (left) The Bookmarks context menu; (right) a wrapped bookmark name
Now you can navigate to other views (pages and magnifications) and create bookmarks wherever you want to direct a viewer s attention.
| |
Acrobat s bookmarks will record not only the page and the specific location on the page but also the zoom or magnification level of the view you choose to bookmark. So select exactly the view you will want your viewers to see prior to making a bookmark.
| |
Reordering and Nesting Bookmarks
Bookmarks can be ordered in any way you like, and they can be grouped together in a nested fashion to show relationships between them. For instance, if you have two bookmarks on separate pages but they relate to each other topically, you can nest one bookmark under the other one. Or, as we will do here, you may have two bookmarks that occur on the same page that you would like to nest to show their spatial relationship in the document.
To move a bookmark, click its name and drag it to a new position in the list of bookmarks. A small (red) tick mark appears to indicate the destination bookmark ”the bookmark that the one you re moving will follow when you release the mouse. Release the mouse button, and the bookmark you dragged will move to its new location, as shown in Figure 9.3.
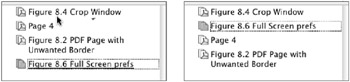
Figure 9.3: Moving the Figure 8.6 bookmark directly under the Figure 8.4 bookmark
| Note | The actual bookmarked view itself does not change; only the entry in the bookmarks list changes. |
To nest a bookmark to show a relationship, follow these steps:
-
Click the bookmark icon (rather than the name). You can highlight multiple bookmarks to move together by Shift+clicking each icon. In this case I will select the icons for the bookmarks named Figure 8.8 and Figure 8.9 and move them under the Page 8 bookmark in the hierarchy.
-
Drag the two bookmarks icons under the icon of the bookmark under which you would like them to nest. A small, one-sided red arrow appears to indicate where the nesting will occur (Figure 9.4).
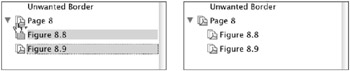
Figure 9.4: Nesting a bookmark -
Release the mouse button, and the selected bookmarks will be nested under the destination bookmark.
Collapse or display the contents of nested bookmarks by clicking the gray triangular tab to the left of the parent bookmark (here, Page 8).
Creating Bookmarks Automatically from PDF Structure
There are methods for automatically creating bookmarks from the content in a document. Two of the most common and useful methods involve using the document structure of a PDF file and using the contents of a web page.
To create a set of bookmarks from a PDF file s structure:
-
Choose Advanced > Accessibility > Add Tags To Document. This will locate all the structures in your document, including style sheets.
-
From the Options menu in the Bookmarks tab, select New Bookmarks From Structure. A Structure Elements window appears (Figure 9.5).

Figure 9.5: Selected style sheets to use as bookmarks
Style Sheets Again! Way back in Chapter 2, Document Construction and Preflighting, I discussed the speed, consistency, and editing benefits of using style sheets when creating original page layout documents. I also stated back then that there would be additional benefits to be gained from initially constructing your documents using style sheets once you converted your page layout document into PDFs. Well, here s a benefit: If you have used style sheets to create your original documents, you can use these style sheets to automatically create bookmarks, which in turn can be used as a hyperlinked interactive table of contents, as I have done here.
To take ease of navigation to the next level, the third-party program Sonar Bookends Activate (from Virginia Systems) creates hyperlinks in Acrobat PDF files for an index, table of contents, URLs, e- mails , figure and table references, and page references. I ve included a trial version of this software on the companion CD.
-
Select the document elements you would like to use as bookmarks. Style sheets are commonly used elements for creating bookmarks. In Figure 9.5, the three main heading style sheets are selected to use as bookmark elements: H1, H2, and H3.
-
Click OK when you have completed selecting your bookmark elements.
-
View the bookmarks created from the selected document structure elements. Initially, the bookmarks created from this command are all nested bookmarks under an Untitled main parent bookmark, as shown in Figure 9.6. These bookmarks can be renamed , moved, and nested.
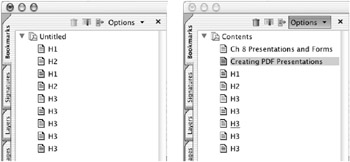
Figure 9.6: Bookmarks made from document structure default to a list under Untitled, but I m renaming these so they serve as a table of contents.
Creating Bookmarks Automatically from Web Pages
Web pages can very easily be made into PDF documents; Chapter 10 describes this process in detail. But you should also know that all the pages of a website can bookmarked on-the-fly . To convert web pages into bookmarked PDFs, get online and follow these steps:
-
Get online; then in Acrobat, choose File > Create PDF > From Web Page.
-
Configure the Create PDF From Web Page dialog as described in Chapter 10, but before you click OK, click the Settings button. The Web Capture Settings dialog appears.
-
Select the following check boxes in the PDF Settings section:
Create Bookmarks This will create a bookmark for each page you convert.
Create PDF Tags This will tag the PDF pages as they are being created, allowing you to make additional bookmarks from the tagged constructed elements, as we did in the previous section using style sheets.
-
Click OK in the Web Capture Settings window, and then click Create in the Create PDF From Web Page window. Your selected website pages will be converted into a multipage PDF document, with each page having its own bookmark.
EAN: 2147483647
Pages: 102