Chapter 7: PDF Document Management
Because PDF documents are page- rather than document-based , you can easily manipulate pages in any wide variety of ways. PDF documents and their pages can be manipulated, compared, optimized, and numbered, and they can have headers and even watermarks added to them. You can work in layers in Acrobat and search their contents to your heart s delight. Heck, Acrobat even has tools to make IT managers smile. It s the page-based nature of PDF documents that makes much of this manipulation and management possible. Let s see how to do all this cool stuff.
Manipulating PDF Document Pages
You can manipulate pages in any number of ways in Acrobat. You can add, subtract, crop, rotate, replace, extract, and change the order of pages. Documents can be compared, optimized, and numbered, and can have headers and even watermarks added to them. You can work in layers in Acrobat and search the contents. Acrobat even has tools to interest IT managers. The page-based nature (which we discussed earlier) of PDF documents is what makes much of this manipulation and management possible.
| Note | Any pages can be added, deleted, extracted, or replaced easily in a PDF document, without any fear of any other pages in the PDF being affected, due to the page-based nature of PDF. I often use Acrobat and PDF to combine PDF document pages from otherwise unrelated and incompatible documents into one document. For instance, I often want to combine text and graphic page layouts for QuarkXPress, with charts and spreadsheets from Excel, charts from Illustrator, and even presentation materials form PowerPoint. I use watched folders ( |
Moving Pages in and out of Your PDF
Manipulating PDF documents in Acrobat is accomplished through page control menus . To access the page controls for adding, deleting, extracting, and replacing pages, do one of the following (Figure 7.1):
-
Select Document > Pages and, from the submenu, choose the desired command (Insert, Extract, Replace, or Delete).
-
Click the Options menu in the Pages tab and choose a command (Insert Pages, Extract Pages, Replace Pages, or Delete Pages).
-
Use the keyboard shortcuts for Insert (Shift+
 +I/Shift+Ctrl+I) or Delete (Shift+ +D/Shift+Ctrl+D).
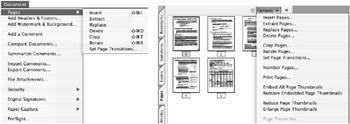
Figure 7.1: Access to page controls
| |
One issue that can lead to confusion when you start combining PDF documents is page numbering. If the documents you are adding together already have their own page numbering system, you can end up with a confusing mishmash of page numbers . Although it is possible to change the page number of PDF pages (more on that a bit later in this chapter), it is much easier to work out the page numbering system in the original document prior to making PDFs.
If I am using an Acrobat and PDF document as a vehicle to combine document pages from several different sources (as I often do when I make manuals), I create alphanumeric sections such as A-1 through A-25, B-1 through B-34, etc. I assign a different alpha section to each document source. This way if I choose to add or delete pages from any specific section, I do not create a renumbering nightmare for the combined final PDF document.
| |
Depending upon where you are and what you are doing, you can use either of these menus or the shortcuts.
Inserting Pages
To insert pages, follow these steps ”and be mindful of the suggestion in the sidebar on page numbering:
-
Open the PDF document that you would like to serve as the base document to which you would like to add pages.
-
Choose Insert Pages using one of the methods offered above. A window will appear (Figure 7.2) asking you to locate and select a PDF document for addition.
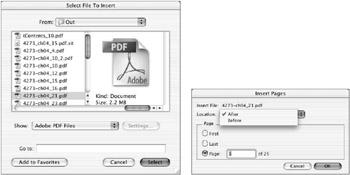
Figure 7.2: Inserting pages into a PDF -
Select the PDF file you would like to add to the base document and click OK. An Insert Pages window will appear.
-
Determine where you would like your PDF document to be added ”After or Before the First or Last page or a specific page number ”and indicate this using the Location menu and the Page buttons .
-
Click the OK button and the new document will be added to the base document. The new page count will be updated at the bottom of the Document pane.
Deleting Pages
Acrobat 6 offers two methods of deleting pages. You can designate numerically a range of pages to be deleted or you can delete a selected set of pages.
If you have a simple page-deletion task of one or more consecutive pages, then follow these steps to delete a numeric range of pages:
-
Open the PDF document from which you would like to delete pages.
-
Save your document prior to making any deletions, so you can return to the last undeleted state if you want to.
-
Select Delete Pages using one of the methods offered above. A Delete Pages window will appear (Figure 7.3).
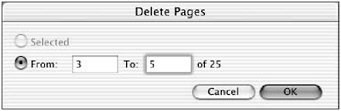
Figure 7.3: Deleting a page range -
Click the From button.
-
Designate the range of pages (here, pages 3 to 5) you would like deleted.
-
Click the OK button to delete the pages.
If you have a more complicated task of deleting nonconsecutive pages or several sets of PDF document pages, then follow these steps for deleting selected pages:
-
Open the PDF document from which you would like to delete pages.
-
Save your document prior to making any deletions, so you can return to the last undeleted state if you want to.
-
Activate the Navigation pane (Figure 7.4) by clicking the Pages tab (A).
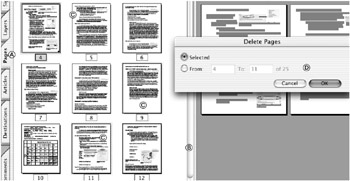
Figure 7.4: Deleting selected pages -
Expand the Pages tab until you can see all the pages you would like to delete, by dragging the divider (B).
-
From the Pages tab, select the pages you would like to delete. Use Shift+click for consecutive page selections, and Shift+
+click/Shift+Ctrl+click for nonconsecutive pages. I have selected pages 4, 9, and 11 here (C). -
Choose Delete Pages using one of the methods offered above; I prefer for speed reasons to use the keyboard shortcut Shift+
+D/Shift+Ctrl+D. The Delete Pages window will appear (D). -
The Selected button should be preselected, and a range of pages from which the deleted pages will be taken should be indicated in the From and To fields even though this section is inactive. Click OK.
Extracting Pages
Acrobat allows you to extract, as well as delete, pages to create separate documents. This is particularly useful when you want to use a single PDF page by itself (or range of pages), such as when you want to use a price sheet or order form out of a document.
-
Open the PDF document from which you would like to extract pages.
-
Use the Pages tab (as we did in the preceding section) to select the range of pages you would like to extract.
Note You can select only continuous pages for extraction.
-
Select Extract Pages using one of the methods offered above. A window will appear asking you to designate those PDF document pages you would like to extract as a separate document (Figure 7.5).
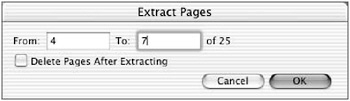
Figure 7.5: Extracting a page range -
Select the range of pages you would like to extract (4 to 7 here).
-
Decide whether you also want these pages to be deleted from the original document after extraction; check Delete Page After Extraction if you do.
-
Click OK. A new PDF document will be created.
-
Save this extracted document with a new name .
Replacing Pages
Acrobat allows you to replace single or multiple pages in a PDF document. This is useful when you want to swap out pages that change periodically, such as price sheets, without having to redo the entire document.
-
Open the PDF document in which you would like to replace pages.
-
Use the Pages tab (as we did in the preceding sections) to select the range of pages you would like to replace. (Figure 7.6 shows a price sheet on page 26 being replaced.)
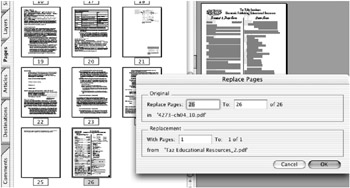
Figure 7.6: Replacing selected pages
PDF Page Sizes and Orientations Because each page in a PDF document is a completely separate element from all the other pages, you are not limited to a specific size or orientation of your pages. Documents of any size or orientation can be added to documents containing other sizes and orientations of pages. For instance, you can easily add an 11 ³ —17 ³ Landscape PDF page to a PDF document that contains mostly 8.5 ³ —11 ³ Portrait pages. Be careful when you print a document with various page sizes and orientations, because the various pages will need to be printed with settings to suit their specific sizes and orientations.
-
Choose Replace Pages using one of the methods offered at the start of the chapter. A Select File With New Pages dialog will appear, asking you to designate the source PDF document containing the pages you would like to put into the original PDF.
Note The document you choose here will remain unaffected.
-
Select the replacement document and click Select. A Replace Pages window will appear, showing the Original page and the Replacement document page that will be used in the replacement process (Figure 7.6).
-
Check to make sure the Replace Pages window is correct; then click OK.
-
Save your original document with its replaced pages to complete the process.
Cropping and Rotating Pages
The page-based nature of PDF documents once again pays a benefit if you want to crop and rotate pages. Each page in a PDF document can be cropped or rotated on its own. To crop one or more pages, follow these steps:
-
Using the Pages tab, navigate to the page(s) you would like to crop.
-
Using the
/Ctrl and/or Shift keys plus clicking, select discontinuous or continuous pages. -
Activate the Crop Pages command either by pressing
/Ctrl+Shift+T or by selecting Crop from the Options menu in the Pages tab (Figure 7.7). The Crop Pages window will appear (Figure 7.8). 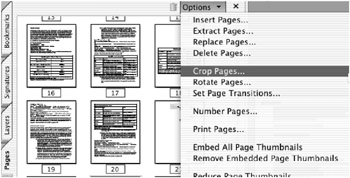
Figure 7.7: Choose the Crop Pages command.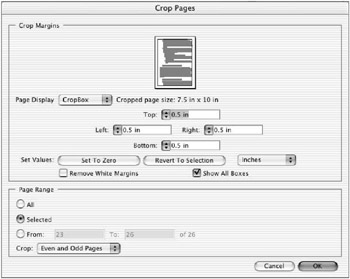
Figure 7.8: Crop Pages dialogNote You can also use Document > Pages > Crop, but it is typically slower if you are already in the Pages tab.
-
Configure the Crop Pages window to suit your needs. The results of your selections will appear in the thumbnail preview at the top of the dialog:
Page Display Select whether you want the Crop, Bleed, Trim, or Art box displayed.
Top, Left, Right, Bottom Indicate the size of the crop that you would like on all four sides. You can have a different crop value on each side.
Remove White Margins If you select this check box, the cropping amount will be decided for you. We will use this feature when we discuss creating presentations in Chapter 8, Building Presentations and Forms.
Page Range Indicate the page or range of pages to be cropped. If you have preselected pages in the Pages tab, those pages will be already indicated in the From and To fields.
Rotating Pages
To rotate pages, follow these steps:
-
Using the Pages tab, navigate to the page(s) you would like to rotate.
-
Using the
/Ctrl and/or Shift keys plus clicking, select discontinuous or continuous pages. -
Activate the Rotate command either by pressing
/Ctrl+Shift+R or by selecting Rotate from the Options menu in the Pages tab. The Rotate Pages window will appear (Figure 7.9). 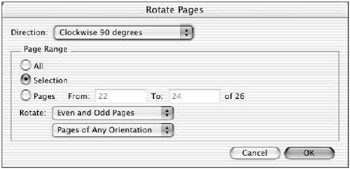
Figure 7.9: Rotating selected pages -
Configure the Rotate Pages window to suit your needs:
Direction Select the direction of rotation: Counterclockwise 90 Degrees, Clockwise 90 Degrees, or 180 Degrees.
Page Range Identify the pages to be rotated. If you have preselected pages in the Pages tab, those pages will be already indicated in the From and To fields.
Rotate Select Even Pages Only or Odd Pages Only if you want to constrain the action to one type of page. Select a specific orientation if you would like to rotate only Portrait or only Landscape pages.
Changing Page Order
The order of page occurrence in a PDF document can be easily changed. And because of the independent nature of each PDF document page, you can reorder the pages to your heart s content without fear of damaging the PDF document. Here are some tips on how to do this fast:
-
Perform a Save As to create a copy of your document.
-
Click the Pages tab (Figure 7.10) to activate the thumbnail views of the pages.
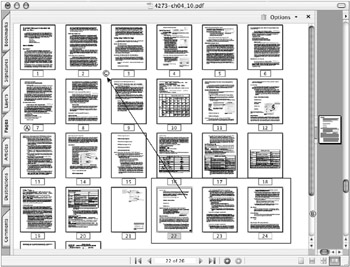
Figure 7.10: Reordering pages -
Expand the Navigation pane (A) by dragging the scrollbar divider (B) until you can see all the pages you want to move.
-
Select the page(s) you want to move. (Use Shift+click to select a continuous range of pages and
/Ctrl+click to select discontinuous pages.) -
Hold down the mouse, click, and drag the selected pages to their new location in the document. Drag the selection(s) between the pages where you want to move them (C). Here, pages 22 “24 are being moved to follow page 8.
-
When your reordering is complete, save the document to make the changes permanent.
| Note | If you reorder numbered pages, their page number sequence will be out of order. If you plan to reorder pages in a PDF document, you might want to refrain from assigning the original document page numbers. |
Renumbering Pages
Acrobat allows you to add and/or change the page numbering system that Acrobat uses when it numbers pages. By default Acrobat will automatically number pages sequentially starting with page #1. It is important to distinguish between Acrobat s page numbering system and any original document page numbering that may be used. For instance, if your PDF is a book with front matter that uses a standard lowercase Roman numeral system ”i, ii, iii, etc. ”then your Acrobat page numbering will not match your original document page numbering.
Acrobat allows you to change the Acrobat page numbering to match the original document numbering system. Here s how:
-
Once again the Pages tab can be a big help here. Using the Navigation pane, navigate to the page(s) you would like to renumber.
-
Shift+click the continuous ranges of pages you would like to renumber ”in Figure 7.11, I ve selected pages 1 “6.
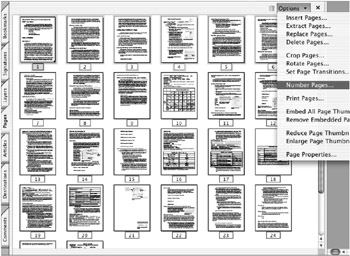
Figure 7.11: Page numbering command and the Pages view -
Choose Number Pages from the Options menu in the Pages tab. The Page Numbering dialog (Figure 7.12) appears.
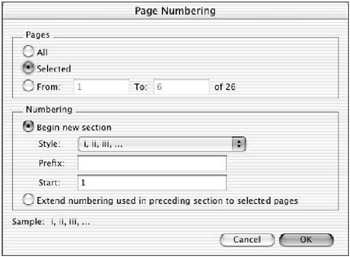
Figure 7.12: Page Numbering window -
Configure the dialog to suit your needs:
Pages Select the range of pages you want to renumber. If you have already selected pages in the Pages tab, they will be preselected here and the Selected button will be active.
Numbering - Style Select the style you would like to use. Here, I have selected lowercase Roman numerals.
Numbering - Prefix If you want your page numbering to have a prefix such as A “, enter the prefix here.
Numbering - Start Enter the first page number for the renumbering here. If you have preselected the page sequence you want renumbered in the Pages tab, the first (current) page number of that sequence will be already entered here.
-
Click OK.
-
Now click the first page of the document in the Pages tab, and check the numbering field in the Status bar. It will now indicate i (1 of 26), showing the renumbered page symbol (i) and the absolute page number (1) as well as the total number of pages in the document (26).

See the later section on adding elements to PDF documents to learn how you can add page numbers to a PDF document, instead of reordering them.
EAN: 2147483647
Pages: 102