Fine-Tuning Distiller Settings for Your PDF Purpose
In some circumstances the Distiller Default Settings give you almost what you want. Distiller Default Settings are completely customizable through editing some 72 Distiller setting values. Here we will discuss two of the more common fine-tuning adjustments you may want to make to your Distiller settings. Learning how to adjust these two Distiller settings will provide you with a good introduction into customizing Distiller settings.
Creating Small PDFs for the Web with Font Integrity Preserved
The Smallest File Size Distiller Default Setting produces a small PDF that will travel nicely across the Web. The only disadvantage of this choice is that the font files used to create the original document are not included in the PDF, so your typesetting integrity may not be preserved. This is because Acrobat Multiple Master font files may be used to create substitute font characters whenever your PDF is opened. This is particularly true if you use nonstandard fonts. So if you want to create a PDF that is small but will always use your font files, here is how to create a Distiller setting to do just that:
-
Launch Distiller 6.
-
Open the Default Settings menu (shown back in Figure 4.1) and choose Smallest File Size. This will define the basic set of Distiller values, which we will now fine-tune.
-
Click the Settings menu and choose Edit Adobe PDF Settings (or use the keyboard shortcut
 /Ctrl+E). The Adobe PDF Settings: Smallest File Size dialog will appear.
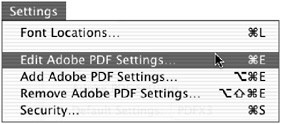
-
Click the Fonts tab (Figure 4.5).
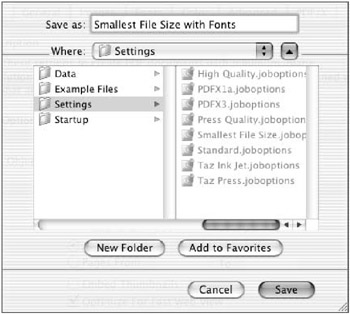
Figure 4.5: Opening the Distiller Smallest File Size setting Fonts tab -
The Embed All Fonts check box near the top of the window is, by default, unchecked. Check this box to ensure that Distiller will embed all the font files that were used in the creation of this document, which will, in turn , prevent any font file substitution later on.
-
Click the Save As button at the bottom of the Fonts tab. A Save As dialog will appear with the Distiller Settings folder automatically located (Figure 4.6).
Figure 4.6: Distiller Save As Settings dialog -
Type in a name for the new/edited setting you have just created. Create a logical name that will clearly inform you later what the setting contains. Here I have labeled the setting Smallest File Size with Fonts.
-
Click Save. This will save your new setting in the Distiller Settings folder, thereby making it available as a choice in the Distiller Default Settings menu.
-
Now return to the main Distiller window. Open the Distiller Default Settings menu. It will contain your newly created Distiller setting (Figure 4.7).
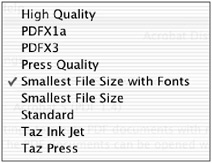
Figure 4.7: Updated Distiller Settings menu
| |
Documents in which standard fonts such as Arial or Helvetica and/or Times or Times New Roman are used in the original document will likely look similar in the font-substituted PDF. This is because the Acrobat Multiple Master fonts (see Chapter 2, Document Construction and Preflighting, for more information on these), which are used for PDF substitution, simulate these font typefaces fairly well. If you use typefaces that are significantly different from the Arial, Helvetica, Times, Times New Roman pair, the final PDF font characters will likely look quite different from the originals .
| |
Creating PDFs that Prevent Alteration of the Graphics
The Press Quality, High Quality, and the two PDFX Distiller Default Settings all are set up to produce high-quality PDFs. But even these higher-quality settings are set up to downsample the resolution of images that are greater than 450 ppi, and they will apply minimal compression to your images. There may be times when you want to make sure that no alteration of your images occurs during distilling. This might be for use in prepress or when you have already sampled and compressed your images with specific characteristics to control their appearance on the Web. If you want to make sure that Distiller does not alter the resolution or apply any compression to your images, here s how to do it:
-
Launch Distiller 6.
-
Click the Default Settings menu (shown back in Figure 4.1) and choose one of the higher-quality settings (Press Quality, High Quality, or one of the two PDFX menu choices). We will start with the Press Quality Default Setting here. This will define the basic set of Distiller values that we will now fine-tune.
-
Click the Settings menu and choose Edit Adobe PDF Settings (or use the keyboard shortcut
/Ctrl+E). The Adobe PDF Settings: Press Quality window will appear. -
Click the Images tab (Figure 4.8). You will notice the following default resolution and compression settings:
Image Type
Resolution Downsampling
Compression
Color images
Downsample to 300 if above 450
JPEG (Auto) Maximum Quality
Grayscale images
Downsample to 300 if above 450
JPEG (Auto) Maximum Quality
Monochrome images
Downsample to 1200 if above 1800
CCITT
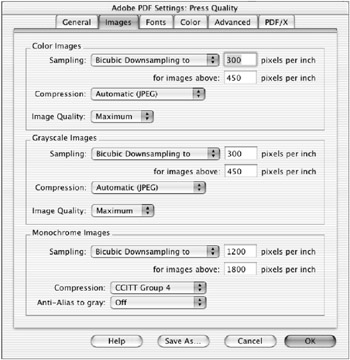
Figure 4.8: The original Distiller Press Quality setting Images tab -
To disable any sampling or compression of any of the images, select Off from each of the six Sampling and Compression menus, as shown in Figure 4.9. After completing Step 5, all of the Sampling and Compression menus should register Off. This will prevent Distiller from altering the resolution of, or applying any compression to, your images.
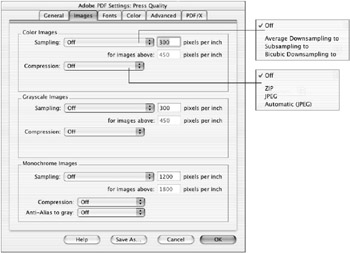
Figure 4.9: The customized Press Quality setting Images tab
Disabling Image Sampling and Compression Disabling image sampling and compression will preserve the original quality of your graphics, but it will also substantially increase the size of your final PDF files. Be extra careful when creating your graphics and preflighting your documents to make sure that you have controlled the size of your images by assigning just enough resolution to your images to output at their best quality but not much more. Few output devices will require more than 300 ppi for contone images or 1200 ppi for detailed line art. And remember that you should scale your images to 100 percent for final placement in your page layout documents prior to making your PDFs, for best results and fastest RIPping.
-
Click Save As; a dialog will appear with the Distiller Settings folder automatically located.
-
Type in a name for the new/edited setting you have just created. Create a logical name that will clearly inform you later what the setting contains. Here I have labeled the setting Press Quality NO Image Change.
-
Click Save. This will save your new setting in the Distiller Settings folder, thereby making it available as a choice in the Distiller Default Settings menu.
-
Now return to the main Distiller window. Open the Distiller Default Settings menu. It will contain your newly created Distiller setting (Figure 4.10).
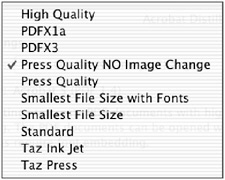
Figure 4.10: Updated Distiller Default Settings menu
| Note | When I scale my computer monitor/screen grabs/shots, I allow the resolution to vary without constraint so that no interpolation-based degradation of my screen shots occurs. Turning off sampling in Distiller, as we have done here, will maintain that resolution, which will in turn guarantee the best-quality screen shots. |
We have covered two of the most common customized settings in Distiller, font embedding and control of resolution and compression of included images. As I mentioned, there are over 70 customizable Distiller settings in the six Distiller Default Setting tabs.
PDF for Special Uses
PDFs can be created for just about any special use. If you are preparing PDFs for a specific or specialized use, the key to success is to ask yourself what the main characteristics of that use are and then be sure to create your PDFs to cater to those needs. Below are a few specialized PDFs with discussion of key PDF creation considerations.
PDFs for Archiving
Paper documents can be converted into PDFs for archiving and access through Acrobat with the use of a special paper capture application known as Adobe Capture. Additionally, a companion series of four plug-in utilities, known as Capture Agent Pack, provides batch control compression, forms, tagging, and security for long and/or multiple documents. Adobe Capture and its companion Capture Agent Pack Utilities can be purchased through the Adobe website: www.adobe.com/PDF.
PDFs for Engineering
Some engineering documents, with all of their multiple layers of drawings, can be saved from some native applications, such as AutoCAD and Visio, with their layers intact. These layers can be opened and viewed in Acrobat. Check your drawing application for instructions on saving your drawing documents as PDF with the layer included. (See the section Using Layers in Acrobat in Chapter 7 for more information on working with these layers in Acrobat. One of the key considerations when saving CAD-type drawing documents is preserving the variable and thin line weights that are often created in CAD-type drawings. These variable and thin-weight lines are often altered and/or lost when converting to PostScript-based file formats such as EPS, so special care should be taken to make sure these line characteristics are preserved. Going directly to PDF rather than through an intermediate stop in EPS format often does the trick. Test and check your PDFs to be sure CAD lines are not altered .
PDFs for Multimedia and Online PDFs
Multimedia-oriented PDFs usually involve the linking of several PDFs. Publishing or distributing these PDFs with cross-document indexes will make these PDFs more accessible and useful. In addition, if your multimedia PDFs are to be distributed online, you will want to make sure that you consider the total size of your multiple files, because sound and video clips, as well as the combined size of the multiple-host PDFs, can grow quickly. Compression and subsampling of sound and video clips, as well as the reduction of the size of your PDF documents, is definitely in order. (See the section Creating a Searchable Index in Chapter 7 for information on index creation and Reducing and Simplifying PDFs in Chapter 12 for more on reducing the size of PDF documents.)
EAN: 2147483647
Pages: 102