Section 2.2. Building a View with Web MVC
|
|
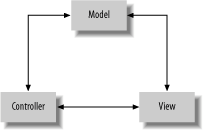
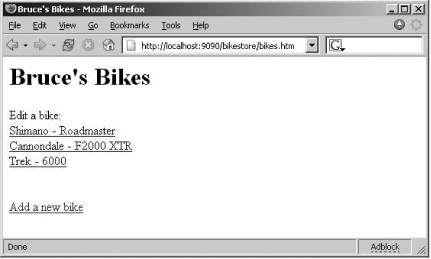
2.2. Building a View with Web MVCIn this example, you'll build a simple web-based user interface with Spring's Web MVC framework. You'll use the code that you've accumulated for RentABike for the business logic, you'll use Spring to help you organize and configure the application, and you'll deploy it on Tomcat. If you've done this for any length of time, you probably recognize that you're barreling down a trail that will break your frame if you're not careful. This simple application is not the ideal structure for a web application. Changes in the application will trickle through the view, and changes in the view will require significant updates to your models. Experience has shown that it's better to have a model, view, and controller layer, with a variation of the model/view/controller (MVC) design pattern called model2, shown in Figure 2-1. This is the design that you'll be using in Spring's Web MVC, or most other MVC frameworks. Figure 2-1. It's best to separate web applications into three distinct components: model, view, and controller 2.2.1. How do I do that?Like Struts, Web MVC lets you build applications with three distinct layers: the model, view, and controller. You'll also need to configure what you've done. Since you've already developed the model with the business logic (you'll specify the façade as your model), you're free to first concentrate on the view. 2.2.1.1 The JSPsFor now, the view will be a thin JSP layer that lets you pick a bike from a list, then remove or edit it. You'll use another screen to add or edit bike information. We aren't focusing on formatting, since we're primarily interested in Spring's role. You'll use standard JSTL (available at http://java.sun.com/products/jsp/jstl/, or packaged with Spring). Add standard.jar, jstl.jar, c.tld and fmt.tld to your war\WEB-INF\lib folder. You'll link them through an include.jsp page which contains just the following two lines: <%@ taglib prefix="c" uri="http://java.sun.com/jstl/core" %> <%@ taglib prefix="fmt" uri="http://java.sun.com/jstl/fmt" %> Example 2-6. bikes.jsp<%@ page import="com.springbook.*"%> <%@ include file="include.jsp" %> <html> <head> <title> <c:out value="${rentaBike.storeName}"/> </title> </head> <body> <h1><c:out value="${rentaBike.storeName}"/></h1> Edit a bike: <br/> <c:forEach items="${rentaBike.bikes}" var="bike"> <a href="editBike.bikes?bikeSerialNo=<c:out value="${bike.serialNo}"/>"> <c:out value="${bike.manufacturer}"/> - <c:out value="${bike.model}"/><br/> </c:forEach> <br/><br/> <a href="newBike.bikes">Add a new bike</a> </body> </html>This page will have a reference to an instance of RentABike to query for values. The JSTL tags <c:out> and <c:forEach> are used to query the properties of the RentABike implementation. Example 2-7 is the JSP that adds a new entry or edits an old one. Example 2-7. editBike.jsp<%@ page import="com.springbook.*"%> <%@ include file="include.jsp" %> <html> <head> <title> Edit Bike </title> </head> <body> <h1>Edit Bike</h1> <form method="POST" action="submitBike.bikes"> <table border="1" cellspacing="2" cellpadding="2"> <tr> <td align="right">Manufacturer:</td> <td> <input type="text" name="manufacturer" value="<c:out value="${bike.manufacturer}"/>"> </td> </tr> <tr> <td align="right">Model:</td> <td> <input type="text" name="model" value="<c:out value="${bike.model}"/>"> </td> </tr> <tr> <td align="right">Frame:</td> <td> <input type="text" name="frame" value="<c:out value="${bike.frame}"/>"> </td> </tr> <tr> <td align="right">Serial Number:</td> <td> <input type="text" name="serialno" value="<c:out value="${bike.serialNo}"/>"> </td> </tr> <tr> <td align="right">Weight:</td> <td> <input type="text" name="weight" value="<c:out value="${bike.weight}"/>"> </td> </tr> <tr> <td align="right">Status:</td> <td> <input type="text" name="status" value="<c:out value="${bike.status}"/>"> </td> </tr> </table> <input type="submit" value="Submit"> </form> </body> </html>Once again, you can use the standard <c:out> JSTL tags to output properties from an object, this time a Bike. If the Bike reference is empty, the tags will output the empty string, not throw an exception, which is precisely what you want. This way, if the page receives a Bike to edit, the fields will be filled in appropriately, and if it is used to add a new bike, then the fields will be empty when rendered. 2.2.1.2 The controllersFor Web MVC, you'll have one controller for every screen. Each controller will return a model and view combination. It's customary to use a façade layer as your model. First, Example 2-8 gives the controller that lets you choose a bike. Example 2-8. BikesController.javapackage com.springbook; import org.springframework.web.servlet.mvc.Controller; import org.springframework.web.servlet.ModelAndView; import javax.servlet.http.HttpServletResponse; import javax.servlet.http.HttpServletRequest; public class BikesController implements Controller { private RentABike facade; public RentABike getFacade( ) { return facade;} public void setFacade(RentABike facade) { this.facade = facade; } public ModelAndView handleRequest(HttpServletRequest request, HttpServletResponse response) throws Exception { return new ModelAndView("bikes.jsp", "rentaBike", facade); } }This controller merely forwards the user to the bikes.jsp page and hands a reference to the RentABike implementation provided by Spring. Next, Example 2-9 shows the controller that lets you add or edit a bike. Note: This class looks like it uses a servlet interface. It doesn't. Unlike controllers from Struts, Spring controllers implement an interface. This design makes it easer test with a technique called mocking. Example 2-9. EditBikeController.javapackage com.springbook; import org.springframework.web.servlet.mvc.Controller; import org.springframework.web.servlet.ModelAndView; import javax.servlet.http.HttpServletRequest; import javax.servlet.http.HttpServletResponse; public class EditBikeController implements Controller { private RentABike facade; public RentABike getFacade( ) { return facade; } public void setFacade(RentABike facade) { this.facade = facade; } public ModelAndView handleRequest(HttpServletRequest request, HttpServletResponse response) throws Exception { if(request.getParameter("bikeSerialNo") == null) { System.out.println("bikeSerialNo was null"); return new ModelAndView("editBike.jsp"); } else { System.out.println("bikeSerialNo == " + request.getParameter("bikeSerialNo")); Bike bike = facade.getBike(request.getParameter("bikeSerialNo")); return new ModelAndView("editBike.jsp", "bike", bike); } } }This controller checks the inbound request to see if it contains a parameter called bikeSerialNo. If such a parameter exists, then it represents a request to edit an existing bike and as such, an implementation of RentABike will be used to fetch the appropriate bike, which will then be handed off to editBike.jsp. Conversely, if the parameter does not exist, then this request is to create a new bike, and all the fields on bikes.jsp will remain blank. Finally, Example 2-10 gives the controller that lets you submit the new or updated bike. Example 2-10. SubmitBikeController.javapackage com.springbook; import org.springframework.web.servlet.mvc.Controller; import org.springframework.web.servlet.ModelAndView; import javax.servlet.http.HttpServletRequest; import javax.servlet.http.HttpServletResponse; public class SubmitBikeController implements Controller { private RentABike facade; public RentABike getFacade( ) { return facade; } public void setFacade(RentABike facade) { this.facade = facade; } public ModelAndView handleRequest(HttpServletRequest request, HttpServletResponse response) throws Exception { Bike bike = new Bike(request.getParameter("manufacturer"), request.getParameter("model"), Integer.parseInt(request.getParameter("frame")), request.getParameter("serialNo"), Double.parseDouble(request.getParameter("weight")), request.getParameter("status")); facade.saveBike(bike); return new ModelAndView("bikes.jsp", "rentaBike", facade); } }This final controller takes the inbound parameters from the request to create an instance of Bike with the appropriate values and then save it to the RentABike. The user is then returned to the original bikes.jsp page, where the list of bikes will reflect the new state of the database. 2.2.1.3 The contextWithin the context, you'll wire together the model, façade, and UI. You'll want to specify the controller and view objects. You'll also need to configure a special object, called a dispatcher, within the configuration. First, you'll need to register the top-level dispatcher and your new taglibs with Tomcat in web.xml (Example 2-11). Example 2-11. web.xml<!DOCTYPE web-app PUBLIC "-//Sun Microsystems, Inc.//DTD Web Application 2.2//EN" "http://java.sun.com/j2ee/dtds/web-app_2_2.dtd"> <web-app> <taglib> <taglib-uri>http://java.sun.com/jstl/core</taglib-uri> <taglib-location>/WEB-INF/lib/c.tld</taglib-location> </taglib> <servlet> <servlet-name>rentaBikeApp</servlet-name> <servlet-class> org.springframework.web.servlet.DispatcherServlet </servlet-class> <load-on-startup>1</load-on-startup> </servlet> <servlet-mapping> <servlet-name>rentaBikeApp</servlet-name> <url-pattern>*.bikes</url-pattern> </servlet-mapping> </web-app> Notice also that you have now defined a new URL suffix (.bikes) for use with the application. Any URL ending with .bikes will be passed in to the rentaBikeApp servlet. Next, build a Spring context in \war\WEB-INF\ called rentaBikeApp-servlet.xml, which has your controllers and views in it. Later, you'll add forms and validation as well, but we'll quit here for now (Example 2-12). Example 2-12. rentaBikeApp-servlet.xml<beans> <bean > <property name="storeName"><value>Bruce's Bikes</value></property> </bean> <bean > <property name="facade"><ref bean="rentaBike"/></property> </bean> <bean > <property name="facade"><ref bean="rentaBike"/></property> </bean> <bean > <property name="facade"><ref bean="rentaBike"/></property> </bean> <bean <property name="mappings"> <props> <prop key="/bikes.bikes">bikesController</prop> <prop key="/editBike.bikes">editBikeController</prop> <prop key="/newBike.bikes">editBikeController</prop> <prop key="/submitBike.bikes">submitBikeController</prop> </props> </property> </bean> </beans> Your Ant build.xml already has everything that you need, so you're ready to build, deploy, and run your application. Simply fire off your deploy task again. Finally, open up your browser and navigate to the virtual directory where you set up the application (for example, http://localhost:8080/bikes.bikes). You'll see the main page in Figure 2-2. Figure 2-2. Main screen for the RentABike application 2.2.2. What just happened?Though the application does not look or act much differently, you've improved the structure dramatically. You've decoupled the model from the view, so that the JSP no longer knows about the underlying structure of the application. It does not need to make an explicit call to Spring to get the application context. You'll also find that it's easier to make enhancements to add form handling and validation logic. Finally, you'll see that the new structure is much easier to test. In fact, you'll be able to call the controller directly from a test case, outside of Tomcat, and verify that the structure and content of the returned model is correct.
|
|
|
EAN: 2147483647
Pages: 90