7.3 Moving and Copying Objects between Drawings
7.3 Moving and Copying Objects between Drawings
AutoCAD has given us the ability to move or copy objects from one drawing to another as well as within a single drawing. This feature makes use of the Windows Cut & Paste or Copy & Paste commands. It also takes advantage of AutoCAD's Multiple Document Environment (MDE), which enables you to open more than one drawing at a time. (Oh, the wonders that can happen with a little cooperation!)
You've probably seen that the Copy and Move commands can be found in the Modify pull-down menu. These, of course, are AutoCAD commands. But did you notice that the Copy command is also located in the Edit pull-down menu? This command (and the other commands in this menu) belongs to Windows. It takes advantage of the Windows clipboard (Windows' method of copying and moving objects and files within and between Windows' documents). It also makes it possible to copy and move objects between AutoCAD drawing files.
The Windows method of copying requires two steps: Copy and Paste . Copy places the item(s) on the clipboard (an imaginary clipboard “ a location in your computer's memory); Paste takes it from the clipboard and puts it into your document.
The Windows method of moving also requires two steps: Cut and Paste . Cut (like Copy ) places the item(s) on the clipboard and removes the item(s) from the source location. Paste puts the item(s) into your document.
| Note | AutoCAD's command line equivalents for Windows commands are
|
Of course, the best way to understand all of this is to see it in action. Let's do an exercise.
Do This: 7.3.1 Using the MDE to Move and Copy Objects between Drawings
-
Be sure you're in star.dwg in the C:\Steps\Lesson07 folder. If not, please open it now.
-
Follow these steps.
Tools
Command Sequence
Steps

New Button
Command: new
1. Without closing the star drawing, start a new drawing from scratch.

2. The new drawing opens atop the already open star drawing. We must position them so that we can see both at one time. Pick the Window pull- down menu and select Tile Vertically , as indicated.
Notice that the two open drawings are listed at the bottom of the menu. Had you not wished to tile your drawings, you would have used these to toggle between drawings.
3. The drawings now appear side by side as shown in Figure 7.3.1.3a.
Pick anywhere in the right drawing to make it active. Notice that the title bar of the active (current) drawing is blue and the other one is gray.
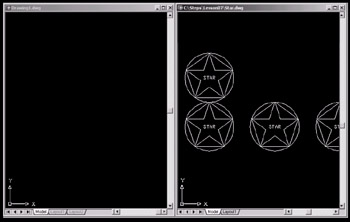
Figure 7.3.1.3a:
4. Without entering a command, place a selection window around the two circles on the left. They now appear highlighted as shown.
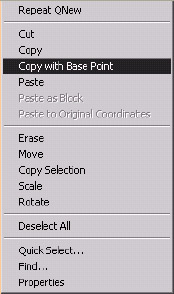
Command: copybase
5. We could use the Cpy command in the Edit pull-down menu, but the cursor menu will be more convenient . Right-click anywhere in the active document and select Copy with Base Point on the menu (the command line equivalent is Copybase ).
(Had we used the copy command, AutoCAD would have assumed a base point in the lower- left corner of the objects selected.)

Specify base point: _cen of
6. AutoCAD prompts you for the base point , select the center of the lower circle.
7. AutoCAD returns to the command line. It doesn't appear that anything has been done, but the objects are now recorded on the Windows clipboard.
Click anywhere in the drawing on the left to activate it. Notice that its title bar turns blue.
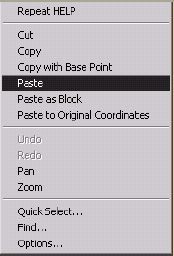
Command: pasteclip
8. Right-click to access the cursor menu. Notice that you've three Paste options. The simple Paste ( pasteclip ) will add the objects to the new drawing as though you had copied them as you did in the last section.
Paste as Block ( pasteblock ) will add the objects as a block (more on blocks in Lesson 18).
Paste to Original Coordinates ( pasteorig ) will add the objects to the new drawing at the same coordinates at which they existed in the source drawing.
Select Paste .
Specify insertion point: 7,3.5
9. Paste the objects at coordinates: 7,3.5 . The objects now appear in the new drawing.
Command: quit
10. Exit both drawings without saving.
Some things to remember about using Windows clipboard:
-
To move objects, use the Cut ( Cutclip command) option rather than the Copy or Copy with Base Point option we used in Step 5.
-
To clear the highlighting, either hit the Esc key or pick the Deselect all option from the cursor menu.
-
Using the clipboard requires a small amount of computer memory. Keep this in mind if you use a particularly slow system (not much RAM) or have problems with your computer's memory.
-
You can also use the Matchprop command from one drawing to another.
-
Hitting enter to repeat a command will repeat the last command given in the active drawing (i.e., commands are active document-specific).
-
Remember to close a drawing when you're finished with it. (Type Close or select it from the File pull-down menu.)