6.5 Un-Ohs, Boo Boos, Ah s: The Miracles of CHProp and the Object Property Manager
6.5 Un-Ohs, Boo Boos, Ah $%&#s: The Miracles of CHProp and the Object Property Manager
6.5.1 The Old Way: Changing Properties with CHProp
You'll soon discover that perhaps the easiest mistake to make in AutoCAD is drawing an object on the wrong layer. You get into a flow with your drawing and simply forget or overlook the necessity of changing layers . The same will hold true if you're using the Color / Linetype method in your drawing. A good drawing flow simply doesn't allow time for changing these things on the fly.
Fortunately, AutoCAD has simple and wonderful tools to fix oversights. These include the CHProp and Properties commands.
Let's begin with CHProp . The command prompt approach looks like this:
Command: chprop
Select objects: [select an object “ AutoCAD reports :] 1 found
Select objects: [hit enter to confirm completion of the selection process]
Enter property to change [Color/LAyer/ LType/ltScale/LWeight/Thickness]: la [tell AutoCAD what you want to change]
Enter new layer name <FURNITURE>: 0 [tell AutoCAD what you want to change]
Enter property to change [Color/LAyer/ LType/ltScale/LWeight/Thickness]: [hit enter to confirm that you have finished]
As you can see, this approach allows you to change the properties of an object “ Color , Layer , Linetype ( LType ), Linetype Scale ( LTScale ), Lineweight , and Thickness . You're familiar with all these except the Thickness option. Thickness refers to 3- dimensional depth and should not be reset in a 2- dimensional drawing.
6.5.2 And Now the Modern Approach: The Object Property Manager ( Properties )
AutoCAD has created one of the most useful “ and user -friendly “ tools to come along in the last several releases with the introduction of the Object Property Manager (OPM). It takes advantage of a programming interface to provide an on-screen, editable listing of properties associated with drawing objects. For those of you who are newly computer literate, this simply means that it's really easy to change things like layers, color, linetypes , and lineweights.
The OPM appears to hover above the screen, just as the ADC did. It begins looking like Figure 6.5.2a, but the properties listed change according to the selected object.
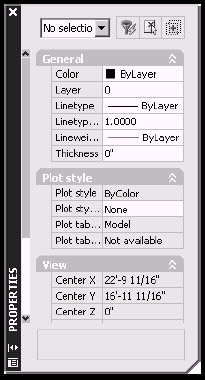
Figure 6.5.2a:
Let's take a look.
-
Notice the control box at the top of the window. You can use this box to select the type of objects in the drawing to edit. Alternately, you can select an object in the drawing and that object will show in the control box.
-
The Quick Select button next to the control box allows you to filter the drawing for objects to edit.
-
The Select Objects button (to the immediate right of the Quick Select button) presents a Select objects prompt on the command line. You can use this to select specific objects whose properties will appear in the OPM. (You can also select the objects without using the Select Objects button. The results will be the same unless the Pickfirst system variable has been set to . More on Pickfirst in Chapter 16.) Note that, if you select two different types of objects, only those properties common to both will appear in the OPM.
Do you want to see the OPM in action?
Do This: 6.5.2.1 Drawing in Color
-
Open the flrpln-a.dwg file in the C:\Steps\Lesson06 folder. The dashed lines under the table have been drawn on the Furniture layer with a hidden linetype. Let's change them to the Hidden layer.
-
Follow these steps.
Tools
Command Sequence
Steps

Properties Button
Command: prop
1. Open the OPM by typing Properties , or props , at the command line. Alternately, you can pick the Properties button on the Standard toolbar or select Properties from the Tools pull-down menu.

Quick Select Button
2. Pick the Quick Select button. AutoCAD presents the Quick Select dialog box (Figure 6.5.2.1.2a).
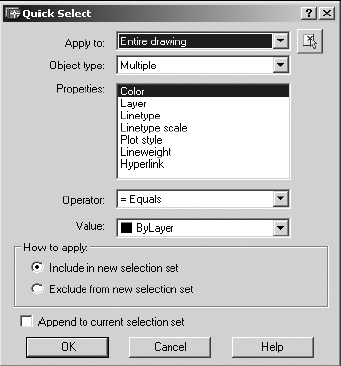
Figure 6.5.2.1.2a:
Select Objects Button
3. Pick the Select objects button. AutoCAD returns to the graphics screen and prompts you to select some objects. Select the area around the table as shown in Figure 6.5.2.1.3a.
Hit enter to complete the select set.
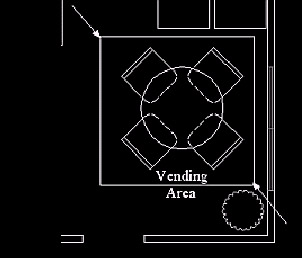
Figure 6.5.2.1.3a: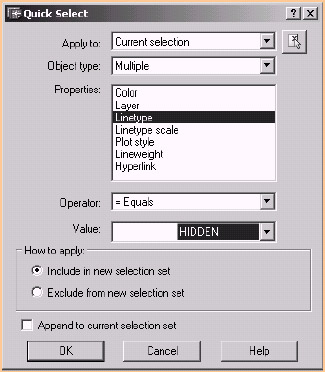
4. (Note: we'll filter multiple objects for those objects drawn with the Hidden linetype.)
Pick Linetype in the Properties list box, and then pick the down arrow in the Value control box and select Hidden , as shown.

5. Pick the OK button to exit the Quick Select dialog box.
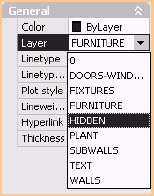
6. Change the layer of the objects as follows :
-
pick in the right column of the Layer row
-
pick the down arrow and select the Hidden layer
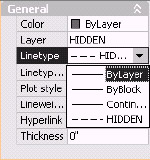
7. Follow the procedure in Step 6 to change the Linetype to ByLayer , as shown.

8. Close the OPM.
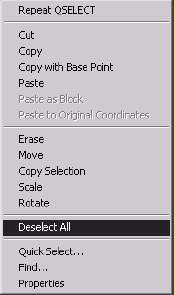
9. Deselect the objects using the cursor menu.

10. Save and close the drawing.
-
You can leave the OPM open all the time if you wish “ you can even dock it and minimize it much as you could the Design Center and the Tool Palettes; but unless you have a fairly large monitor, it may take up too much of your drawing area.
| Note | In our last exercise, we used the Quick select button to select the objects we were going to modify. Frankly, I think the Quick select approach takes longer than simply selecting the objects on the screen using a window or a pick (selection) box. Quick select works well when you must filter a large number of objects to get what you want. But otherwise , just do this:
Still too difficult? Try this: double-click on the object you wish to modify. AutoCAD will automatically open the OPM! |
- Chapter IX Extrinsic Plus Intrinsic Human Factors Influencing the Web Usage
- Chapter X Converting Browsers to Buyers: Key Considerations in Designing Business-to-Consumer Web Sites
- Chapter XIII Shopping Agent Web Sites: A Comparative Shopping Environment
- Chapter XIV Product Catalog and Shopping Cart Effective Design
- Chapter XVII Internet Markets and E-Loyalty