2.4 The Cartesian Coordinate System
Remember suffering through plane geometry back in high school math class? That was the one with the crossing number lines, four quadrants, and probably the one that you insisted to you parents, teachers , and any else who would listen that you would never use. Look at Figure 2.4a “ it's your math teacher's revenge !
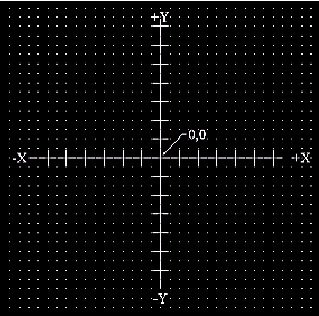
Figure 2.4a:
On the bright side, it's not nearly as difficult as a math teacher might wish. There are three axes “ X, Y, and Z. But we're only concerned with two of them in beginning AutoCAD; so the difficulty is already cut by 1/3!
The X-axis runs horizontally (left to right). Everything to the right of a point we call 0 is positive (plus). Everything to the left of the 0 is negative (minus). Thus, we now have a +X and “X directions identified. Each number of the X-axis (the axis is the line that runs through the 0) represents an X-plane. An X- plane runs infinitely up and down, crossing the X-axis.
The Y-axis runs vertically (up and down). Everything above the point we call 0 is positive. Everything below the 0 is negative. Each number on the Y-axis represents a Y-plane. A Y-plane runs infinitely right and left, crossing the Y-axis.
Are you still with me?
Okay. Where an X-plane meats a Y-plane in two- dimensional space, we've a point . We identify the point by its coordinate “ or by the number of the X-plane, followed by a comma, and then the number of the Y-plane. Remember this as X,Y (no spaces). For example, point 4,3 is found 4 spaces to the right of zero and 3 spaces above, as shown in Figure 2.4b.

Figure 2.4b:
AutoCAD provides three methods for using these coordinates: absolute , relative , and polar . The use of coordinates is your first step toward a drawing precision that was never possible using conventional drafting tools.
| Note | The X- and Y-planes also run parallel to the 3-dimensional Z-axis and might be called the XZ- and YZ-planes. But let's stick to two dimensions for now. |
2.4.1 Absolute Coordinates
The Absolute System is easiest . You simply enter absolute coordinates as X,Y whenever AutoCAD asks for a point.
Give it a try.
Do This: 2.4.1.1 Using Absolute Coordinates
-
Open drawing CCS in the C:\Steps\Lesson02 folder. Refer to Figure 2.4b.
-
Follow these steps.
Tools
Command Sequence
Steps

Command: l
1. Enter the Line command.
Specify first point: 4,3
2. Enter the first absolute coordinate.
Specify next point or [Undo]: 2,5
3. Enter the next absolute coordinate.
Specify next point or [Undo]: [enter]
4. Hit enter to complete the command.
The Absolute Coordinate System is quite easy to use, but using it means that you must know the exact X and Y value of each point you wish to use. This isn't always possible. Let's look, then, at the Relative System.
2.4.2 Relative Coordinates
Use a relative coordinate anytime after identifying the first point. (Either select the first point with the mouse, or use an absolute coordinate.) The syntax for relative coordinates is @X,Y (read, "at X,Y").
Let's give the Relative System a try.
Do This: 2.4.2.1 Using Relative Coordinates
-
Be sure you're still in the CCS drawing in the C:\Steps\Lesson02 folder. If not, open it now.
-
Erase the line you drew in the last exercise.
-
Follow these steps. (Refer to Figure 2.4.2.1a.)

Figure 2.4.2.1a:Tools
Command Sequence
Steps
Command: l
1. Enter the Line command.
Specify first point: 2,3
2. Use absolute coordinates to enter the first point.
Specify next point or [Undo]: @1,2
3. Now use relative coordinates to draw a line one space in the +X direction and 2 spaces in the +Y direction.
Specify next point or [Undo]: [enter]
4. Hit enter to complete the command.
Notice that the second point is located 1 unit to the right (a positive 1 on the X-axis) and 2 units up (a positive 2 on the Y-axis), or at 1X and 2Y from the last point identified. The point is relative to the last identified point.
Using the Relative System means you must know how far (in plus/minus terms) along each axis you want to go from where you're. You'll find this much easier than having to locate each point in absolute terms, especially on larger drawings.
2.4.3 Polar Coordinates
I find polar coordinates the most useful. But I must admit that I will use the Relative System when needed.
Like relative coordinates, you'll use polar coordinate entry after identifying the first point required. The syntax for polar coordinates is @dist<angle (at “ distance “ at an angle of “ angle ). You must know the distance and direction you wish to go from the last selected point. Remember, measure angles counterclockwise beginning at 0 °East.
Let's take a look.
(Refer to Figure 2.4.2.3a)

Figure 2.4.3.1a:
Do This: 2.4.3.1 Using Polar Coordinates
-
Be sure you're still in the CCS drawing in the C:\Steps\Lesson02 folder. If not, open it now.
-
Erase the line you drew in the last exercise.
-
Follow these steps. (Refer to Figure 2.4.3.1a.)
Tools
Command Sequence
Steps
Command: l
1. Enter the Line command.
Specify first point: 4,2
2. Use absolute coordinates to enter the first point.
Specify next point or [Undo]: @3<135
3. Now use polar coordinates to draw a 3" line at an angle of 135 °.
Specify next point or [Undo]: [enter]
4. Hit enter to complete the command.
Notice that the coordinate of the second point isn't an integer. This often happens with polar entries. Remember that you're drawing the hypotenuse of an angle. This is why I mix my use of polar coordinates with the use of relative coordinates. Sometimes I may know how long a line I need (polar coordinates); other times I know the X and Y distances (relative coordinates).
We've seen three approaches to drawing a simple line with a great deal of precision. Time now to practice.
2.4.4 Practicing with Cartesian Coordinates
Do This: 2.4.4.1 Practice
-
Begin a new drawing using Sample Template 03 found in the C:\Steps\Lesson02 folder.
-
Using the following chart, draw Figure 2.4.4.1a. (Note: Grid marks are 1 unit apart.) Draw the figure first using absolute coordinates. Erase it. Draw it using relative coordinates. Erase it. Draw it again using polar coordinates.
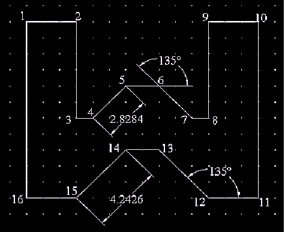
Figure 2.4.4.1a:Point
Absolute (X,Y)
Relative (@X,Y)
Polar (@dist<angle)
1
2,15
2,15
2,15
2
5,15
@3,0
@3<0
3
5,9
@0,-6
@6<270
4
6,9
@1,0
@1<0
5
8,11
@2,2
@2.8284<45
6
10,11
@2,0
@2<0
7
12,9
@2,-2
@2.8284 <315
8
13,9
@1,0
@1<0
9
13,15
@0,6
@6<90
10
16,15
@3,0
@3<0
11
16,4
@0,-11
@11<270
12
13,4
@-3,0
@3<180
13
10,7
@-3,3
@4.2426<135
14
8,7
@-2,0
@2<180
15
5,4
@-3,-3
@4.2426<225
16
2,4
@-3,0
@3<180
Back to 1
C
C
C