1.7 Creating and Using Templates
We've learned how to set up a new drawing using wizards from the Startup dialog box. But let's face it; this is a tedious procedure at best. About midway through the exercise, many students ask if "we have to do this every time." The answer is, "NO!"
You should have to set up a drawing once for each scale and sheet size you'll use. So you may have a ¼"=1'-0" drawing setup for an 11 x 17 sheet of paper, a 3/8"=1'-0" drawing for an 11 x 17 sheet, a ¼"=1'-0" for a 24 x 36, and so forth. But once set up, you should not have to set it up again regardless of how many times you may need it.
Here's how this works. Set up your drawing, but save it as a template. Then when you need to create a drawing at that scale and with those limits (on that size sheet of paper), use the template to create the drawing. Any drawing created with that template will carry the same setup as the template. But the template will never change unless you overwrite it, so you can use it repeatedly.
Now let's see if we can create a template from the MyFirstStep file we created earlier. We'll see how to use the template to start a new drawing, too.
| Note | We'll set up our template using some basic stuff “ sheet size and scale. But templates can and should also include such things as dimension and text styles, plot styles, layers , and so forth. You'll learn about these things over the course of this text. AutoCAD also provides a host of predefined templates that can also be of use with some adjustments for project-specific details. |
Do This: 1.7.1 Creating a Template
-
Open the MyFirstStep file in the C:\Steps\Lesson01 folder.
-
Follow these steps
Tools
Command Sequence
Steps
No Button Available
Command: saveas
1. Enter the Saveas command.
AutoCAD presents the Save Drawing As dialog box we examined in Do This Exercise 1.4.1.1, "Saving Your Drawing Changes."
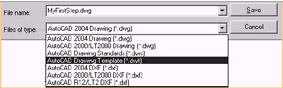
2. Pick the down arrow in the Files of Type control box and select the AutoCAD Drawing Template option.
3. AutoCAD has automatically changed the path to place the template in its own template folder. Change it back to save our template in the C:\Steps\Lesson01 folder.
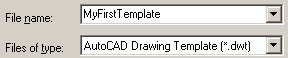
4. Change the name to MyFirstTemplate as shown.

5. Pick the Save button.

6. AutoCAD presents a Template Description dialog box. You can enter a description if you wish, but it isn't required. Pick the OK button to complete the procedure.

Command: close
7. Close the drawing template.
That was easy! Now let's create a new drawing using the template you just created.
Do This: 1.7.2 Using a Drawing Template
-
Follow these steps.
Tools
Command Sequence
Steps

New Button
Command: new
1. If you're already in AutoCAD but not at the Start Up dialog box, type new at the command prompt. (Alternately, you can hold down the control key and type n , or pick the New button on the Standard toolbar.)

Use a Template Button
2. On the Start Up dialog box, pick the Use a Template button.

3. The Select a Template list box that appears now shows several standard templates used by AutoCAD (or the CAD guru on your job may have already replaced them with job-specific templates). Normally, you would select one of these. But to find our template, we must click on the Browse button.
4. A Select File dialog box appears. This one is just like the other Select File dialog boxes we've already encountered . Follow the path to the C:\Steps\Lesson01 folder as you've done previously.
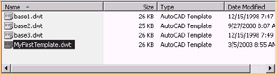
5. In the Lesson01 folder, double-click on the MyFirstTemplate file. AutoCAD launches a drawing session using the setup you created for MyFirstTemplate as the new drawing's setup.
Remember, you can use the setup in a template file as many times as you wish with this procedure. The drawing you create will contain all the information (setup, drawing, etc.) found in the template, but using the template will in no way affect the template itself.