Future Borland C Mobile Products
Creating a Mobile Application
Let's now examine the specifics of creating a mobile application. With the C++ Mobile Edition there are two ways to establish a project. Either import an existing mobile application project, such as one of the projects that can be found in the SDK installation folders, or create a brand- new project. For learning, the easiest thing to do is to import an existing SDK example. You can also load the sample Hello World project provided on the companion CD-ROM for this book. This project can found under the MadeInBorland folder for this appendix.
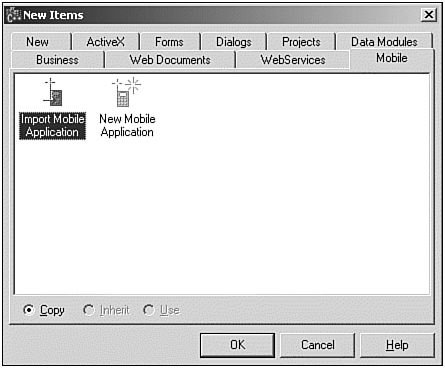
The process of establishing a mobile project within C++Builder is performed by selecting File/New/Other from the main menu, and then by selecting the Mobile Tab on the New Items dialog. This is illustrated in Figure B.3.
Figure B.3. New Items dialog ”Mobile Tab.
If you select the New Mobile Application glyph and press OK within this Dialog view, a brand-new mobile application will be generated representing a mobile dll project consisting of a .cpp and .res file. You can then begin to use the Borland text editor to code your application. Be sure to refer to the SDK documentation for details on utilizing the Symbian OS API classes.
If you select the Import Mobile Application glyph and press OK within this Dialog view, an open dialog will appear as illustrated in Figure B.4.
Figure B.4. Open dialog.
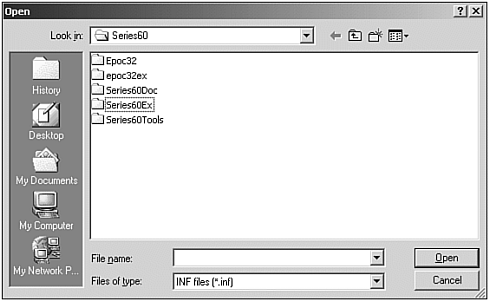
The folders ending with the Ex tag identify the available mobile examples that can be imported. The epoc32ex folder contains generic Symbian OS examples, whereas the Series60Ex folder contains examples pertinent to not only the Symbian OS but also the Nokia Series 60-based phones. Borland recommends you use the projects found in the Series60Ex folder, unless you are developing for a pen-based mobile device.
NOTE
Many of the examples contained within the epoc32ex folder were written by Symbian for use with the Symbian OS 6.1, Quartz user interface. Quartz is a pen-based UI, with a different form factor from the Series 60. Because the Series 60 Emulator presents a one-handed, buttons only interface it is nearly impossible to interact with most of the pen-based examples.
These two options, New Items dialog and Mobile Tab, illustrate how to establish a new project within C++Builder. For our purposes, we will use the Hello World mobile application provided with the companion CD to highlight the build and test process, and to understand the composition of a mobile application.
NOTE
If you're yearning for more (after we examine the Hello World application), it's recommended that you further explore and learn by importing example applications such as the Query example, which can be found with the Nokia Series 60 SDK under the Series60Ex\Query\ group folder. Select the BLD.INF file within this folder. C++Builder, in concert with the Mobile Edition plug-in, will load this project. Build and run as described in the "Building a Mobile Application" section.
Let's now look specifically how to load and build the Hello World project, and test the application using the Nokia emulator.
Loading the Hello World Example
We have already described the step of importing an existing project. The Hello World mobile application provided on the companion CD-ROM can either be loaded using this import method by selection of the BLD.INF file associated to the project, or it can be loaded directly by using the Open Project menu item and selecting the MadeInBorland_Project project group file.
If you choose the import method, you will be prompted for a Project and a Project Group filename when you go to build the project. You're free to choose any name you'd like, but keep in mind that names have already been prescribed for the project as provided on the CD-ROM.
Building a Mobile Application
One of the first steps in building a mobile application is to make sure the project options are set properly. The project options dialog for the C++ Mobile Edition is shown in Figure B.5.
Figure B.5. Project Options dialog ”Preferences Tab.
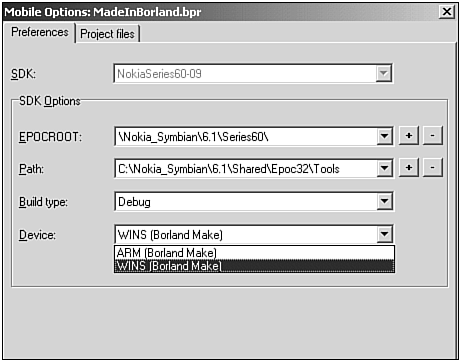
You'll notice that the project options dialog is quite a bit different from the project options dialog associated with a typical C++Builder application. At this stage, C++ Mobile Edition is dependent on the Symbian and Nokia tools and scripts and less reliant on its own utilities. Furthermore, the Symbian OS is a different animal than Windows and requires fewer settings.
To test our mobile application locally on a Windows platform, we need to set the target Device type to WINS and the Build Type to Debug .
WINS identifies that a Windows OS will be used to host the mobile application, in other words the application will be compiled to run on the emulator. To test an application on a simulator or deploy to a mobile device, the Target you must select within the build options is the ARM target. ARM identifies the type of processor utilized by the mobile device. A Nokia 3650, for example, uses an ARM-based processor. When you select the ARM target, C++Builder will actually use the GNU ARM C++ compiler provided with the Symbian SDK to compile the source code, and the Symbian OS utilities to link the project.
After the mobile project options are set, we can now build the mobile application. Under the Project menu within the IDE, select the Build menu item pertaining to the loaded project. Then, you will see C++Builder's Compiling dialog identifying the various phases of the build process within the Status field. When it's complete, you should see a "Project Build Successful" status.
WARNING
When creating a new project, consider saving the project beneath the EPOCROOT folder. Otherwise, the mobile project might not compile and load properly within the Nokia emulator.
Testing the Application
You're now ready to test run the Hello World mobile application. This is achieved simply by selecting the Run button on the C++Builder IDE toolbar. The Nokia emulator will begin to load. The load is complete after you see the main menu for the Nokia emulator appear as illustrated in emulator phone display on the left side of Figure B.6.
Figure B.6. Nokia Emulator ”Displays.
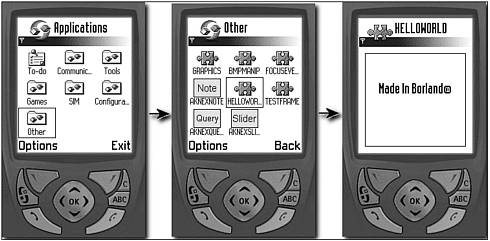
This figure illustrates how to access the Hello World application that was built within the C++Builder IDE and loaded by the Nokia emulator. From the main menu within the Nokia emulator, select the Other glyph using the O keypad button, and then select the HelloWorld glyph, which represents the Hello World application.
TIP
Occasionally, a project that has been built and loaded within the emulator might not reflect future changes if it is modified and rebuilt again within the C++Builder IDE. In these circumstances, you can delete the folder representing the mobile application that was built from the Symbian OS System folder. To locate this folder, go to where the Symbian SDK was installed and trace down the following path :
Series60\Epoc32\Release\winsb\UDEB\Z\SYSTEM\apps
You should then see a list of folders, one of which represents your application. Simply delete the specific folder representing your mobile application and rebuild it within C++Builder. The folder will then be regenerated and when you run the Nokia emulator the updated application should appear with the Other menu.
WARNING
If you modify a file related to your mobile project, selecting Run will not necessarily automatically rebuild the project. Instead, select either Make or Build prior to selecting Run .
| |
| Top |