Programming Security
So far, you have looked at declarative security, but what about programmatic security? Well, as matter of fact, COM is implicitly making calls into its security API for us.
What happens is that under the hood, COM reads the settings stored in the registry and calls the CoInitializeSecurity() function.
CoInitializeSecurity() is called exactly once for each process that uses COM, establishing process-wide security settings. It configures the security packages that will be used by COM, the authentication level for each process, and which users will be allowed access to the object.
CoInitializeSecurity Function Parameters
CoInitializeSecurity() is, by far, the most important COM security API function and has the following parameters:
PSECURITY_DESCRIPTOR pVoid, //Points to security descriptor LONG cAuthSvc, //Count of entries in asAuthSvc SOLE_AUTHENTICATION_SERVICE * asAuthSvc, //Array of names to register void * pReserved1, //Reserved for future use DWORD dwAuthnLevel, //Default authentication level DWORD dwImpLevel, //Default impersonation level SOLE_AUTHENTICATION_LIST * pAuthList, //Authentication information for // each authentication service DWORD dwCapabilities, //Additional client and/or // server-side capabilities void * pReserved3 //Reserved for future use
Some parameters apply to both servers and clients, whereas others apply solely to clients or to servers exclusively.
The first parameter, pVoid , applies only when the process acts like a server. It's used to control access permissions, and its value can be a pointer to an AppID GUID , a SECURITY_DESCRIPTOR , or an IAccessControl interface.
If a NULL pointer value is passed on pVoid , COM will grant access to anyone . This achieves the same functionality as using DCOMCnfg to grant access permission to the built-in Everyone account. If a valid pointer is passed on pVoid , the dwAuthnLevel (fifth parameter) cannot be set to RPC_C_AUTH_LEVEL_NONE .
The second and third parameters, cAuthSvc and asAuthSvc , are also used for servers. They are used for registering the authentication packages with COM and refer to an array of SOLE_AUTHENTICATION_SERVICE structures.
The SOLE_AUTHENTICATION_SERVICE structure has the following members :
typedef struct tagSOLE_AUTHENTICATION_SERVICE { DWORD dwAuthnSvc; DWORD dwAuthzSvc; OLECHAR* pPrincipalName; HRESULT hr; } SOLE_AUTHENTICATION_SERVICE; You can pass -1 (cAuthSvc) and NULL (asAuthSvc) to use the default security packages available on the system. NTLM (NT Lan Manager) is the only authentication service available on Windows NT 4.0, but you can use Kerberos with Windows 2000.
The fifth parameter, dwAuthnLevel , is used for setting the authentication level and applies to both clients and servers. It is equivalent as setting per-server authentication level (refer to Figure 18.5) through the use of DCOMCnfg . For this parameter, the value specified by the server is the minimum allowed. The actual value used will be the higher of the client and server values. If the client calls in with a lower value, the call fails.
The sixth parameter, dwImpLevel , applies only to clients. It sets the impersonation level the client has toward the server. It is equivalent to setting the global impersonation level (refer to Figure 18.2) through the use of DCOMCnfg . The clear advantage here is that you're no longer dependent on system-wide settings; you're now in control of the impersonation level, and this per-client setting cannot be achieved by the use of DCOMCnfg .
You can choose from one of the following impersonation levels:
RPC_C_IMP_LEVEL_DEFAULT RPC_C_IMP_LEVEL_ANONYMOUS RPC_C_IMP_LEVEL_IDENTIFY RPC_C_IMP_LEVEL_IMPERSONATE RPC_C_IMP_LEVEL_DELEGATE
As you might have guessed, they're equivalent to their DCOMCnfg counterparts (refer to Figure 18.2).
The eighth parameter, dwCapabilities is used for both clients and servers to describe additional capabilities they might have. The value for this parameter can be one or more of the following bitmasks :
-
EOAC_NONE Indicates that no capability flags are set.
-
EOAC_MUTUAL_AUTH Not used. Mutual authentication is automatically provided by some authentication services.
-
EOAC_SECURE_REFS Determines that reference-counting calls must be authenticated to avoid malicious releases. Refer to Figure 18.2 for the equivalent option using DCOMCnfg .
-
EOAC_ACCESS_CONTROL Must be used when passing an IAccessControl interface pointer as an argument to the parameter pVoid of CoInitializeSecurity() .
-
EOAC_APPID Indicates that the pVoid parameter to CoInitializeSecurity() is a pointer to an AppID GUID. CoInitializeSecurity() searches the AppID in the Registry and reads the security settings from there.
Using CoInitializeSecurity
You're going to modify your sample application to completely turn off DCOM security by using CoInitializeSecurity() . This modification will make your sample application suitable for Internet access.
To accomplish this, you must allow access to anonymous users, disable authentication, and disable impersonation. It turns out that this is very simple to implement using CoInitializeSecurity() .
As stated earlier, CoInitializeSecurity() must be called only once per process just before any significant COM calls. You must make the call on both the client and server sides just after calling CoInitialize() .
To turn off security in your EasyDCOM sample, do the following:
-
Open EasyDCOM.cpp .
-
Add the following code just below the line containing the try block inside WinMain :
CoInitialize(NULL); CoInitializeSecurity(NULL, -1, NULL, NULL, RPC_C_AUTHN_LEVEL_NONE, RPC_C_IMP_LEVEL_ANONYMOUS, NULL, EOAC_NONE, NULL);
-
Add the following code above the line containing the return statement at the end of WinMain :
CoUninitialize();
-
Open EasyDCOMClient.cpp , repeat steps 2 and 3 and add the following line below the include for vcl.h :
#include <objbase.h>
Let's see what you have done.
You started by calling CoInitialize() saying that you wanted to join the main STA. Next, CoInitializeSecurity() is called with the appropriate parameters to solve your problem.
For the pVoid parameter of CoInitializeSecurity() , you passed NULL , telling COM that anyone is welcome to access your server.
For the cAuthSvc and asAuthSvc parameters, you stuck with the defaults of -1 and NULL , respectively, letting COM use the available security packages on the system.
Because you're not interested in authenticating any user calling into your object, you used RPC_C_AUTH_LEVEL_NONE for the dwAuthnLevel parameter.
For the dwImpLevel parameter, you use RPC_C_IMP_LEVEL_ANONYMOUS because you're not going to impersonate the client to discover its credentials or act on its behalf . Remember, you actually don't know who the client is.
For the dwCapabilities parameter, you just pass EOAC_NONE .
That's all; you completely turned off security for your sample application. From now on, any anonymous user will be able to make calls into your server.
NOTE
Servers using connection points over DCOM could also make use of this technique to turn off DCOM security because they will want to access the sink implemented at the client side. If you try to use an event sink over a DCOM connection, it will fail with an Access Denied error. This is because the client, now acting as a server, will verify if the caller has the necessary credentials to access its sink object. The client will try to ensure that the server account is allowed access to its sink object.
You can work around this problem by making the server account the same as the client account. In other words, the client on the client machine and the identity of the server on the server machine must use a login account with the same name and password.
The problem with this approach is that you must know beforehand what account the client will be using.
Understanding DLL Clients and Security
What if you need to implement the client for your remote server as an ActiveX control to be used inside some container such as Internet Explorer or IIS and Active Server Pages? Well, that's trouble.
An in-proc-server (DLL) is loaded into the address space of a container process and, when this happens, COM has already called CoInitializeSecurity() , explicitly or implicitly.
It doesn't matter if the container application issued the call or if COM did it based on Registry settings. Even if you call CoInitializeSecurity() in your code, it will be too late; by that time, all COM security settings are already in place.
One possible solution for this case could be the creation of an intermediary out-of-proc server (EXE) that would take care of security issues and make calls into the remote server on behalf of the ActiveX client. To the ActiveX client, this intermediary server would look like the remote server.
The bottom line is that you can't control security through the use of CoInitializeSecurity() from inside a DLL. You should keep that in mind when writing DLL clients for your remote servers.
Implementing Programmatic Access Control
You can indicate which individual users or group of users are allowed or denied access to your server by using the pVoid parameter of CoInitializeSecurity() . When providing a valid argument for this parameter, the authentication level must be at least RPC_C_AUTH_LEVEL_CONNECT ; otherwise , CoInitializeSecurity() will fail.
Now, you'll learn how to use a SECURITY_DESCRIPTOR , instead of an AppID GUID or IAccessControl interface, to supply security information using the pVoid parameter in a call to CoInitializeSecurity() .
The SECURITY_DESCRIPTOR structure has the following members:
typedef struct _SECURITY_DESCRIPTOR { BYTE Revision; BYTE Sbz1; SECURITY_DESCRIPTOR_CONTROL Control; PSID Owner; PSID Group; PACL Sacl; PACL Dacl; } SECURITY_DESCRIPTOR; Creating a security descriptor with the outdated Win32 Security API is, to say the least, arcane. C++Builder and its ATL support greatly simplify this job with a class called CSecurityDescriptor .
NOTE
Programmatic modification of access control lists (ACLs) via the Win32 Security API is a very complex procedure that requires careful coding and testing.
Beginning in Windows NT 4.0 with Service Pack 2, COM provides the IAccessControl interface. This interface, which is implemented in CLSID_DCOMAccessControl system object, is also considered an easy alternative to programming ACLs other than using the raw security API.
CSecurityDescriptor can be used anywhere a SECURITY_DESCRIPTOR structure is required, thanks to its conversion operators. You can use its methods to initialize a new security descriptor to allow or deny access to particular accounts.
The built-in account SYSTEM must always be included in the access control list because the system's Service Control Manager (SCM) needs this account to manage COM servers.
For demonstration purposes, you're going to change your server to only accept requests from clients using the Guest account. This account is disabled by default when the operating system is first installed.
Let's keep modifying your EasyDCOM sample application by doing the following:
-
Open EasyDCOM.cpp and add the following code below the line containing the include for atlmod.h :
#include <atl\atlcom.h>
-
Add the following code above the line containing the call to CoInitialize() :
CSecurityDescriptor sd; sd.InitializeFromProcessToken(); sd.Allow("Guest", COM_RIGHTS_EXECUTE); sd.Allow("NT_AUTHORITY\SYSTEM", COM_RIGHTS_EXECUTE); -
Replace the call to CoInitializeSecurity() with the following:
CoInitializeSecurity(sd, -1, NULL, NULL, RPC_C_AUTHN_LEVEL_CONNECT, RPC_C_IMP_LEVEL_IDENTIFY, NULL, EOAC_NONE, NULL);
-
Open EasyDCOMClient.cpp and delete the lines containing CoInitialize() , CoInitializeSecurity() , and CoUninitialize() .
To experiment with the sample, you will need to enable the Guest account and give it the same password on both the client and server machines. As an alternative you can log on as Guest on the machine hosting the server and run the client application from there.
You can replace the Guest account with the name of a valid local or domain account. You must use the format DOMAIN\UserOrGroup or MACHINE\UserOrGroup when passing the account name to the Allow method of CSecurityDescriptor . If you suppress the DOMAIN or MACHINE from the account name, the current machine name is assumed.
If you try to run the sample without being logged as Guest , you will receive an Access Denied error coming from the server. This is because only the Guest account is granted access to the server now.
TIP
Windows 2000 comes with a new command-line utility called RunAs. This utility allows an application to be run under the credentials of a supplied account. RunAs is an excellent tool for testing COM servers under the credentials of different client principals.
Let's examine the code.
A CSecurityDescriptor object, represented by the variable sd , is instantiated and, encapsulated inside it, a new security descriptor is created.
Next, you called the InitializeFromProcessToken() method to take care of all subtle details regarding the internals of the security descriptor.
The call to Allow passed Guest as the account name, and the value COM_RIGHTS_EXECUTE to grant access rights to the Guest account. You did the same to grant access to built-in System account, this time using NT_AUTHORITY\SYSTEM as the account name.
Last, CoInitializeSecurity() is called passing the sd object as an argument for its first parameter. You use RPC_C_AUTHN_LEVEL_CONNECT as the authentication value, RPC_C_IMP_LEVEL_IDENTIFY as the identity value, and the default values for all other parameters.
Implementing Interface-Wide Security
Up to this point, you have centered your focus on process-wide security settings that can be configured using CoInitializeSecurity() . But, what if you need to control security only during method calls; for example, to make a specific call encrypted instead of encrypting the entire process?
IClientSecurity Interface
COM helps us with this scenario by providing a finer control of security at the interface level for both clients and servers. At client-side, the underlying remoting layer, represented by the Proxy Manager, implements the IClientSecurity interface. At server-side, the Stub Manager implements the IServerSecurity interface.
The methods of the IClientSecurity interface are QueryBlanket() , SetBlanket() , and CopyProxy() .
QueryBlanket() retrieves the authentication information used by the interface proxy. This information is the security information passed to CoInitializeSecurity() during process initialization. You call QueryBlanket() using NULL on all parameters that you don't want to retrieve information.
SetBlanket() sets the authentication information to be used by a particular interface proxy. Its use affects all clients of the proxy.
CopyProxy() makes a private copy of the interface proxy that you can use later with SetBlanket() . This method enables multiple clients to independently change their interface security settings.
The parameters for QueryBlanket() and SetBlanket() correspond to the parameters of CoInitializeSecurity() with one notable exception, the seventh parameter pAuthInfo . This parameter is dependent on the security package in use. It points to a COAUTHIDENTITY structure when the NTLM security package is being used.
The COAUTHIDENTITY structure has the following members:
typedef struct _COAUTHIDENTITY { USHORT *User; ULONG UserLength; USHORT *Domain; ULONG DomainLength; USHORT *Password; ULONG PasswordLength; ULONG Flags; } COAUTHIDENTITY; You can make calls using the credentials of an arbitrary user if you pass the pAuthInfo parameter a COAUTHIDENTITY structure pointer filled with username, password, and domain information. When you pass NULL to this parameter, each COM method call is made using the credentials of the client process.
To use IClientSecurity , you must use QueryInterface() on the Proxy Manager for IID_IClientSecurity , call one of its methods, and then release the interface. COM makes your life easier by providing wrappers that encapsulate this sequence.
The COM wrapper functions for the methods of the IClientSecurity interface are CoQueryProxyBlanket() , CoSetProxyBlanket() , and CoCopyProxy() .
IServerSecurity Interface
At the server-side, the IServerSecurity interface can be used to identify and impersonate the client. You can call CoGetCallContext() from within a method call to obtain an interface pointer to this interface. IServerSecurity has the methods QueryBlanket() , ImpersonateClient() , RevertToSelf() , and IsImpersonating() .
QueryBlanket() is analogous to its sibling in IClientSecurity interface; it returns the security settings in use. For example, you could use QueryBlanket() to determine whether the client is using encryption or to discover the client identity.
During a method call, you can use ImpersonateClient() to enable the server to use the security credentials of the client. The impersonation level used by the client determines if the server can actually access system objects acting as the client itself, or if the server can only use the client's credentials to perform access checks.
RevertToSelf() restores the security credentials of the server and stops the server from impersonating the client. COM will automatically restore the server's security credentials prior to leaving a method call, even if you forget to call RevertToSelf() explicitly.
IsImpersonating() is used to check whether the server is currently impersonating the client.
COM offers the following functions as wrappers for the methods of the IServerSecurity interface: CoQueryClientBlanket() , CoImpersonateClient() , and CoRevertToSelf() .
Using the Blanket
To demonstrate the use of the IServerSecurity and IClientSecurity interfaces, you're going to create a brand-new example. This example will enable the client to change its identity and interrogate the server to discover the current identity in use. It will also let the server create a local file using the credentials of the client. Later, through the use of Windows Explorer, you will be able to access the properties of the file object and see its owner to confirm whether the file was created using the identity you supplied.
To conduct this experiment, create two local accounts named CommonUser and ExtraUser , members of the User group, on both the client and server machines, and log on the client machine using the ExtraUser account.
Use DCOMCnfg to configure the server to allow access and launch permissions to everyone, and set the identity of the server (refer to Figure 18.8) to use the Administrator account.
The example server application that you will create in the following section is provided in the Blanket\Server folder on the CD-ROM that accompanies this book.
NOTE
In the absence of an NT Server domain, the workstation machine is, in effect, the only member of its own domain.
Create your new sample server as follows :
-
Start by creating an EXE server called Blanket with an Automation Object that has a CoClass name of ObjBlanket . Next, use the TLE editor to add the following two methods:
[id(1)] HRESULT _stdcall BlanketInfo([out, retval] BSTR * Value); [id(2)] HRESULT _stdcall CreateFile([in] BSTR Value);
-
Now you need to implement the methods. Open ObjBlanketImpl.cpp and add the following code to the BlanketInfo method:
try { *Value = NULL; LPWSTR pPrivs; OleCheck(CoQueryClientBlanket(NULL, NULL, NULL, NULL, NULL, (LPVOID*)&pPrivs, NULL)); WideString strInfo = pPrivs; *Value = strInfo.Detach(); } catch(Exception &e) { return Error(e.Message.c_str(), IID_IObjBlanket); } return S_OK;This method makes use of the CoQueryClientBlanket() to retrieve the name of the client principal and return it to the caller. It performs this operation by passing NULL to all parameters except the sixth, pPrivs . This tells CoQueryClientBlanket() that you're only interested in information regarding the identity of the client.
-
Add the following code to the CreateFile() method:
try { OleCheck(CoImpersonateClient()); HANDLE hFile = ::CreateFile(AnsiString(Value).c_str(), GENERIC_WRITE, FILE_SHARE_WRITE, NULL, CREATE_ALWAYS, FILE_ATTRIBUTE_NORMAL, NULL); if (INVALID_HANDLE_VALUE == hFile) return HRESULT_FROM_WIN32(GetLastError()); CloseHandle(hFile); OleCheck(CoRevertToSelf()); } catch(Exception &e) { return Error(e.Message.c_str(),IID_IObjBlanket); } return S_OK;
Here, you started by calling CoImpersonateClient() to begin impersonating the client. You made this call because you wanted to create a local file using the identity supplied by the client instead of the identity currently in use by the server process.
Remember that you manually set the server's identity to use the credentials of the Administrator account. So, if the call to CoImpersonateClient() succeeds, you will be able to see a different owner for the created file.
Before leaving the method, you closed the file handle and called CoRevertToSelf() to tell the server to stop impersonating the client and revert to its own identity.
You can now build the project. When done, copy the server to the remote machine and run it once to perform self-registration.
You can find the code for the example client application in the Blanket\Client folder on the CD-ROM that accompanies this book.
The client will also be an EXE application. To create the client application do the following:
-
Start a new project and save it as BlanketClient renaming Unit1 to MainUnit .
-
Design its main form to look like Figure 18.15, and rename its components as follows:
Figure 18.15. The BlanketClient main form and its components.
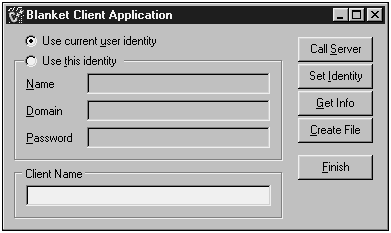
Original Name
New Name
Form1
frmMain
RadioButton1
rdoLoged
RadioButton2
rdoIdnty
GroupBox1
gbxIdn
GroupBox1
gbxInfo
Label1
lblUser
Label2
lblDomain
Label3
lblPwrd
Edit1
txtUser
Edit2
txtDomain
Edit3
txtPwrd
Edit4
txtInfo
Button1
cmdCallServer
Button2
cmdSetIdentity
Button3
cmdGetInfo
Button4
cmdCreateFile
Button5
cmdFinish
-
Open MainUnit.h and add the following header file to its list of header files:
#include "..\Server\Blanket_TLB.h"
-
Declare two private data members in the TfrmMain derived class as the following:
TCOMIObjBlanket m_objBlanket; SEC_WINNT_AUTH_IDENTITY m_pAuthInfo;
-
Add the following two private member functions to the TfrmMain class:
void GetAuthInfo(); void SetAuthInfo();
You will find the code for MainUnit.cpp in Listing 18.1.
Listing 18.1 The Code for MainUnit.cpp , Main Form of the BlanketClient Project
#include <vcl.h> #pragma hdrstop #include "MainUnit.h" #pragma package(smart_init) #pragma resource "*.dfm" TfrmMain *frmMain; __fastcall TfrmMain::TfrmMain(TComponent* Owner) : TForm(Owner) { m_AuthInfo.Flags = SEC_WINNT_AUTH_IDENTITY_ANSI; m_AuthInfo.User = NULL; m_AuthInfo.Domain = NULL; m_AuthInfo.Password = NULL; } void __fastcall TfrmMain::FrmMain_Close(TObject *Sender, TCloseAction &Action) { m_objBlanket.Unbind(); delete[] m_AuthInfo.User; delete[] m_AuthInfo.Domain; delete[] m_AuthInfo.Password; } void __fastcall TfrmMain::CmdCallServer_Click(TObject *Sender) { if (!m_objBlanket.IsBound()) { AnsiString strHost; if (InputQuery("Create Server", "Enter computer name:", strHost)) { if (strHost.IsEmpty()) OleCheck(CoObjBlanket::Create(m_objBlanket)); else OleCheck(CoObjBlanket::CreateRemote(WideString(strHost), m_objBlanket)); ShowMessage("Server created"); } } } void __fastcall TfrmMain::CmdCreateFile_Click(TObject *Sender) { if (m_objBlanket.IsBound()) { AnsiString strFile; if (InputQuery("Create File", "Enter path and file name:", strFile)) { OleCheck(m_objBlanket.CreateFile(WideString(strFile))); ShowMessage("File created"); } } } void __fastcall TfrmMain::CmdFinish_Click(TObject *Sender) { Close(); } void __fastcall TfrmMain::CmdGetInfo_Click(TObject *Sender) { if (m_objBlanket.IsBound()) GetAuthInfo(); } void __fastcall TfrmMain::CmdIdentity_Click(TObject *Sender) { gbxIdn->Enabled = rdoIdnty->Checked ? true : false; txtDomain->Color = rdoIdnty->Checked ? clWindow : clBtnFace; txtPwrd ->Color = rdoIdnty->Checked ? clWindow : clBtnFace; txtUser ->Color = rdoIdnty->Checked ? clWindow : clBtnFace; } void __fastcall TfrmMain::CmdSetIdentity_Click(TObject *Sender) { if (m_objBlanket.IsBound()) { if (rdoIdnty->Checked) SetAuthInfo(); OleCheck(CoSetProxyBlanket(m_objBlanket, RPC_C_AUTHN_WINNT, RPC_C_AUTHZ_NONE, NULL, RPC_C_AUTHN_LEVEL_CONNECT, RPC_C_IMP_LEVEL_IMPERSONATE, rdoIdnty->Checked ? &m_AuthInfo : NULL, EOAC_NONE)); } } void TfrmMain::GetAuthInfo() { WideString strInfo; OleCheck(m_objBlanket.BlanketInfo (&strInfo)); txtInfo->Text = strInfo; } void TfrmMain::SetAuthInfo() { delete[] m_AuthInfo.User; delete[] m_AuthInfo.Domain; delete[] m_AuthInfo.Password; m_AuthInfo.UserLength = txtUser ->Text.Length(); m_AuthInfo.DomainLength = txtDomain->Text.Length(); m_AuthInfo.PasswordLength = txtPwrd ->Text.Length(); m_AuthInfo.User = (PUCHAR)new TCHAR[txtUser ->Text.Length()+1]; m_AuthInfo.Domain = (PUCHAR)new TCHAR[txtDomain->Text.Length()+1]; m_AuthInfo.Password = (PUCHAR)new TCHAR[txtPwrd ->Text.Length()+1]; lstrcpy((LPTSTR)m_AuthInfo.User , (LPCTSTR)txtUser ->Text.c_str()); lstrcpy((LPTSTR)m_AuthInfo.Domain , (LPCTSTR)txtDomain->Text.c_str()); lstrcpy((LPTSTR)m_AuthInfo.Password, (LPCTSTR)txtPwrd ->Text.c_str()); } You can see from Listing 18.1 that you initialized some of the members of m_AuthInfo in the constructor of TfrmMain . Microsoft documentation suggests DCOM will keep a pointer to the identity information contained in this structure until a new value is used, or until COM itself is uninitialized .
The SetAuthInfo() private member function acts like a helper method for dealing with the SEC_WINNT_AUTH_IDENTITY structure. It avoids memory leaks and correctly assigns identity information to its members.
The Set Identity button handles client identity change. It performs its action by calling CoSetProxyBlanket() to adjust the interface security settings telling the Proxy Manager to use identity information contained in the m_AuthInfo member variable.
Identity information is toggled between the current logged user identity (process token credentials), and the supplied identity through the use of a NULL argument in the pAuthInfo parameter of the CoSetProxyBlanket() function.
CoSetProxyBlanket() is called with a RPC_C_IMP_LEVEL_IMPERSONATE level of impersonation to let the server effectively behave as the client using the credentials supplied in the pAuthInfo parameter.
The event handler for the Get Info button calls the server's BlanketInfo() method to retrieve the current user identity name and place the result in the txtInfo edit box.
The Create File button handles file creation at the remote machine, asking for a path and a filename and executing the server's CreateFile() method. The remote file is then created using the identity currently in use.
Let's try your sample and proceed as follows:
-
Start BlanketClient.exe and click the Call Server button. Enter the name of the host machine to instantiate the Blanket server.
-
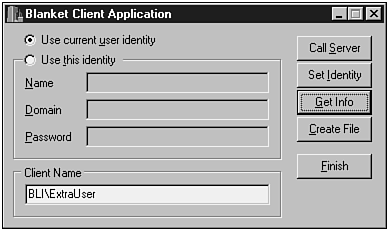
Click the Get Info button, and you should see something similar to the screen in Figure 18.16. This is the result of pressing the Get Info button while BlanketClient is using the credentials of the current logged user, ExtraUser .
Figure 18.16. BlanketClient running under the current logged user account.
-
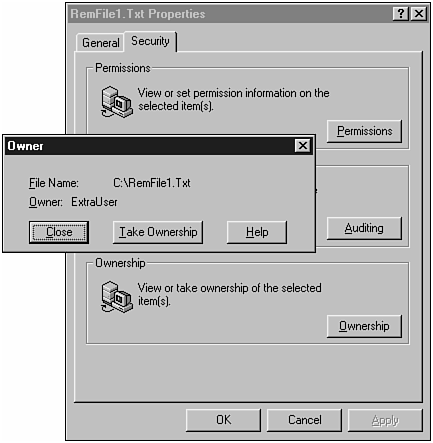
Click the Create File button and enter C:\RemFile1.Txt to create a remote file named RemFile1.Txt on the root of the host's drive C.
Figure 18.17 shows the file properties. You can confirm that the remote file was created under credentials of the ExtraUser account.
Figure 18.17. RemFile1.Txt properties shows ExtraUser as its owner.
-
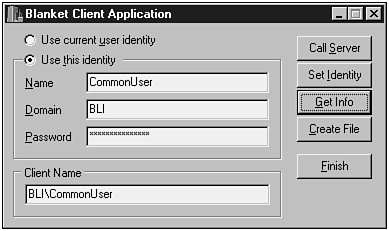
Fill the identity fields with information from the CommonUser account, and click the Set Identity button to change the client identity. Figure 18.18 shows the result of clicking the Get Info button after performing this operation.
Figure 18.18. BlanketClient using the credentials of the CommonUser account.
-
Click the Create File button again. This time, give the remote file the name RemFile2.Txt .
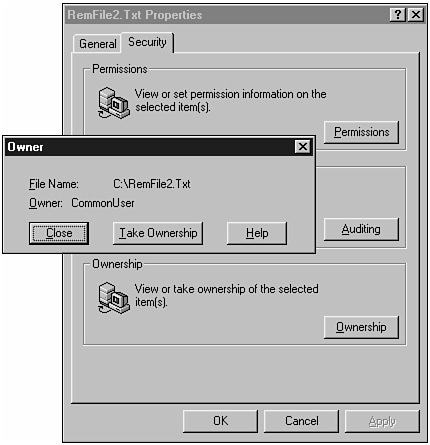
Figure 18.19 now shows that the remote file was created under credentials of the CommonUser account.
Figure 18.19. RemFile2.Txt properties shows CommonUser as its owner.
| |
| Top |