XML Mapping Tool
The last example in the previous section must have felt a bit like using a dataset and/or data-aware controls, where we could navigate through the items of an XML document. If you liked that, you're in for more enjoyment because we'll now start to use the XML Mapping Tool (or XML Mapper for short). You can find it in the Tools menu of the C++Builder 6 IDE, as well as with a separate icon in the Borland C++Builder 6 Program Group. Whichever way you start it, you can do File, Open to load the BizSnap.xml file, and it will display a treeview with the list of XML nodes.
The XML Mapper is divided into three areas. On the left side we have the XML document, displayed in a treeview. We can also enable the Data View, which will display the actual contents of the XML nodes and switch to the Schema view to see the generated DTD as well as the XML Schema (you can even save the generated XML Schema if you need one).
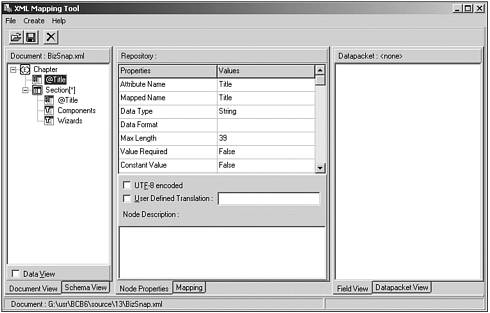
The right side will show the transformed (generated) DataSet, which we'll see in a moment. In the middle we can set some options, make some modifications, and so on. In Figure 13.9, you can see the Node Options for the Title attribute of the Chapter node. Note the value for Max Length , which is based on the actual values present in the XML Document (in this case only the chapter title "XML Document Programming and XML Mapper," which is indeed 39 characters long). Similarly, the Max Length for the Title of the Section node is 24, and the Max Length for Components and Wizards is 71 and 32, respectively.
Figure 13.9. Loading BizSnap.xml in XML Mapper.
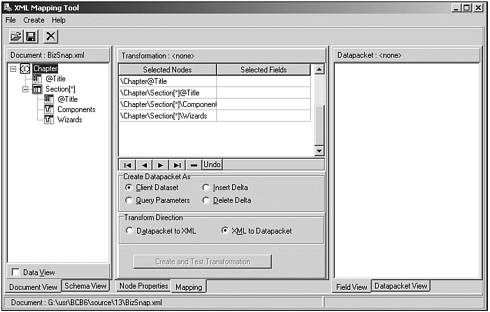
After you've loaded an XML document, you need to specify which nodes are required to be transformed into a DataSet. You can do this with a right-click of the mouse. For our example, I've selected all nodes, but there may be situations where only a subset of the nodes are useful; for example, if you only want to work with the section title and components.
After we've selected one or more nodes, the information in the middle of the XML Mapper changes to display the Selected Nodes, as shown in Figure 13.10.
Figure 13.10. Selecting All Nodes in XML Mapper.
To actually transform the selected nodes from the XML document into a datapacket, we must right-click the left side and select the Create Datapacket from XML pop-up menu choice (or press Ctrl+D). See Figure 13.11.
Figure 13.11. Create Datapacket from XML.
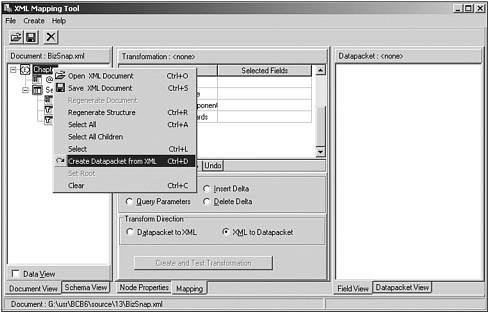
Figure 13.12 displays datapacket, which will be the result of the transformation. I was surprised to notice a little unexpected discrepancy: The Title field of the nested Section dataset is set to have a Length of 39 (instead of the required 24). This is most likely caused by the fact that the Chapter also has a field with the name Title , which had a Max Length of 39. This is a small bug in the XML Mapper, which should hopefully be fixed in an upcoming update of C++Builder 6. Fortunately, it's not a big problem in our case because the second Length field was originally supposed to be smaller (24 characters) than the value that was assigned to it (39 characters). So we're fine in this case.
Figure 13.12. Title Field with Length of 39.
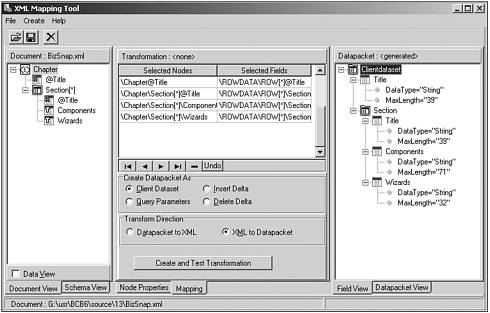
If the size of the second Length field had to be longer than the first one (that is, if it was clipped from its original length to the new value of 39), we would have a problem. Unfortunately, in that case there is no place to modify the settings for the generated datapacket. Therefore, no other option is available but to return to the Title attribute of the Chapter node on the left side, change the Max Length to the maximum of the two, and re-create the datapacket from XML again. This time, the result will be as required, with both Title fields having a specified Length of the maximum value of their original value. That's okay, at least no field values will be truncated or clipped.
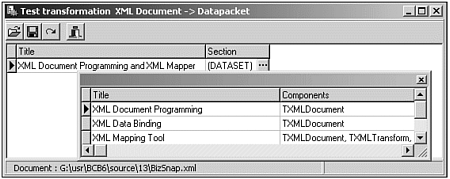
Finally, to create and test the transformation and verify that this time nothing went wrong, we should click the big Create and Test Transformation button. This will show a form with the generated dataset (along with the contents from the XML document inside the dataset). We could have noted from Figure 13.12 that the Section dataset is actually a nested dataset (a field of type TDataSetField ). So at first, we only see the Title and Section of the chapter and have to click the ellipsis to get a second form with a grid that shows the three sections from the chapter, see Figure 13.13.
Figure 13.13. Create and Test Transformation.
After we've verified that the transformation is okay, we should save the current transformation information in the suggested ToDp.xtr file. Next , if you also want to be able to transform the dataset back to an XML document, you should click the radio button to set the direction from XML to Datapacket to Datapacket to XML. Then, click the Create and Test Transformation button, which will result in an XML document this time, and save the transformation information again, this time in ToXml.xtr . At this time you can close the XML Mapper, because it has performed its task.
Transforming
Armed with the BizSnap.xml file and the two ToDp.xtr and ToXml.xtr transformation information files, we can now convert the XML document to a dataset, make changes to the data inside the dataset, and convert it back to an XML document again.
We can use the same XML Document component: the BizSnap.xml file. Now we should access it using the Transform components from the Data Access tab of the component palette. From left to right, we have the TXMLTransform , TXMLTransformProvider , and TXMLTransformClient components.
The TXMLTransform can be used to transform an XML document into a datapacket or back. The TXMLTransformProvider can be used to transform an XML document into a data packet that is provided to a TClientDataSet (or a TXMLBroker component) component. It can be exported in a DataSnap application, as I'll show in the last section of this chapter. Finally, the TXMLTransformClient component converts the dataset from a TDataSetProvider back into an XML document.
Transformation Demonstration
To demonstrate this transformation process, start a new application and drop a TXMLTransformProvider component from the Data Access tab on the main form. Set the TransformationFile subproperty of the TransformRead property to the ToDp.xtr transformation file, which is used when XML information is read so it can be transformed into a dataset data packet, which will be provided to a receiving TClientDataSet component. If you also want to update the XML document again, we must set the TransformationFile subproperty of the TransformWrite property to the ToXml.xtr transformation file, which is used when the connecting TClientDataSet calls the ApplyUpdates method back through the TXMLTransformProvider all the way to the XML document. Apart from the transformation information, we should make sure to set the XMLDataFile property to the BizSnap.xml document itself. I often use .xtr and .xml files in the same directory as my executable, which means that I can remove the directory information in front of each of these three filenames (leaving only ToDp.xtr , ToXML.xtr , and BizSnap.xml ). Therefore, I can easily move the application and accompanying files around and to other machines.
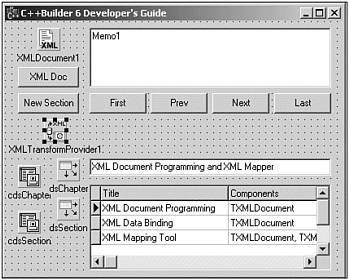
Anyway, after we've specified the external files to use, we can drop a TClientDataSet component on the main form as well, call it cdsChapter and point its ProviderName property to the TXMLTransformProvider component. We can open cdsChapter , which will request data from the XMLTransformProvider , and as a side-effect, start the XML transformation. Right-click the cdsChapter component to start the Fields Editor, right-click again and do Add All Fields to create a persistent Title field as well as the nested dataset Section.
Now, drop another TClientDataSet component, and call it cdsSection . Obviously, this one will be used to connect to the nested dataset Section, so make sure to assign the DataSetField property to the cdsChapterSection field. To see the transformed data, drop two TDataSource components (one for each ClientDataSet ), a TDBEdit (for the Title field of cdsChapter ) and a DBGrid (for the entire cdsSection ).
Figure 13.14. XMLTransformProvider at design time.
We can now use this application to browse through the grid as if we were indeed browsing through a regular dataset. If we make changes to the data, we can call the ApplyUpdates methods of the (master) ClientDataSet cdsChapter to apply the updates back to the original XML document (via the TXMLTransformProvider component, hence, the need for the transformation back to an XML document).
A good technique is to update the XML document as soon as a change is made in the cdsChapter or the cdsSection dataset, which can be done in the OnAfterPost event handler of these ClientDataSets as follows :
void __fastcall TForm1::cdsChapterAfterPost(TDataSet *DataSet) { dynamic_cast<TClientDataSet*>(DataSet)->ApplyUpdates(0); } void __fastcall TForm1::cdsSectionAfterPost(TDataSet *DataSet) { cdsChapter->ApplyUpdates(0); } Note that I'm using two different approaches here: In the OnAfterPost of the cdsChapter , I can take the DataSet argument, whereas in the OnAfterPost of the cdsSection I just take the cdsChapter member of the TForm itself. In both cases, it's the master ClientDataSet that makes the call to ApplyUpdates because the detail is only connected to the DataSetField cdsChapterSection .
Another option is to perform a final check at the FormClose event handler by looking at the ChangeCount property of both the cdsChapter and cdsSection. If the sum of them is bigger than zero (that is, if any change is made in either dataset), calling the ApplyUpdates on the master table.
void __fastcall TForm1::FormClose(TObject *Sender, TCloseAction &Action) { if ((cdsChapter->ChangeCount + cdsSection->ChangeCount) > 0) cdsChapter->ApplyUpdates(0); } For more information about DataSetProviders , ClientDataSets , and calling ApplyUpdates , see Chapter 20, "Distributed Applications with DataSnap."
| |
| |
| Top |