Editing and Retrieving Data from a Table
|
OK, so we've built a new database, and added the new table named Discs to it, but the table is still empty – there is no data in it. The next step is therefore to think about how we can fill it with data.
Inserting and Editing Data with SQL Statements
The examples that come with the code samples for this chapter include a simple SQL script that can be used to create the sample Cornflakes at Midnight database and fill it with some sample data. This script contains the definition of the database and the tables, and a series of SQL statements that specify the data to fill the tables. These SQL statements look something like this:
INSERT INTO Discs (Title, ReleaseDate, Notes, Label, CoverImageURL) VALUES ('No Inspiration', '10-10-2002', 'The debut album', 'Wrox Records', 'http://oursite.com/covers/noinsp.gif')
This script inserts the values in the second section of the statement into the columns of the table named Discs listed in the first part of the statement. Since the DiscID is an IDENTITY column that automatically generates the values for new rows, we can't insert values for this column. However, even though there is a default value for the ReleaseDate column, we can still insert values for this and over-ride the default value.
However, it's unlikely that we'll already have suitable scripts available for new databases and tables we build, and typing SQL statements is laborious. It is really only useful when we want to create copies of a database and install it on other database servers, such as the installation script for the example CAM database.
Inserting and Editing Data with an ASP.NET Page
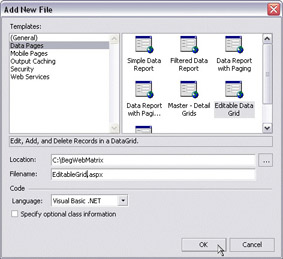
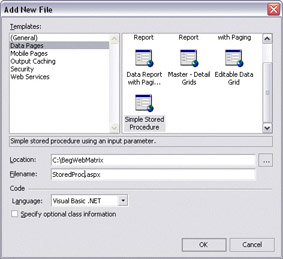
Another alternative is to build an application or web page that accepts values typed into textboxes, or selected in other controls, and inserts them into the database tables automatically. Web Matrix includes an example of this type of ASP.NET page, called the Editable Data Grid type. This type of page can be found in the Data Pages section of the Add New File dialog that appears when you start Web Matrix, when you select File | New from the main menu bar, or when you hit the New File icon on the toolbar:
If you create a new file based on this template and run it, you'll see how data can be inserted into a table from an ASP.NET page. Simply click the Add new item link at the bottom of the page, and fill in some values for the columns. Then, click the Update link on the left-hand side of the column and the data is saved into the database (you may have to use the numbered links in the footer of the table to go through the pages to find the new row afterwards):
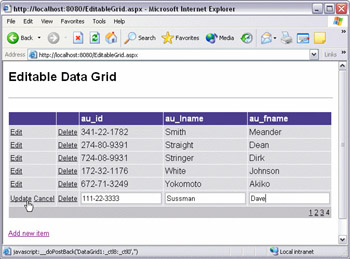
This page displays values from, and updates values in the authors table within the sample pubs database (the database we used in the first Try It Out in this chapter. So it's clear that we can easily build pages that can insert new rows and update existing rows in our database.
Inserting and Editing Data with Data Explorer
Now, we'll look at the features that come as part of Web Matrix that are used for inserting and editing data in a database. The Data Explorer allows us to do both of these things quite easily – in fact, we've already seen the dialog we use to perform these tasks earlier in the chapter.
Try It Out—Inserting and Editing Data in a Table
-
Make sure you are connected to the CAM database you created earlier in this chapter. If not, connect to it using the New Connection icon in the Data Explorer window as described in the first Try It Out.
-
In the Tables entry in the Data Explorer window, find the table named Discs that we created previously. Either double-click on it, or select it and then click the Edit icon on the toolbar, to open the Edit Table dialog for the Discs table:

-
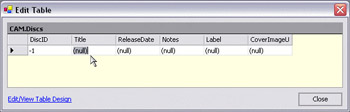
The table has no rows in it at the moment, but a new empty row is displayed (the asterisk * at the left-hand end indicates a new row). Click in the title column of this new row, and you'll see that the value of the DiscID column is automatically set to -1 (providing that this is the first row you've inserted into the table), and the other columns are set to (null):
-
Type some values into the Title, Notes, Label, and CoverImageURL columns. Another new empty row is created automatically as soon as you start typing, and the row you are editing now has the "pencil" symbol to indicate that it's been changed but not yet saved to the database.
-
Now press the Tab key to move to the next row, or click on one of the cells in the next row, and you'll see the row you just completed updated so that the DiscID has its "proper" value. The "pencil" symbol also disappears to indicate that the row has been saved to the database. However, there is one problem in this release of Web Matrix (which will be fixed in future releases). The default value for the ReleaseDate column is not set, and is left as (null):

-
However, the Edit Table dialog can also be used to modify values in existing rows of a table. Click on the ReleaseDate column in the first row, and enter a date. Depending on where you are in the world, and what International Settings you have set in Windows Control Panel, you may have to enter it in the form mm-dd-yyyy, dd-mm-yyyy, dd/mm/yyyy, or possibly some other format. You can also get away with yyyy-mm-dd or yyyy/mm/dd in most cases, again depending on your international settings. We used 10/10/2002 for our example here, as you'll see shortly.
-
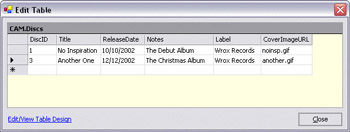
Add another row (or more) to the table, and experiment editing the values of columns in existing rows until you are happy with the way that this dialog works. To delete a column, click on the gray cell at the left-hand end so that the entire row is highlighted and press the Delete key. We added a couple of rows to our table, and then deleted the second row. You can see in the screenshot that the row with DiscID value 2 has been deleted, because the second row has the value 3 for this column. The values of a primary key IDENTITY row can't be changed once the row has been inserted into the table, and even if you delete a row, the values for this column are not re-used:
-
At the bottom of the Edit Table dialog is a link Edit/View Table Design. You won’t be surprised to know that it opens the table design dialog that we used to create the table in a previous Try It Out. However, this time the dialog has the title View Table Design, rather than Edit Table Design. Since the table contains data, we can’t edit the actual structure (the table name, column names, or other column properties); they are all disabled in the dialog:
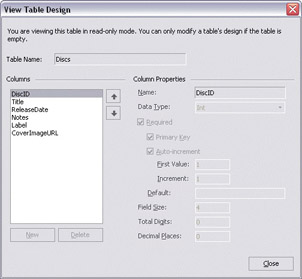
Note The reason for this behavior is because, as we just said, the table contains data. The structure can only be changed when the table is empty. To change the structure of the table, you have to delete all the existing rows first. However, this dialog does provide a useful way to see what the table design looks like when we are working with it – for example when building ASP.NET pages that use the data.
-
OK, now we're done, so you can now click the Close buttons to close the View Table Design and Edit Table dialogs.
Viewing Data in the Query Dialog
Now that we have some data in our new table, we can look at ways that we can extract it again. In the next two chapters, we'll be playing with some more controls for listing data that come as part of Web Matrix, or are built into the .NET Framework. However, while we're looking at the Data Explorer window in this chapter, we'll see how we can use it to look at data in an existing table, and even search for specific rows in a table. We do all this using the Query dialog.
Try It Out—Viewing Data in the Query Dialog
-
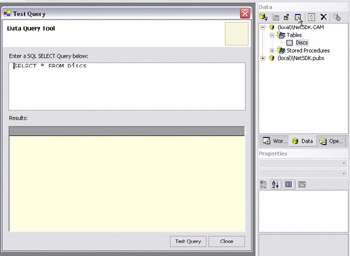
Connect to the database we built earlier in this chapter, and select the Discs table in the Data Explorer window. Then click the Query icon in that window to open the Test Query dialog. You can see that the top section of this dialog contains a SQL statement already built which uses the table we selected:
-
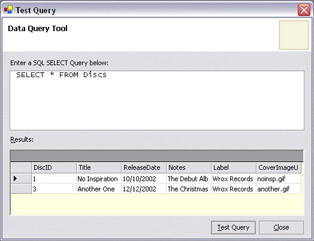
The default SQL query, SELECT * FROM Discs, extracts all the columns for all the rows in the table. To see the results, just click the Test Query button at the bottom of the dialog:
-
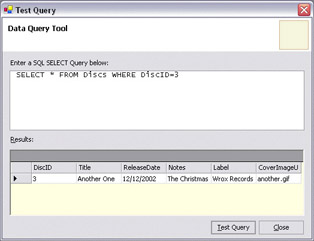
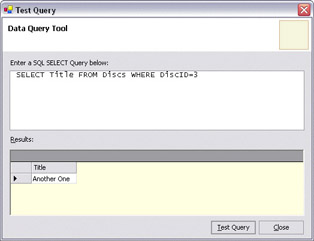
By editing this query, we can select specific rows, which is useful if there are a lot of rows in the table. It also allows us to test SQL SELECT statements directly against our table to make sure that they work like we expect. Add WHERE DiscID=3 to the end of the existing query, as shown in the next screenshot, which specifies that we only want rows with the value 3 for the DiscID column to be returned by the query. Then click the Test Query button to select and display the single matching row:
-
You can also select rows based on other column values, not just the DiscID primary key (IDENTITY) column. For example, change the SQL statement to read:
SELECT * FROM Discs WHERE Title LIKE '%no%'and then click Test Query. This returns only rows that have the string no somewhere in the Title column. In SQL, the percent character % is a wild-card that means "any characters". Note that this particular query will return both albums, because the string occurs in both of them: "No Inspiration" and "Another One".
-
A SQL SELECT statement can also be used to return specific columns, rather than all of them. We just have to replace the asterisk (which means "all columns") with a list the columns we want, separated with a comma. Change the SQL statement to that shown in the next screenshot to select just the row with DiscID value 3, and return just the column named Title. Then click the Test Query button to see the results:
-
After you've finished experimenting, close the Query dialog and go back to the Data Explorer window.
How It Works
SQL statements such as the simple SELECT statement can be executed against any table in a database. In our example, we are simply viewing some rows in the database, but we can use this query tool to execute INSERT or UPDATE statements to add or amend data if we want to. For a more thorough discussion of SQL syntax, you may want to refer to Beginning SQL Programming, Wrox Press, ISBN: 1-86100-180-0, or you can visit some useful online sites, including http://www.sqlcourse.com, or http://www.w3schools.com/sql/.
Creating and Using Stored Procedures
To finish off this chapter, we'll plug together a few of the things we've seen so far and show you how we can build and work with stored procedures. We'll create a fairly simple one, and then see the results by modifying one of the standard pages that Web Matrix can create. There is no built-in way of executing a stored procedure to view the results directly, but we can use the Query dialog we just looked at to test the SQL statement in our stored procedure.
Stored procedures can be very simple, or very complex, or, as is usually the case, somewhere between these two extremes. They can contain any number of separate SQL statements, which are executed sequentially or according to rules and constructs within the stored procedure. In some ways, it's just like writing code for an ASP.NET page, because we can use IF statements and various other selection statements within a stored procedure.
However, our stored procedure is going to be simple, with only one statement. Let's get on and build it now.
Try It Out—Creating a Stored Procedure
-
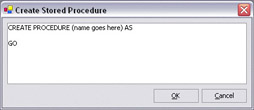
Make sure you are connected to the CAM database and in the Data Explorer window, select the Stored Procedures entry and click the New Item icon. This opens the Create Stored Procedure dialog, with some default text already in place:
-
Add the following text to the dialog box:
CREATE PROCEDURE AllDiscsByDate AS SELECT Title, ReleaseDate, Notes, Label, CoverImageURL FROM Discs ORDER BY ReleaseDate DESC GO
-
Click OK to save the new stored procedure into the database, and return to the Data Explorer window. If you want to edit the stored procedure at a later time, simply double-click on the entry in this window, or select it and click the Edit icon:

-
The next step is to test our new stored procedure. An easy way to do this is to use one of the ASP.NET pages that Web Matrix can create automatically. Close the page you have open, and click the New File icon on the main toolbar, or select New from the File menu. In the New File dialog that appears, open the Data Pages list, and select the Simple Stored Procedure item:
-
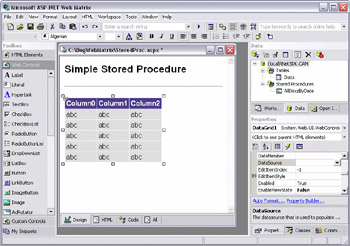
Click OK and the Simple Stored Procedure example page opens in Design view. It contains a DataGrid control (like the one we saw in use earlier in this chapter), and uses ASP.NET code to fill it with data from a stored procedure. We're going to hijack this example to run our own new stored procedure:
-
Click the Code tab at the bottom of the main Web Matrix editing window to see the code in this page. There isn't much, and we only need to make a three minor changes. These changes are highlighted in the code listing below, and described afterwards:
Sub Page_Load(Sender As Object, E As EventArgs) ' TODO: Update the ConnectionString for your application Dim ConnectionString As String = _ "server=(local)\netsdk;database=cam;trusted_connection=true" ' TODO: Update name of Stored Procedure for your application Dim CommandText As String = "AllDiscsByDate" Dim myConnection As New SqlConnection(ConnectionString) Dim myCommand As New SqlCommand(CommandText, myConnection) Dim workParam As New SqlParameter() myCommand.CommandType = CommandType.StoredProcedure ' TODO: Set the input parameter, if necessary, for your application ' myCommand.Parameters.Add("@OrderId", SqlDbType.Int).Value = 11077 myConnection.Open() DataGrid1.DataSource = myCommand.ExecuteReader(CommandBehavior.CloseConnection) DataGrid1.DataBind() End Sub
-
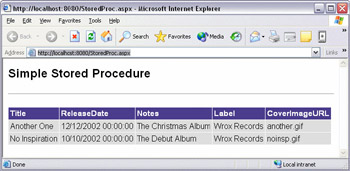
Finally, click the Save button on the main Web Matrix toolbar to save the updated code, and then click the Run button to display the page in your browser. You'll see the results returned by the new stored procedure displayed in the DataGrid control:
How It Works
The name of the new stored procedure is AllDisksByDate, and you can see that it contains a single SQL statement rather like the ones we used in the previous Try It Out. This time though, we have specified all of the columns except for the DiscID. We probably won't want to display this column – we don't need to display information about how our data is stored to users, after all. We've also added the clause ORDER BY ReleaseDate DESC. This specifies that the rows should be sorted into reverse date order when they are returned:
CREATE PROCEDURE AllDiscsByDate AS SELECT Title, ReleaseDate, Notes, Label, CoverImageURL FROM Discs ORDER BY ReleaseDate DESC GO
When writing a SQL statement like this to be used as part of a stored procedure, you can do so in the Query window and run it to make sure that it is correct, and that it returns the data you want. Open the Query window by selecting the Tables entry in the list in the Data Explorer window and clicking the Query icon. Type in the SQL statement and click the Test Query button. Once it is working properly, highlight the SQL statement, press Ctrl-C (copy), close the Query dialog, open the Stored Procedure dialog, and paste it into the stored procedure with Ctrl-V. Also, remember to replace (name goes here) with a name for your new procedure.
In the page code, we added/amended three parts:
Dim ConnectionString As String = _ "server=(local)\netsdk;database=cam;trusted_connection=true"
The auto-generated connection string in the first section of the code refers to the Northwind sample database, but we need it to refer to the database we created in this chapter instead, so we changed it so that is says the same as the code in the listing above (you need to omit the netsdk part if you are using SQL Server rather than the NetSDK instance of MSDE).
Dim CommandText As String = "AllDiscsByDate"
We changed the name of the stored procedure in the second section from CustOrdersDetail to AllDisksByDate, as shown in the listing above. Finally, we commented out a line of auto-generated code:
' myCommand.Parameters.Add("@OrderId", SqlDbType.Int).Value = 11077 We added an apostrophe before the line starting myParametrers.Add to comment it out, though we could have deleted the entire line. This line of code sets the value of a parameter for the stored procedure. Parameters are used to pass in values to the stored procedure, but since our new stored procedure does not use any parameters, we can omit this line.
|
EAN: 2147483647
Pages: 141