Hostname and Domain Name
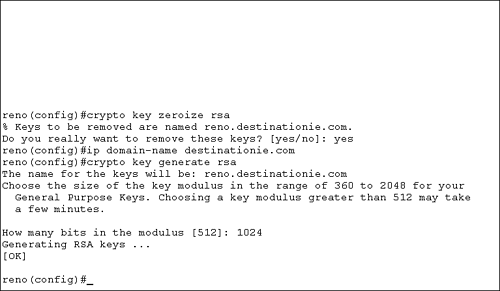
Hostname and Domain NameThe router's hostname and domain name are used in the creation of RSA key pairs. You must configure both of these items prior to generating RSA keys. The commands that you need to issue are Router(config)# hostname name Router(config)# ip domain-name name The following example configures a hostname of reno and a domain name of destinationie.com : Router(config)# hostname reno reno(config)# ip domain-name destinationie.com Notice that the router prompt changed to reno after a hostname was configured. Hostname-to-IP-Address MappingYou need to configure a static Domain Name System (DNS) entry on the router for each CA that you plan to use. You create this mapping because some of the digital certificate commands on the router will not accept an IP address. Therefore, you must use a hostname and create a local DNS entry. To create the hostname-to-IP-address mapping, use the following command: reno(config)# ip host name address1 [ address2 ... address8 ] We will configure the router to use a Microsoft CA, so we will name it MSCA . The IP address of the CA is 10.99.99.99 : reno(config)# ip host MSCA 10.99.99.99 At this point, it is a good idea to ping the CA by name ( MSCA ) to ensure that you have connectivity to the CA. Generating RSA KeysBefore generating a new RSA key pair, you need to ensure that a current key pair is not already configured on the router. To view the router's public keys, issue the command show crypto key mypubkey rsa . If there are no RSA keys, go ahead and generate a pair. The command syntax to generate RSA keys is reno(config)#crypto key generate rsa [usage-keys]
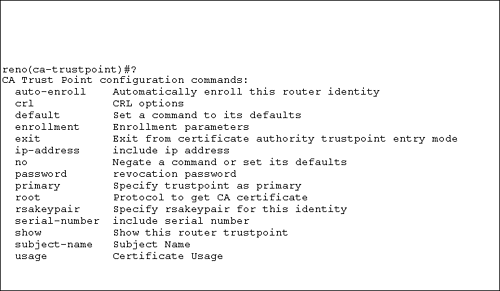
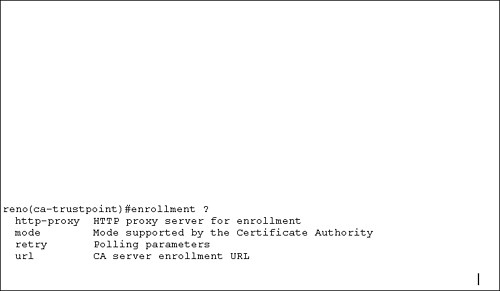
Figure 9.4 shows an example of deleting the existing RSA key pair, then configuring a domain name, and finally generating a 1024-bit RSA key pair. Figure 9.4. RSA key generation. We input the key size of 1024. The key range is from 360 to 2048 bits, as indicated in the router message. Also notice the name that the router assigned to the key pair, reno.destinationie.com . That is the concatenated router hostname and domain name that we configured earlier. Defining a CABefore a router can request a digital certificate, you must define a CA on the router. You issue a few commands when defining a CA. The first command is to define the CA itself: Router(config)# crypto ca trustpoint name The crypto ca trustpoint command replaces the crypto ca identity command starting with IOS release 12.2(8)T. The name you use with this command is the name that you configured with the ip host command. We configured the host to be MSCA, so the command to define a CA is Router(config)# crypto ca trustpoint MSCA After you enter this command, the router will be in ca-trustpoint configuration mode. Figure 9.5 displays the options that are available in this mode using context-sensitive help. Figure 9.5. CA trust point configuration option. The command that you are interested in is the enrollment command so you can obtain a digital certificate. Figure 9.6 shows the available options for the enrollment command. Figure 9.6. CA enrollment options. Configuring CA EnrollmentThe CA you are using will determine the actual URL that you need to enroll with the CA. The Microsoft CA> also has a specific path you must use, http:// ip_address/ certsrv/mscep/mscep.dll . For the example, the command is reno(ca-trustpoint)# enrollment url http://MSCA/certsrv/mscep/mscep.dll This is the path to enroll with a Microsoft CA. The Microsoft CA also requires that you configure an RA. The command to configure an RA is reno(ca-trustpoint)# enrollment mode ra That is all that you need to do to configure an RA. It is important to remember that you will be unable to connect to a Microsoft CA from a Cisco router or Cisco PIX Firewall until you install Simple Certificate Enrollment Protocol (SCEP) support on the Microsoft CA. Access the Windows 2000 Resource Kit and locate the cepsetup.exe application to install SCEP support on your Windows 2000 server. Obtaining a CA Root CertificateBefore the router obtains its own digital certificate, which is called an identity certificate , the router needs to obtain the CA's own certificate. The CA's certificate is called a root certificate , and the root certificate is used to verify the validity of the identity certificate. The command syntax to get the root certificate is reno(config)# crypto ca authenticate name Continuing with the example, the following code shows the command you need to issue with the resulting router output: reno(config)# crypto ca authenticate MSCA crypto ca authenticate myca Certificate has the following attributes: Fingerprint: 98CE76 45DD83 123ETZ 846ASE 111KEN Do you accept this certificate? [yes/no] y Type y to accept the CA's root certificate. Record the fingerprint that is displayed, and verify the fingerprint with the CA administrator. The verification process is necessary to ensure that you did in fact receive the CA's root certificate and not a sham certificate. Obtaining an Identity CertificateOnce you obtain and verify the root certificate, you need to obtain the router's identity certificate. The command syntax to get the identity certificate is reno(config)# crypto ca enroll name We issue that command with the MSCA name to obtain our identity certificate. Here is the command and resulting output generated by the router: reno(config)# crypto ca enroll MSCA % % Start certificate enrollment .. % Create a challenge password. You will need to verbally provide this password to the CA Administrator in order to revoke your certificate. For security reasons your password will not be saved in the configuration. Please make a note of it. Password: Re-enter password: % The subject name in the certificate will be: reno.destinationie.com % Include the router serial number in the subject name? [yes/no]: n % Include an IP address in the subject name [yes/no]? n Request certificate from CA [yes/no]? yes % Certificate request sent to Certificate Authority % The certificate request fingerprint will be displayed. % The 'show crypto ca certificate' command will also show the fingerprint. When the identity certificate is received, the router displays a message on the console. When the message appears depends on when the CA issues the identity certificate. Some CAs might verify the received information used to obtain the identity certificate prior to issuing it. Other CAs might immediately issue the identity certificate. The following message indicates that the identity certificate has been received: Fingerprint: 01234567 10ABCDEF ZSR1E4R4 AB54AB58 |
- Structures, Processes and Relational Mechanisms for IT Governance
- Integration Strategies and Tactics for Information Technology Governance
- Linking the IT Balanced Scorecard to the Business Objectives at a Major Canadian Financial Group
- A View on Knowledge Management: Utilizing a Balanced Scorecard Methodology for Analyzing Knowledge Metrics
- Governance in IT Outsourcing Partnerships