Menus
Menus
While addressing menus, we will use the term menu to refer to those menus that exist at the top of the window and panels. Other menus, like popupMenus , optionMenus , and other specialty menus will be explicitly referred to. Unlike simple controls like a slider or textField , menus are defined by multiple commands. The first command defines the type of menu, and the command menuItem is used to add entries to a menu. In this sense, menus act much like layouts, acting only as a holder of other items. Interestingly, menuItem is used to define any submenus that exist for the menu. Although it does create a new menu item that can be accessed from MEL, the command menuItem acts in many ways like a variety of separate controls, so we will cover some of the flags possible for use with the command
Perhaps the three most important are the checkbox , optionBox , and radioButton options. In Figure 11.3, we see a menu demonstrating all three of these flags. In the first section are three check-box menu items, the third one enabled. The second section contains check-box menu items, and the third section contains a menu item with an option box. The radio buttons are part of a radioMenuItemCollection . Although they appear similar to the checkboxes visually, their behavior is quite different. Of all the menuItems that make up the radio collection, only one can be selected. The checkbox items, on the other hand, are either on or off on an individual basis.
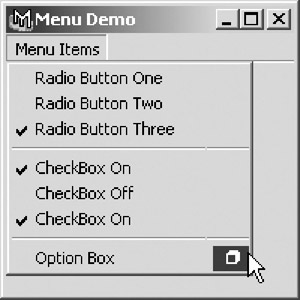
Figure 11.3: The checkbox, optionBox, and radioButton menuItem options.
Note that the different menu sections were differentiated with the divider flag used on the menuItem command. This flag makes the menuItem into a visual separator, similar to the separator control, but without the wide variety of drawing styles. Also important to realize is that the optionBox flag does not add an option box to a menuItem; rather, it turns that menuItem into an option box that has separate command flags. This means that if a menu has only a single listing, but with an option box, the menu requires two menuItem entries.
Not surprisingly, sub-menus are defined with the flag - subMenu . After creating a submenu, each subsequent menuItem command issued will be part of that submenu, until the command setParent “menu is issued. A menu with a submenu is seen in Figure 11.4.
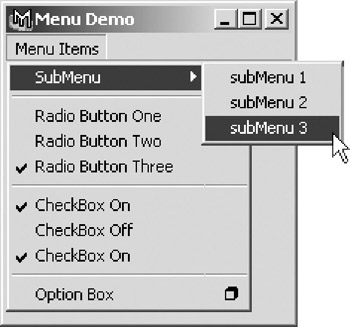
Figure 11.4: The subMenu.
When the submenu is created, you have the option to enable the new menu s ability to be torn off and whether it allows child items to have option boxes.
Menu items can either issue a command, or simply exist for later data gathering. For example, one menu item could print out a series of statements to the Script Editor, but first that command issues a query to find out whether the user has the (theoretical) checkbox menuItem "Clear Script Editor History" enabled. The checkbox and radio button menu items can also issue commands, so by having that command check the status of a menu item, you can easily create menu items that enable options. This is how many features of standard Maya editors, such as the "Show Buffer Curves" menu item in the Graph Editor, work.
In our last chapter, we used MEL to dynamically build UIs with varying amounts of buttons based on how many lights existed in the scene. While it is possible to dynamically build menus in much the same way, in general it is best to avoid this practice. There are exceptions, such as the menu to choose which camera a panel uses. The reason for this is that if options disappear from a menu, users might lose track of where to find certain items. Rather than removing items, simply disable them, by using the enable flag. Because you can execute a command when a menu is asked to be drawn, you can dynamically enable or disable items before the menu is seen by the end user. A menu showing some disabled items is seen in Figure 11.5.
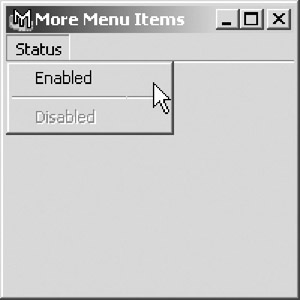
Figure 11.5: Disabled menu items.
Menus can be embedded into windows , layouts, and the general UI itself. Because of this, the screen can sometimes be overflowing with menus. For example, if we look at Figure 11.6, we see a large number of menus.
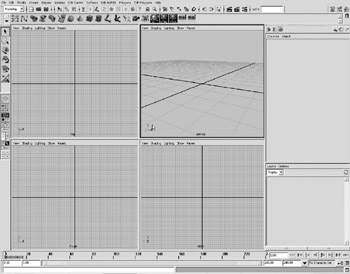
Figure 11.6: The basic modeling view of Maya.
In this somewhat basic Maya view, there are 40 menus. Each modeling pane has 5 menus, the Script Editor has 4, the Channel Box and Layer Editor each have 2, and the remaining 12 are found as part of the main Maya menu set. To ease the confusion for the user, menus generally follow guidelines according to what order they come in. While there are no brigades of menu police who will come to take away programmers who don t follow these rules, it is a sign of a considerate and intelligent programmer who does. If the menu set contains a File menu, it should come first, working from left to right. Then, the Edit menu, if it exists, coming next . If a Help menu exists, that should come as the last menu. In fact, due to the way different operating systems treat Help menus, there is a flag on the menu command to notify Maya that the menu is a Help menu.
| Note | The command showHelp can be used to launch a Web browser pointing to either a URL or to a location on the local drive. This allows programmers to put both documentation and a method for the user to find the author quite easily. It is even possible to put a "Check for Updates " option in, by passing the script version in the URL and some clever Web site construction. |
Now that we are able to create menus for menu bars, the inevitable question arises, can we add menus to the main Maya window? The answer is, obviously, yes. Not only can we add menus, we can also delete items in the menus that exist already, or even delete entire menus.
There are many reasons to remove or add items to the Maya menus. Most obvious is to add menus for the scripts we have taken the time to write. Or, perhaps we want to rearrange the order of menus or items in the menus. We can even take the drastic action of removing entire suites of tools from the artist.
To add a menu to the main Maya window, we first must give it a name, such as Edit Polygons. This menu name is defined by the global variable $gMainWindow . We can use the Command menu and explicitly name its parent as $gMainWindow , as seen in Example 11.1.
Example 11.1: Creating a menu in the main Maya interface.
// creates a menu in Main Menu // named "MEL Companion" menu -label " MEL Companion " -tearOff true -parent $gMainWindow melCompanionMenu; menuItem -label "Generate Grass" -command "generateGrass"; menuItem -label "Front" -command "switchModelView front;";
This produces the menu seen in Figure 11.7.
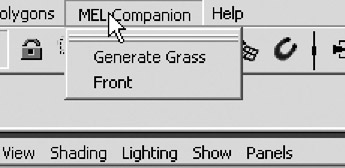
Figure 11.7: Adding a menu to the main interface.
However, if we switch modes, such as to Modeling from Animation, the menu persists. If we want to add the menu just to one of these, we have to access further global variables , which hold the names of all the menus. The four basic modules are:
-
$gModelingMenus
MayaWindowmainEditCurvesMenu
MayaWindowmainSurfacesMenu
MayaWindowmainEditSurfacesMenu
MayaWindowmainPolygonsMenu
MayaWindowmainEditPolygonsMenu
-
$gAnimationMenus
MayaWindowmainKeysMenu
MayaWindowmainDeformationsMenu
MayaWindowmainSkeletonsMenu
MayaWindowmainSkinningMenu
MayaWindowmainConstraintsMenu
MayaWindowmainCharactersMenu
-
$gDynamicsMenus
MayaWindowmainParticlesMenu
MayaWindowmainFieldsMenu
MayaWindowmainDynBodiesMenu
MayaWindowmainDynEffectsMenu
MayaWindowmainDynSettingsMenu
-
$gRenderingMenus
MayaWindowmainShadingMenu
MayaWindowmainRenTexturingMenu
MayaWindowmainRenderMenu
MayaWindowmainCreatorMenu
| Note | We found the global variables holding the names of all these menus by using the env command to get a list of every global variable. Then, we can just explore what each is, if not readily apparent from its name. |
To add a menu to one of the modal sets, we simply capture the name of the menu upon creation and add it to the array representing the menu set we want to add to, as seen in Example 11.2. Note that in the example, we check to see if the menu already exists. This is always a good idea, to avoid errors.
Example 11.2: Adding our menu only to the modeling menu set.
int $companionMenuExists; // Check for the existence of a menu containing the // word "Companion" in its title for ($eachMenu in $gModelingMenus) if (`match "Companion" $eachMenu` == " Companion") $companionMenuExists = 1; if ($companionMenuExists != 1) { $gModelingMenus[`size $gModelingMenus`] = `menu -label "The MEL Companion" -label " MEL Companion " -tearOff true melModellingCompanionMenu`; menuItem -label "Generate Grass" -command "generateGrass"; menuItem -label "Front" -command "switchModelView front;"; } Now, the menu appears only in the Modeling menu set.
To modify the appearance of the default Maya menus simply requires the modification of the scripts that define these menus. In the directory Maya is installed in, look for a directory called Maya XX , where XX represents the version number of Maya with which you are working. There will be a directory called scripts , and within that a directory entitled startup , as seen in Figure 11.8.

Figure 11.8: the Maya 4.0 Startup Scripts directory in Windows.
Within this directory, we find a vast number of scripts. Modification of these scripts will allow us to alter the menus as they appear. It is, however, a very bad idea to modify the original scripts. Instead, we can write scripts that delete elements of the array, using the scripts found in ../startup/ to find the names of the menuItem controls you want to eliminate or replace the creating scripts with or own copies, after backing up the originals . To remove an entire menu, simply find the full internal name of the menu you want to eliminate and use the command deleteUI on it.
Now that we are able to modify the Maya menus from within the interface, how do we modify Maya with these menu changes? The answer lies in a special script called userSetup.mel .
userSetup.mel
When Maya initializes, it looks in the current user s scripts directories for a file called userSetup.mel . If it finds the file, it is executed, a new file is created, and the program is ready for the user to use. If we put our menu commands into that script, we are able to rebuild the Maya interface before the user ever encounters it. The userSetup.mel is also where you can define any standard global variables you want, as well as use the alias command to further customize the Maya environment.
If the goal is to add items to or re-arrange a standard Maya menu, such as the File or Edit menu, there are two approaches. The first is to delete each item in the menu and rebuild it as you want. The second, slightly more dangerous approach, is to modify the scripts found in the ../scripts/startup/ directory. It must be stressed that this can prove to be very dangerous, so users doing this must back up the files they change so they can recover them if necessary.
Menu bars are not the only types of menu available to you within Maya. As previously stated, both marking menus and popups are considered menus. They are actually the same command, popupMenu .
While Maya provides a method for creating Marking menus for use in the viewport, it is possible to attach both to controls used in user interfaces you create.
Doing this is a simple matter of adding in the popupMenu command in the UI definition.
Example 11.3: Window ”title "Popup Menus On Controls";.
window; columnLayout -columnAttach "both" 5 -rowSpacing 10 -columnWidth 250; button -label "Has Popup"; popupMenu; menuItem -label "popItem 01"; menuItem -label "popItem 02"; menuItem -label "popItem 03"; button -label "No Popup"; showWindow;
This window is seen in action in Figure 11.9.
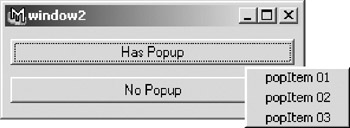
Figure 11.9: Popup menu attached to controls.
A popup menu can be added to nearly every control, but some such as buttons and fields limit the popup to being activated with the third mouse button to reduce conflicts with the behaviors of these controls.
To learn more about how to properly implement popups in a user interface, we will construct a simple UI for globally setting transformation attributes.
EAN: 2147483647
Pages: 101