Lesson 3: Securing Microsoft Exchange Server for the Internet
Lesson 3: Securing Microsoft Exchange Server for the Internet
E-mail is one of the two primary reasons people use the Internet, so interoperability among different e-mail server applications was originally more important than security. Competing vendors either did not implement any form of security or chose different security standards rather than developing and adopting widely accepted cross-platform standards for security. Therefore, two primary security problems affect e-mail delivery on the Internet:
-
The lack of a standard authentication protocol to determine who is a valid mail sender. Any unauthorized user can send e-mail through your mail servers. Any e-mail server can attach to your e-mail server and send e-mail to it with no specific form of authentication.
-
The lack of a standard encryption standard for exchanging credentials securely. The only standard method for users to log on to an e-mail server is to pass plaintext user names and passwords.
Microsoft products like Exchange Server and Outlook 2000 use existing Internet standards like SSL to provide strong security. By deploying these products together, you can completely avoid the security problems that plague other systems.
To complete this lesson, you will need
-
The dc01.domain.Fabrikam.com domain controller and certificate authority
-
The Microsoft ISA Server private-side firewall set up in Lesson 1
-
A new Exchange server named exchange.domain.Fabrikam.com on IP address 192.168.241.11 installed using all default options
-
A Microsoft Windows 2000 Professional computer configured on an IP address outside the firewall
After this lesson, you will be able to
-
Understand the security problems inherent in providing Internet e-mail service
-
Configure Exchange Server to encrypt e-mail communications to clients
-
Configure Microsoft Outlook Express to support encrypted communication
Estimated lesson time: 30 minutes
Exploiting Open Relays
Spammers, those who send unsolicited e-mail to Internet consumers, frequently try to exploit mail servers on high-capacity Internet connections to send more e-mail than they would normally be able to send. This attack works because the SMTP protocol, in its standardized form, does not include any type of authentication so anyone can connect to it and send mail, which the server dutifully delivers to the intended recipient.
The solution to preventing spam from being sent through a server in your domain is to prevent e-mail from being forwarded unless it originates within, or is destined for, a valid domain on your network. In other words, as long as the "from" or "to" address is the local domain, the mail should be sent. This type of mail server is known as a closed relay.
In the context of e-mail servers, "domain" refers to the DNS domain such as "Fabrikam.com," not the windows security domain.
To prevent spammers from simply claiming to be on the local domain, local source restrictions are typically enforced by checking the source IP address of the mail sender or by requiring the user to log on to the mail server using a protocol such as the UNIX AUTH protocol, POP3, or Windows authentication. Microsoft Exchange Server uses normal Windows authentication to determine whether a user can send mail out through the server.
In its default configuration, Microsoft Exchange Server 2000 is immune to open relay attacks and cannot be exploited to relay spam. Earlier versions of Microsoft Exchange Server are not secure by default. You can find instructions on securing these versions against open relay attacks on the Microsoft Web site. Search for article 324059 at http://support.microsoft.com for information about how to close an Exchange 5.5 open relay. Earlier versions of Exchange cannot be closed and must be upgraded to Exchange 5.5 SP1 or later to prevent spammers from exploiting them.
Properly Protecting an Exchange Server
The strong support for authentication in Exchange Server comes at a price: Exchange Server must be closely integrated into a Windows domain to work correctly, which makes it dangerous to place Exchange 2000 servers in the public or perimeter network security zones. This danger arises because a large number of protocols must be exchanged through the firewall (each of which could be a potential vector for attack) and because confidential domain user account information could be sent through the firewall into the perimeter network.
As a rule, you should never have computers that are domain members sitting outside your private network. Because Exchange 2000 must participate in Active Directory, it is not a good candidate for deployment in a perimeter network. However, because it's a public server, it shouldn't be placed inside a private network. If hackers were able to exploit a public server inside a private network, they would have open access inside that unprotected private network
The solution to the Exchange Server dilemma is either to use an SMTP relay server inside the perimeter network that filters mail and forwards it securely to the Exchange Server, or to use a strong security proxy such as ISA Server to protect the Exchange Server.
Protecting Exchange Server with a Relay Mail Server
An SMTP relay server is a server whose only purpose is to receive e-mail from the Internet and then relay it to another server inside a private network. In this case, the relay sits inside the perimeter network to receive e-mail and then relays it securely to an Exchange server inside the network through some secure connection such as an SSL or IPSec tunnel, depending upon what the firewall is capable of forwarding. This solution is complex to configure and requires a third-party SMTP relay, because Exchange Server is not well suited to the task.
Protecting Exchange Server with a Strong Security Proxy
The simpler solution for Exchange 2000 is to rely on ISA Server to examine the mail protocols at the border and proxy them to an Exchange server. This solution is simple, as it requires merely using publication wizards built into ISA Server that are configured correctly for Exchange Server by default. Configuring other strong security proxies is similar in complexity.
You can install ISA Server directly on, and configure it to work in conjunction with, an Exchange server. While this configuration is not specifically covered in this chapter, it is not difficult to set up, because ISA's installation process handles it as a standard case. It is wise to use ISA Server in this mode to protect any server that is reachable from the Internet, because ISA can be configured to trap hackers who have exploited a server, preventing them from bouncing through the server to exploit the rest of your network. However, installing ISA Server should be a secondary measure after e-mail protocols have been forwarded through a private-side security proxy, not a replacement for it.
Securing Credentials with SSL
After you secure your e-mail server from attack by correctly locating it in your network and ensuring that it is not configured to relay mail without authorization, you need to consider how users will securely access their e-mail from the Internet. Internal users can simply rely on Exchange 2000 and Outlook support for integrated Windows Authentication to make security transparent on the interior of your network, but the Messaging Application Programming Interface (MAPI) protocol used natively by Exchange to transfer e-mail to clients and Integrated Windows authentication are both too complex to operate securely over the Internet.
The standard POP3 e-mail client protocol is simple enough to securely forward, network address translate, and proxy easily, but it does not meet security requirements because logon names and passwords (as well as e-mail text) are not encrypted and could be revealed to any attacker who could sniff the network.
Exchange 2000 and Outlook solve this problem by enabling SSL encryption of POP3 data between the client and the server, beginning before credentials are exchanged. This ensures that passwords and e-mail body text remain secure between the client and the server. Enabling SSL for POP3 (to receive e-mail messages) and SMTP (to securely send e-mail messages) requires only a standard encryption certificate; Exchange System Manager can walk you through requesting a standard encryption certificate from your own enterprise CA.
Certificates do not need to be deployed to clients, so end users can reach your e-mail server from their own clients as long as they know a valid user name and password. SSL is used only for encryption in Exchange Server, not for client computer authentication.

In this practice, you configure an ISA private-side firewall to forward e-mail service to an interior Exchange server that is a member of the domain and that is Active Directory integrated. You also configure the server to use Secure Password Authentication to protect the passwords of clients that use POP3 from the Internet. Finally, you test the configuration by configuring a client on the Internet to connect securely using Outlook Express.
This exercise requires the following
-
The dc01.domain.Fabrikam.com domain controller
-
An Exchange server installed in default mode named exchange.domain.Fabrikam.com, operating on IP address 192.168.241.11
-
The ISA private-side firewall configured in Lesson 1
You can download an evaluation version of Microsoft Exchange 2000 at www.microsoft.com/exchange.
Exercise 1: Forwarding Ports to Exchange
In this exercise, you configure ISA Server to publish a Microsoft Exchange Server located inside the private network.
To configure ISA Server
-
Log on to the ISA server as the administrator.
-
Click Start, point to Programs, point to Microsoft ISA Server, and click ISA Management. The ISA Management console appears as shown in Figure 11.19.
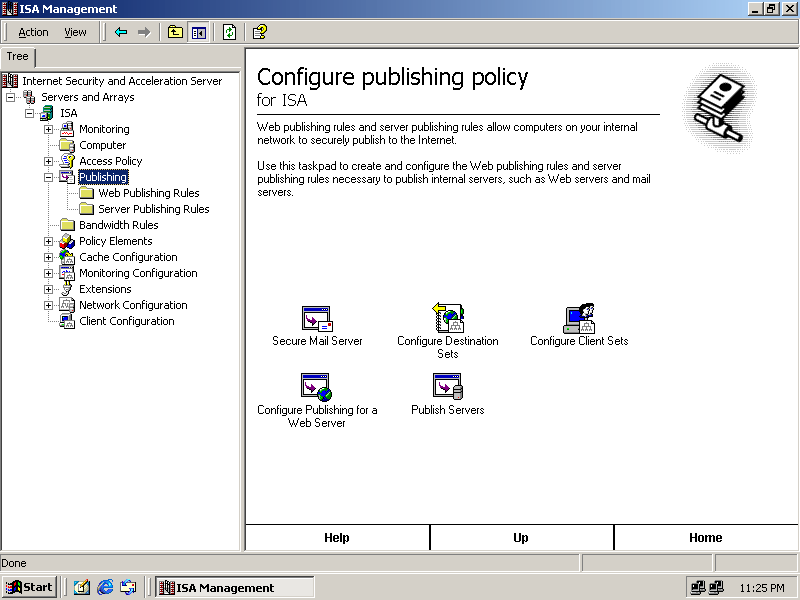
Figure 11-19. The ISA Management console
-
Expand Servers And Arrays, ISA, and Publishing.
-
Click Publishing, and then click Secure Mail Server. The Mail Server Security Wizard appears.
-
Click Next. The Mail Services Selection page appears.
-
Select the Default Authentication check boxes for Incoming SMTP and Outgoing SMTP.
-
Under Incoming SMTP, select Apply Content Filtering.
-
Select the SSL Authentication check boxes for Incoming SMTP, Outgoing SMTP, and Incoming POP3.
Your Mail Services Selection page should look like Figure 11.20.
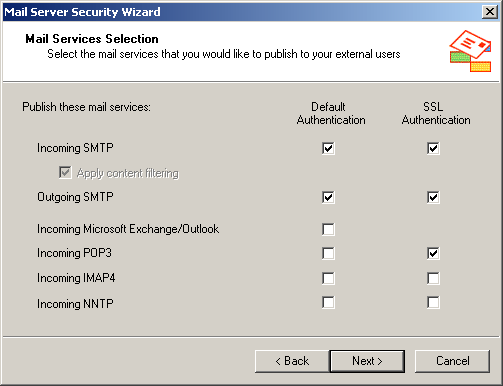
Figure 11-20. Selecting secure mail protocols
-
Click Next. The ISA Server's External Address page appears.
-
Click Browse, click the external IP address entry in the IP Address list, and click OK.
-
Click Next. The Internal Mail Server address page appears.
-
Click Find. The Find Internal IP Address dialog box appears as shown in Figure 11.21.
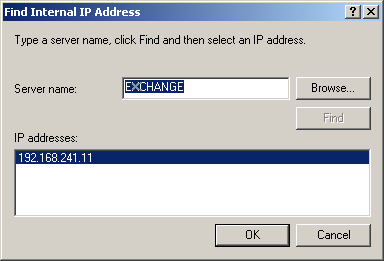
Figure 11-21. Selecting the inside IP address for the mail server
-
Type EXCHANGE in the Server Name box, and click Find.
The Server's IP Address appears in the IP Addresses list box, as shown in Figure 11.21.
-
Click OK to close the Find Internal IP Address dialog box, and then click Next. The Completing The Mail Server Security Wizard appears.
-
Click Finish, and then close the ISA server. The internal Exchange server is now available to public servers and clients.
Exercise 2: Configuring Secure Password Authentication
In this exercise, you configure a default Exchange Server installation to require SSL and install an SSL certificate to accomplish that goal.
To obtain an SSL encryption certificate for the Exchange server
-
Log on to the Exchange server as the domain administrator.
-
Click Start, point to Programs, point to Microsoft Exchange, and click System Manager.
-
Expand First Organization (Exchange), Servers, EXCHANGE, Protocols, POP3, and Default POP3 Virtual Server. The screen will appear like Figure 11.22.
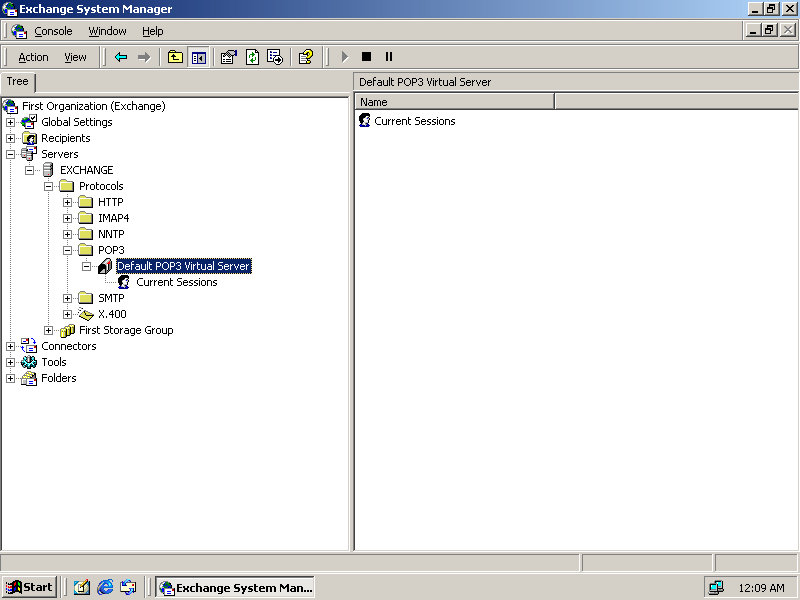
Figure 11-22. The Exchange System Manager showing the POP3 protocol service
-
Right-click Default POP3 Virtual Server, and click Properties. The Default POP3 Virtual Server Properties dialog box appears.
-
Click the Access tab, as shown in Figure 11.23.
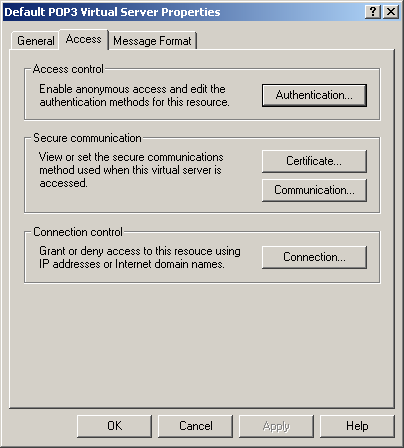
Figure 11-23. Configuring POP3 for SSL encryption
-
Click the Certificate button. The IIS Certificate Wizard appears.
-
Click Next. The Server Certificate page appears.
-
Select Create A New Certificate, and click Next. The Delayed Or Immediate Request page appears.
-
Select Send The Request Immediately To An Online Certificate Authority, and click Next.
-
The Name And Security Settings page appears, as shown in Figure 11.24, to set the certificate name and bit length.
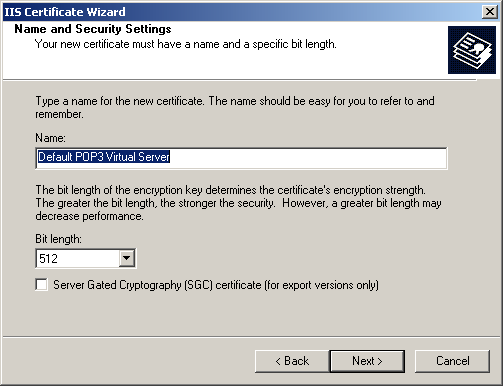
Figure 11-24. The POP3 SSL Certificate name
-
Accept the defaults, and click Next. The Organization Information page appears.
-
Type Fabrikam in the Organization box and Headquarters in the Organizational Unit box.
-
When the Your Site's Common Name box appears, type 10.0.0.90, and click Next.
The content of the Your Site's Common Name box is crucial to the proper operation of POP3 and SMTP over SSL. The information in this box must match the server name entered into every client e-mail application's account server name box, or the SSL connection will fail. In this exercise, you are using an IP address because it is not feasible to register the IP address of a test machine with an Internet Domain Name registrar for a lesson, but you would normally use the fully qualified domain name of the server (in this case, exchange.domain.fabrikam.com) in this box for a production server.
-
When the Geographical Information page appears, select US in the Country/Region box, type WA in the State/Province box, and type Redmond in the City/Locality box.
-
Click Next. The Choose A Certificate Authority page appears. The dc01.domain.Fabrikam.com\Fabrikam Enterprise Root Certifier should appear in the box.
-
Click Next. The Certificate Request Submission page appears as shown in Figure 11.25.
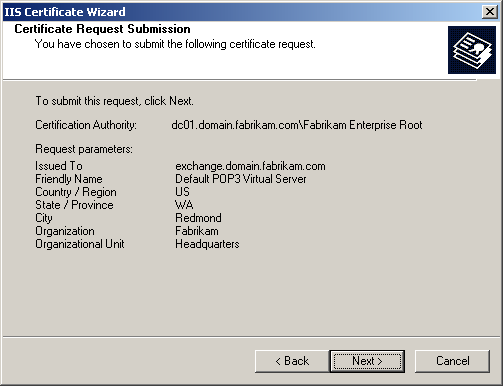
Figure 11-25. The elements of a completed certificate form
-
Click Next. The completion page appears. Click Finish.
To establish SSL encryption for POP3 connections
-
On the Access tab of the Default POP3 Virtual Server Properties dialog box, click the Communication button.
-
The Security dialog box appears as shown in Figure 11.26.
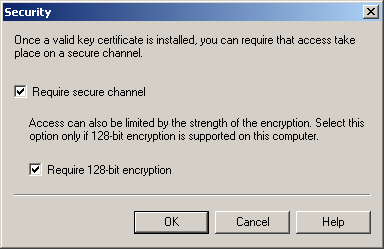
Figure 11-26. Configuring POP3 for SSL
-
Select the Require Secure Channel and Require 128-bit Encryption check boxes.
-
Click OK to close the Security dialog box.
-
Click OK to close the Default POP3 Virtual Server Properties dialog box.
-
Click the stop icon in the toolbar to stop the POP3 service.
-
Click the start icon in the toolbar to start the POP3 service.
To configure the Exchange server e-mail address policy
-
Under Recipients in the Exchange Systems Manager console, click Recipient Policies.
-
Double-click Default Policy. The Default Policy Properties dialog box appears.
-
Click the E-Mail Addresses tab. The dialog box now appears as shown in Figure 11.27.
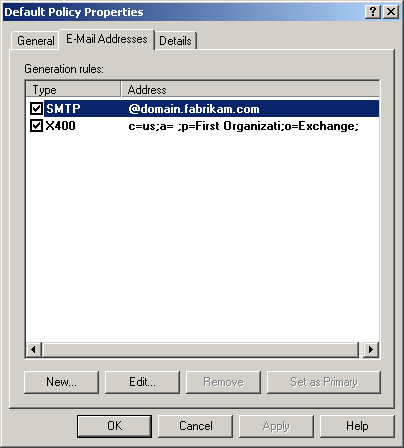
Figure 11-27. The Default SMTP policy
-
Double-click SMTP. The SMTP Address Properties dialog box appears.
-
Replace the @domain.fabrikam.com text in the Address box with @fabrikam.com, as shown in Figure 11.28.

Figure 11-28. Changing the default SMTP domain
-
Click OK to close the SMTP Address Properties dialog box.
-
Click OK to close the Default Policy Properties.
-
Click Yes when the Exchange System Manager console asks if you want to update all corresponding recipient e-mail addresses to match the new address.
-
Close the Exchange System Manager console.
Exercise 3: Testing Exchange Server Security
In this exercise, you test the Exchange Server and ISA Server configuration by configuring a machine in the perimeter network to connect through the ISA server to the Exchange server using POP3/SSL. For the purposes of this exercise, the perimeter network is essentially the same as the Internet.
To configure an e-mail account in the domain
-
Log on to the EXCHANGE server as the administrator.
-
Open the Active Directory Users And Computers management console.
-
Expand domain.Fabrikam.com and Departments.
-
Click Design.
-
Right-click Syed Abbas, and click Exchange Tasks. The Exchange Task Wizard appears.
-
Click Next.
-
Verify that Create Mailbox is selected, and click Next. The Create Mailbox page appears as shown in Figure 11.29.

Figure 11-29. Creating a user's mailbox in Active Directory
-
Click Next. The wizard creates the mailbox.
-
Click Finish, and close the Active Directory Users And Computers management console.
To connect securely to an Exchange server from the Internet
-
Log on to the Windows 2000 workstation located in the perimeter network.
-
Start Outlook Express.
Outlook Express appears, and the Internet Connection Wizard opens to help you configure an e-mail account the first time you use Outlook Express.
-
In the Display Name box, type Kevin Kennedy, and click Next.
-
In the E-mail Address box, type kkennedy@Fabrikam.com, and click Next.
-
In the Incoming Mail Server and Outgoing Mail Server boxes, type 10.0.0.90, and click Next.
-
Click Finish to close the Internet Connection Wizard.
-
The Outlook Express e-mail client appears as shown in Figure 11.30.
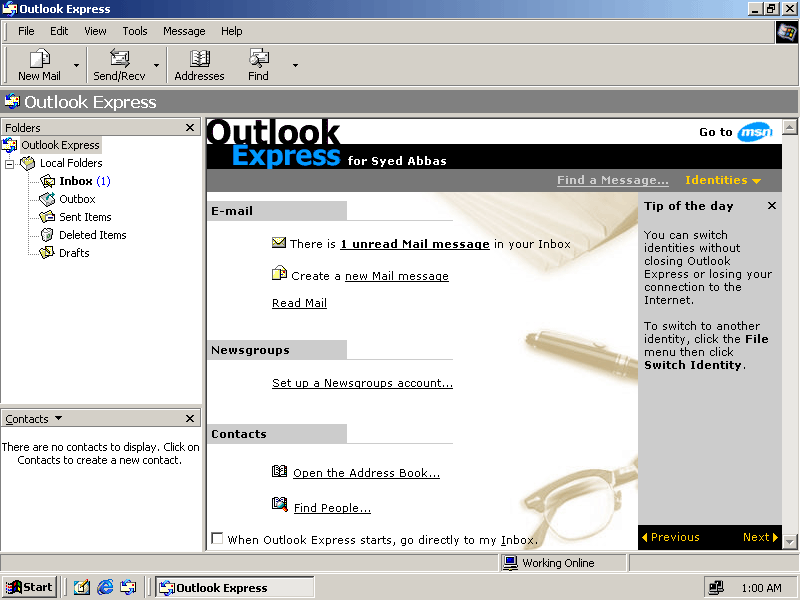
Figure 11-30. Outlook Express
-
From the Tools menu, choose Accounts. The Internet Accounts dialog box appears with account 10.0.0.90 selected.
-
Click Properties. The 10.0.0.90 Properties dialog box appears.
-
Click the Advanced tab. The Advanced tab appears as shown in Figure 11.31.
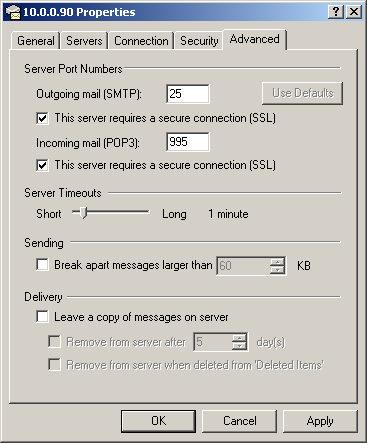
Figure 11-31. Enabling POP3 SSL encryption on the client side
-
Under Outgoing Mail (SMTP), select the This Server Requires A Secure Connection (SSL) check box.
-
Under Incoming Mail (POP3), select the This Server Requires A Secure Connection (SSL) check box. The displayed TCP port will change from 110 to 995.
-
Click OK to close the 10.0.0.90 Properties dialog box.
-
Click Close to close the Internet Accounts dialog box.
-
Click the Send/Rcv button in the toolbar. Exchange will use the SSL connection to check for e-mail on the Exchange server mapped through the ISA server and report that the exchange was successfully completed, as shown in Figure 11.32.
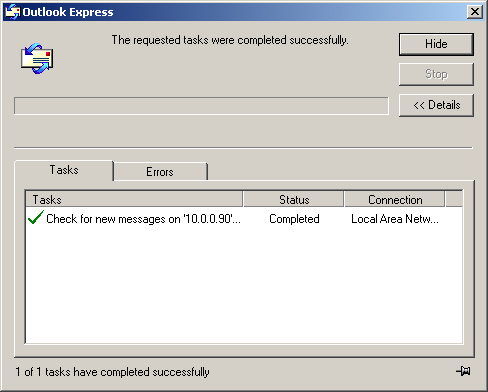
Figure 11-32. Exchanging mail over SSL

The following questions are intended to reinforce key information in this lesson. If you are unable to answer a question, review the lesson and try the question again. Answers to the questions can be found in the appendix.
-
What are the two primary problems affecting e-mail on the Internet?
-
How does Exchange Server solve these problems?
-
Why is it unwise to place an Exchange server in the perimeter network?
-
What are common methods used to secure an Exchange 2000 server inside a private network?
-
What method of encryption does Exchange Server support for passing credentials?
Lesson Summary
-
Traditional e-mail protocols lack standards for authenticating other mail servers and for protecting and authenticating e-mail clients. Microsoft Exchange implements these two functions using SSL for encryption and certificates.
-
Open Relays allow spammers to send bulk e-mail through them. Microsoft Exchange 2000 is immune to bulk spamming because it requires authentication from e-mail clients in order to transmit e-mail.
-
Exchange 2000 servers should remain on the interior of private networks because they interact heavily with the Active Directory database and store sensitive information. A strong security proxy or a relay SMTP server should be used to transmit e-mail through the perimeter network to the Exchange server.
-
For clients on the Internet, POP3 with SSL is the preferred method of authenticating securely with Exchange Server. The default MAPI protocol used with Exchange Server is difficult to get working correctly through a firewall and difficult to encrypt.
EAN: 2147483647
Pages: 82