Lesson 2: Configuring IPSec Between Untrusted Networks
Lesson 2: Configuring IPSec Between Untrusted Networks
Using IPSec between networks requires some method of exchanging secret keys for IKE negotiation other than Kerberos because Kerberos-based key exchange is available only to machines within the same domain or with an existing trust relationship. For testing purposes, it is desirable to use the simplest method: manual keying. Manual keying enables administrators to type matching secret keys (pass phrases) at both end systems to establish that IPSec policies are functioning correctly.
To complete this lesson, you will need
-
Member server ms01
-
Domain controller dc01
-
Domain controller gdi-dc-01
After this lesson, you will be able to
-
Configure IPSec using manual keys
-
Understand IPSec filters
Estimated lesson time: 30 minutes
Providing a Secret Key
Windows 2000 allows administrators to manually type in a secret key to be used in IKE negotiation. This method is the simplest way to provide secret keys for IKE. However, manual keys have a number of problems:
-
Manual keys cannot be distributed automatically each participant must be individually administered.
-
Manual keys are generated by humans, and are usually far less random than most machine-generated keys.
-
It is difficult to securely distribute manual keys over any significant distance.
In a high-security application, you cannot simply phone another administrator over a non-secure telephone and speak the key, because the telephone conversation might be overheard. E-mailing the information is also not secure. Your key is only as secure as the method used to transmit it. Arguably, the only secure method would be to have the same administrator key both sides from memory by traveling to the two locations.
Certificates solve these problems by using public key security to distribute the secret key necessary for IKE negotiation. Even though using certificates is the preferred solution, it's more complex because it adds all the possible failure modes of certificate distribution to the already complex configuration of IPSec.
In a ground-up deployment, you can use manual keying with non-secure keys to prove that the IPSec configuration works as long as the servers in question do not yet have secure data on them. When you've established that your IPSec policies are working, it's a simple matter to upgrade from manually keyed IKE to certificate-based IKE. Once that has been done, you can begin using the servers in production, secure in the knowledge that no intermediate party will be able to decrypt your communications.
Creating IPSec Policy in Windows 2000
IPSec policy is applied to packets when they are transmitted or received depending on how their headers match the IPSec filters that are applied to the computer. On an individual basis, if a packet's header matches an IPSec filter, then
-
The packet is blocked.
-
The packet is permitted.
-
An IPSec filter action is applied to the packet.
The first two options are obvious. All IPSec actions are based on the third option.
Creating IPSec Filters
To enable IPSec, administrators first define a filter list that applies to the computer. Once the filter list is defined, any number of individual IP filters can be created.
IPSec filters describe the packets that the filter will apply to. Any number of combinations can be used, and packets can be described by a specific IP address, a network range, or a domain name, as well as by protocol and port number.
Once you've created a filter, you can apply any number of filter actions to the filter. Filter actions allow you to specify whether security is required, which protocols are allowed, and what IPSec mechanisms to use, such as AH, ESP, and tunnel mode.
IPSec requires two-way communications between hosts. Filters are actually unidirectional they create only an inbound or an outbound rule. Because the vast majority of scenarios require bi-directional functionality, Windows 2000 can automatically mirror the filter to create the reciprocal filter by transposing the source and destination addresses.
Always mirror your filters when you create them unless you have a specific reason to do otherwise.
What Are the IPSec Exceptions?
A few types of packets are always exempted from IPSec filters because they must be passed in order for IPSec to function, or they represent a type of service that cannot be secured. They are
-
Broadcast addresses.
-
Multicast-addresses (224.0.0.0 - 239.255.255.255).
-
Quality of Service requests. RSVP (IP protocol 46) allows Quality of Service (QOS) requests to pass. If QOS requests were encrypted, intermediate systems could not use them to prioritize traffic, and QOS would not function.
-
Kerberos (UDP port 88), used for IPSec's IKE negotiation service, which is used for authentication of other computers in a domain. IKE is secure by itself.
-
IKE (UDP port 500), required to allow IKE to negotiate parameters for IPSec security. All IPSec implementations must pass IKE messages.
These exemptions do not apply to tunnel mode filters tunnel mode passes all IP traffic without inspecting the contents of the interior packets because it is designed to function as an intermediate system. Tunnels cannot filter based on protocol type for the same reason.

Fabrikam has a business partner, Graphic Design Institute, which produces the collateral print materials for Fabrikam products. Design documents and requirements must be securely transmitted to GDI, and finished print materials must remain secure when they are returned to Fabrikam.
In this practice, you create a manually keyed IPSec security association between two hosts on foreign networks (networks between which no trust relationship exists) using manual keying. This procedure is a prelude to creating a security association that is keyed using certificates.
Exercise 1: Configuring a Foreign Server for IP Security
In this exercise, you establish connectivity between the local and remote server, secure the remote server, and then ensure that communication has been disrupted by the security requirement.
To establish a test environment
Perform this procedure on member server ms01.domain.Fabrikam.com while logged on as Administrator.
-
Click Start, point to Programs, point to Accessories, and click Command Prompt. The command prompt appears.
-
Type Ping 192.168.241.60 -t, replacing the IP address with the address of gdi-dc-01.graphicdesigninstitute.com on your network.
A ping reply will appear once per second until the screen is full. Leave this procedure running on the console throughout the remainder of this lesson.
To create an IPSec Policy management console on the remote host
Perform this procedure on the gdi-dc-01.extranet.graphicdesigninstitute.com.
-
Click Start, and click Run to open the Run dialog box.
-
Type MMC and then click OK. An empty management console appears.
-
From the Console menu, choose Add/Remove Snap-in.
-
In the Add/Remove Snap-in dialog box, click Add.
-
In the Add Standalone Snap-in dialog box, double-click IP Security Policy Management.
-
In the Select Computer Wizard, leave Local Computer selected, and click Finish.
-
Click Close to close the Add Standalone Snap-in dialog box.
-
Click OK to close the Add/Remove Snap-in dialog box.
The IP Security Policies Snap-in appears in the management console as shown in Figure 8.8.
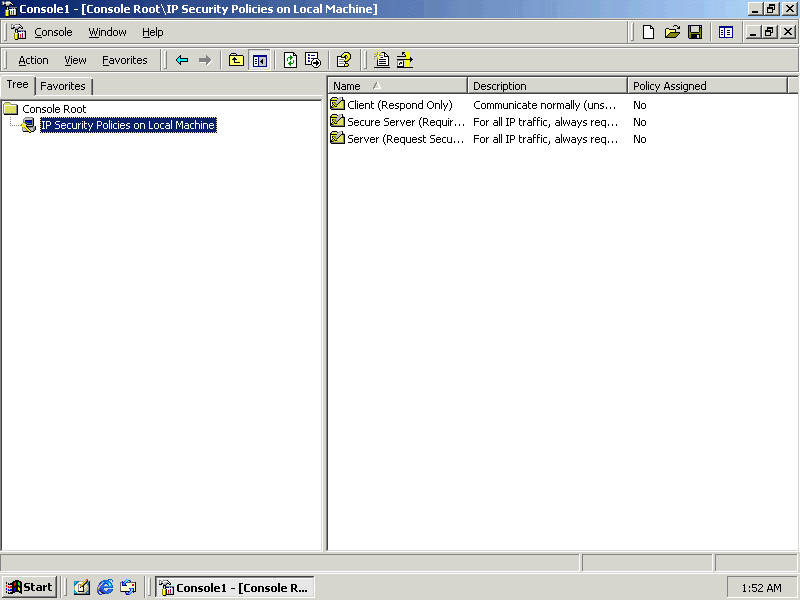
Figure 8-8. The Local IP Security console
-
From the Console menu, choose Save. The Save As dialog box appears.
-
Type IP Security (local) in the File Name box and click Save.
The IP Security (local) management console will appear on the Administrative Tools menu.
To create an IPSec policy on the remote host
Perform this procedure on gdi-dc-01.graphicdesigninstitute.com.
-
In the IP Security (Local) management console, right-click IPSecurity Policies On Local Machine, and click Create IP Security Policy.
-
When the IP Security Policy Wizard appears, click Next.
-
Type Encrypted Link to Fabrikam in the Name box, as shown in Figure 8.9, and then click Next.
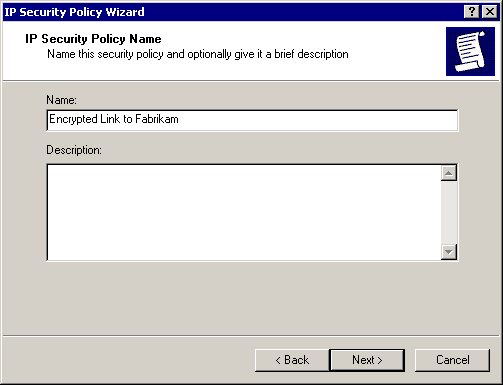
Figure 8-9. The IP Security Policy Wizard
-
Clear the Activate The Default Response Rule check box, and click Next.
-
Ensure that the Edit Properties check box is selected, and click Finish.
The Encrypted Link To Fabrikam Properties dialog box appears, as shown in Figure 8.10.
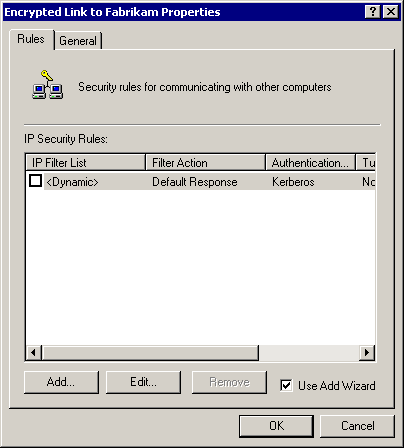
Figure 8-10. The IP filter list
-
Ensure that the Use Add Wizard check box is selected, and click Add.
-
When the Security Rule Wizard appears, click Next.
-
On the Tunnel Endpoint page, leave This Rule Does Not Specify A Tunnel selected, and click Next.
-
On the Network Type page, leave All Network Connections selected, and click Next.
-
On the Authentication Method page, select Use This String To Protect The Key Exchange.
-
Type test_preshared_key in the box, as shown in Figure 8.11.
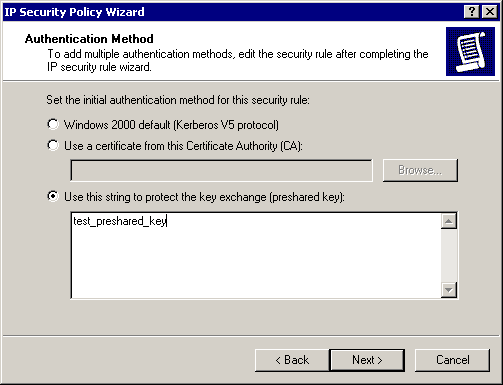
Figure 8-11. Using a pre-shared secret key to encrypt traffic between machines
-
Click Next.
-
On the IP Filter list page, click Add. The IP Filter List dialog box appears, as shown in Figure 8.12.
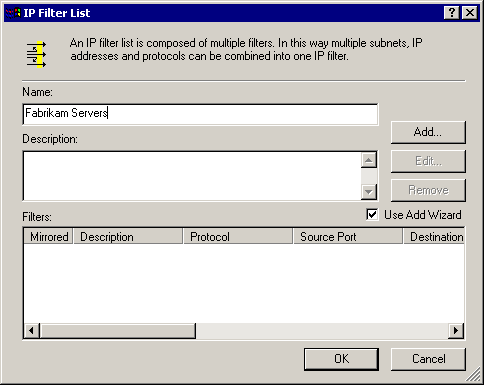
Figure 8-12. The IP Filter List dialog box
-
Type Fabrikam Servers in the Name box.
-
Clear the Use Add Wizard check box.
-
Click Add. The Filter Properties dialog box appears.
-
In the Destination Address list, select A Specific IP Address. An IP Address box and a Subnet Mask box appear.
-
Type 192.168.241.63 in the Address box, replacing the IP address with the IP address of member server ms01.domain.Fabrikam.com on your test network.
The Filter Properties dialog box should now be similar to Figure 8.13.
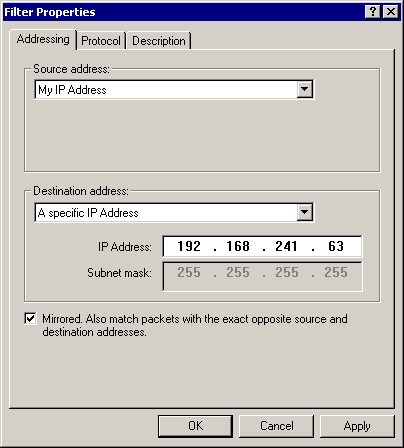
Figure 8-13. The Filter Properties dialog box
-
Ensure that the Mirrored check box is selected, and click OK.
-
Click Close to close the IP Filter List dialog box.
Fabrikam Servers now appears in the list of IP Filter Lists shown in the Security Rule Wizard, as shown in Figure 8.14.
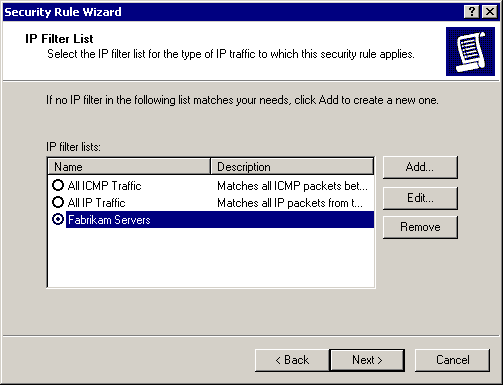
Figure 8-14. Selecting the Fabrikam Server IP filter
-
Select Fabrikam Servers, and click Next. The Filter Action page appears.
-
Ensure that the Use Add Wizard check box is selected, and click Add.
-
When the IP Security Filter Action Wizard appears, click Next.
-
Type Encrypt Fabrikam Traffic in the Name box, and click Next.
-
On the Filter Action General Options page, leave Negotiate Security selected, and click Next.
-
On the Communicating With Computers That Do Not Support IPSec page, leave Do Not Communicate With Computers That Do Not Support IPSec selected, and click Next.
-
On the IP Traffic Security page, leave High (Encapsulated Secure Payload, Data Will Be Encrypted, Authenticated, and Unmodified) selected, and click Next.
-
Click Finish. Encrypt Fabrikam Traffic now appears in the Filter Action dialog box as shown in Figure 8.15.
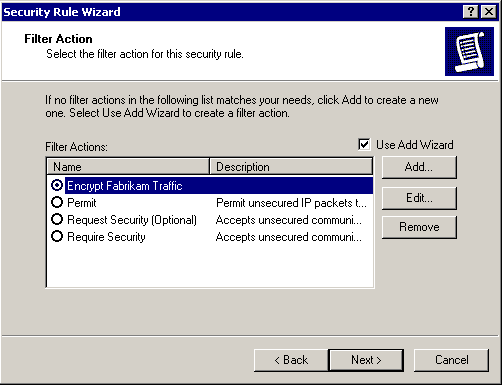
Figure 8-15. Creating a IP Security Filter Action
-
On the Filter Action page, select Encrypt Fabrikam Traffic, and click Next.
-
Click Finish to close the Security Rule Wizard, and return to the Encrypted Link To Fabrikam Properties dialog box.
-
Click Close to return to the IP Security (Local) management console.
-
Right-click the Encrypted Link to Fabrikam policy, and click Assign.
Notice that the constant ping on ms01.domain.Fabrikam.com now fails with a Request Timed Out message, as shown in Figure 8.16. This indicates that gdi-dc-01 is no longer accepting traffic from ms01.domain.Fabrikam.com because of the IPSec policy now in place.
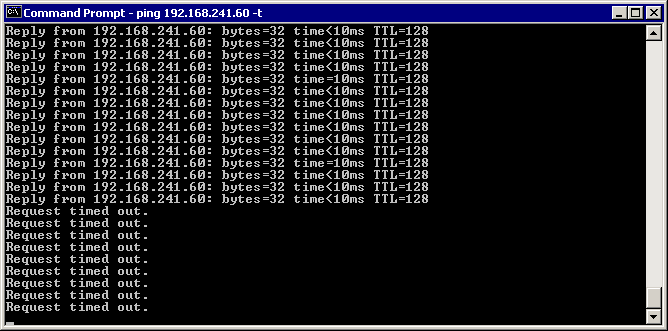
Figure 8-16. ICMP traffic between hosts fails if matching authentication for IKE cannot be resolved
-
Close the IP Security (Local) management console.
Exercise 2: Configuring Servers in a Domain for IPSec with a Foreign Server
In this exercise, you extend the existing security policy for servers to allow communications with a foreign server.
To create an IPSec policy for secure servers in the domain
Perform this procedure on the dc01.domain.Fabrikam.com domain controller.
-
Click Start, point to Programs, point to Administrative Tools, and click Active Directory Users And Computers. The Active Directory Users And Computers management console appears.
-
Right-click Secure Servers, and click Properties.
-
In the Secure Servers Properties dialog box, click the Group Policy tab.
-
Double-click Secure Servers IPSec Policy. The Group Policy management console appears.
-
Expand Computer Configuration, Windows Settings, and Security Settings.
-
Right-click IP Security Policies On Active Directory, and click Create IP Security Policy.
To work with the IP Security Policy Wizard
-
When the IP Security Policy Wizard appears, click Next.
-
On the IP Security Policy Name page, type Encrypted Link to Graphic Design Institute in the Name box, and then click Next.
-
On the Requests For Secure Communication page, clear the Activate The Default Response Rule check box, and click Next.
-
Ensure that the Edit Properties check box is selected, and click Finish. The Encrypted Link To Fabrikam Properties dialog box appears.
-
Ensure that the Use Add Wizard check box is selected, and click Add.
-
When the Security Rule Wizard appears, click Next.
-
On the Tunnel Endpoint page, leave This Rule Does Not Specify A Tunnel selected, and click Next.
-
On the Network Type page, leave All Network Connections selected, and click Next.
-
On the Authentication Method page, select Use This String To Protect The Key Exchange.
-
Type test_preshared_key in the box, as previously shown in Figure 8.11, and click Next.
-
On the IP Filter List page, click Add to open the IP Filter List dialog box.
-
Type GDI Servers in the Name box, clear the Use Add Wizard check box, and click Add. The Filter Properties dialog box appears.
-
In the Destination Address list, select A Specific IP Address. An IP Address box and a Subnet Mask box appear.
-
Type 192.168.241.60 in the IP Address box, replacing the IP address with the IP address of member server gdi-dc-01.graphicdesigninstitute.com on your test network.
The Filter Properties dialog box should now be similar to Figure 8.17.

Figure 8-17. The Filter Properties dialog box showing a specific IP address as the destination
-
Ensure that the Mirrored check box is selected, and click OK.
-
Click Close to close the IP Filter List dialog box.
Fabrikam Servers now appears in the list of IP Filter Lists shown in the Security Rule Wizard.
-
Select GDI Servers, and click Next. The Filter Action page appears.
-
Ensure that the Use Add Wizard check box is selected, and click Add.
-
When the IP Security Filter Action Wizard appears, click Next.
-
On the Filter Action Name page, type Encrypt GDI Traffic in the Name box, and click Next.
-
On the Filter Action General Options page, leave Negotiate Security selected, and click Next.
-
On the Communicating With Computers That Do Not Support IPSec page, leave Do Not Communicate With Computers That Do Not Support IPSec selected, and click Next.
-
On the IP Traffic Security page, leave High (Encapsulated Secure Payload, Data Will Be Encrypted, Authenticated, and Unmodified) selected, and click Next.
-
Click Finish. Encrypt GDI Traffic will now appear in the Filter Action dialog box, as shown in Figure 8.18.

Figure 8-18. Selecting a Filter Action to encrypt traffic between servers
-
Select Encrypt GDI Traffic, and click Next.
-
Ensure that the Edit Properties check box is cleared, and click Finish to close the Security Rule Wizard and return to the Encrypted Link To Graphic Design Institute Properties dialog box.
GDI Servers should appear selected in the IP Security Rules list, as shown in Figure 8.19.
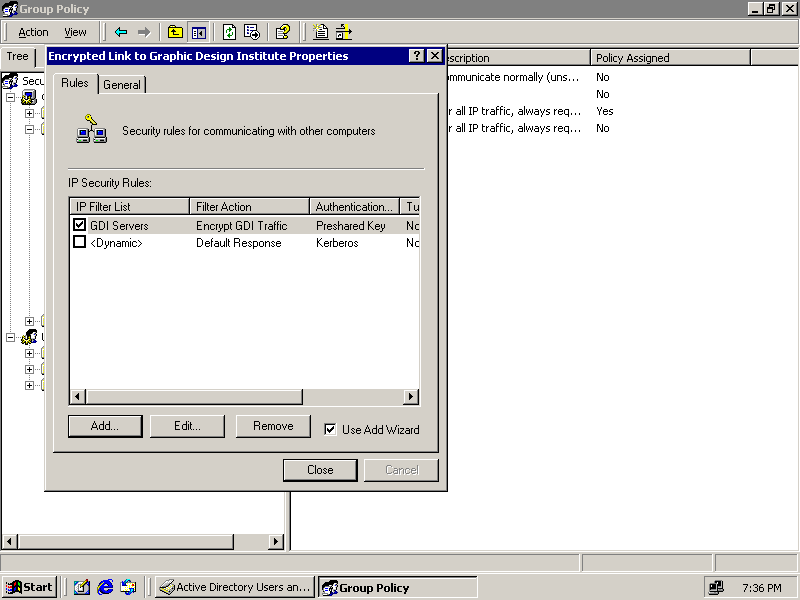
Figure 8-19. Selecting a custom IP security rule
-
Click Close to return to the Group Policy management console. Encrypted Link To Graphic Design Institute now appears in the list of IP Security Policies.
-
Right-click the Encrypted Link To Graphic Design Institute policy, and click Assign.
-
Close the Group Policy management console.
-
Click OK to close the Secure Servers Properties window.
-
Close the Active Directory Users And Computers management console.
To test the policy application
Perform this procedure on member server ms01.domain.Fabrikam.com.
-
Verify that the command prompt you set to continuously ping gdi-dc-01.graphicdesigninstitute.com is still showing Request Timed Out. Leave this window open for this procedure.
-
Click Start, point to Programs, point to Accessories, and click Command Prompt. A second command prompt appears.
-
Type secedit /refreshpolicy MACHINE_POLICY and press Enter.
The Secedit program will report that a policy refresh has been initiated. In a few seconds, the Request Timed Out message will be replaced by a Negotiating IP Security Message, which will shortly be replaced by Reply From messages indicating that encrypted communications are now operating between the servers, as shown in Figure 8.20.
-
Type Exit.
-
Click Start, and click Run to open the Run dialog box.
-
Type ipsecmon, and click OK. The IP Security Monitor appears as shown in Figure 8.21.
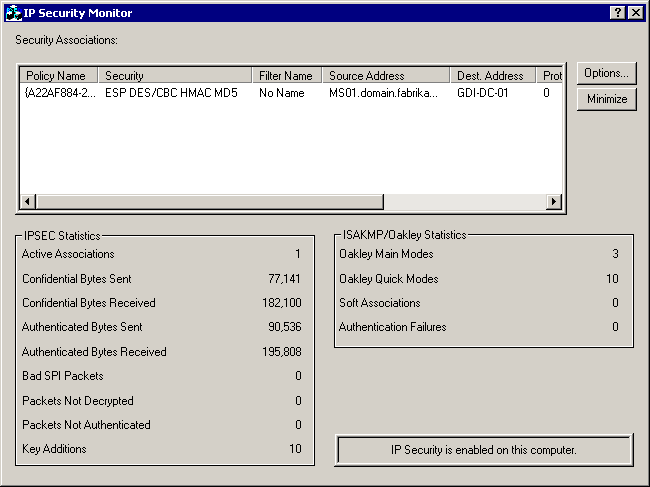
Figure 8-21. Using the IP Security Monitor to verify IPSec connectivity
-
Verify the IP Security connection between ms01.domain.Fabrikam.com and gdi-dc-01.
-
Close the IP Security Monitor.
-
Select the Command Prompt running ping and press Ctrl+C. The ping will stop.
-
Type Exit at the command prompt to close the window.
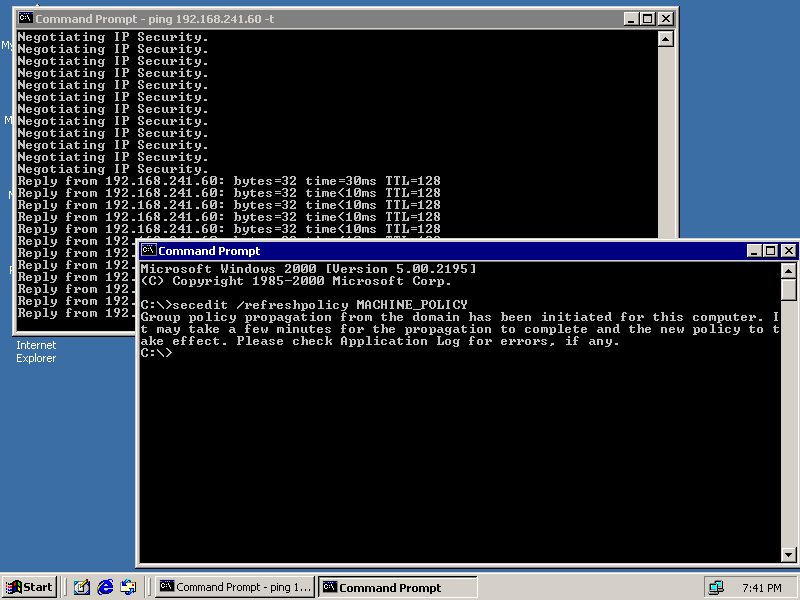
Figure 8-20. ICMP messages begin passing as soon as IKE negotiation converges

The following questions are intended to reinforce key information in this lesson. If you are unable to answer a question, review the lesson and try the question again. Answers to the questions can be found in the appendix.
-
Which methods are available to distribute IKE secret keys in Windows 2000?
-
When would you use manual keying rather than Kerberos or certificates?
-
How is IPSec policy defined in Windows 2000?
-
Name the types of traffic that are never secured by IPSec.
Lesson Summary
-
There are three methods that can be used to distribute secret keys for IKE negotiation: Kerberos, manual keying, and certificates rooted in the same trusted certificate authority.
-
Manual keying is appropriate for use in situations where neither Kerberos nor certificates can be used, for testing IPSec without the complexity of certificates, and when establishing individual IPSec associations on an infrequent basis, where security is not paramount.
-
IPSec policy in Windows 2000 is defined by using filter lists comprised of filters that specify the hosts, networks, and ports that should trigger IPSec actions. Valid IPSec actions include blocking traffic, permitting traffic, and securing traffic using IPSec.
-
There are some types of packets that are never secured using IPSec: broadcast, multicast, RSVP-QOS, Kerberos, and IKE traffic. These types of traffic must remain unsecured in order for IPSec to work correctly. Exceptions don't apply to tunnel mode traffic, which encrypts everything.
EAN: 2147483647
Pages: 82