Lesson 1: Managing File System Permissions
Lesson 1: Managing File System Permissions
In this lesson, you learn about file system permissions that apply to files and folders stored on NTFS volumes. The next few lessons in this chapter cover the other types of permissions you can use to secure your system.
Permissions are the foundation on which most Windows 2000 security features are based. You need to understand both how to allow access to security groups and how to deny access to security groups for purposes such as controlling access to files and controlling the application of Group Policy Objects to specific users.
After completing this lesson, you will be able to
-
Understand the role of NTFS permissions in securing a computer
-
Manage NTFS permissions
Estimated lesson time: 1 hour
Managing Permissions-Based Security
Windows implements authorization by attaching a security descriptor to each secured object in the system, such as a file or folder. Security descriptors contain the following information:
-
The owner SID, which is the security identifier (SID) of the security principal that created the object, or the security principal that was assigned to be the owner by an administrator exercising the Take Ownership user right.
-
The group SID, which is the SID of the security group that owns the object. Group ownership is used only by the Portable Operating System Interface for UNIX (POSIX). Windows does not provide an interface for establishing group ownership.
-
The discretionary access control list (DACL), usually referred to simply as an ACL, which contains access control entries (ACEs) composed of a security principal's SID and a specific type of allowed or denied access. ACLs are described in detail in Chapter 2, "User Accounts and Security Groups."
-
The system access control list (SACL), which contains ACEs that specify how access to the object by permitted security principals should be recorded in the audit log. Auditing is discussed in Lesson 3 of this chapter.
Technically, any resource can be controlled with security descriptors if the process that provides access to the resource is configured to manage security, and if access to the object cannot be controlled by any other process that does not respect security descriptors. In the case of file system permissions, the NTFS driver manages setting permissions, and the security reference monitor process of the Local Security Authority (LSA) checks permissions whenever files on an NTFS-formatted volume are accessed.
Why Is File System Access Control Important?
Hackers can completely circumvent any security restriction in any computer if they have the ability to modify files on disk, because this gives them the ability to change the files that store the operating system. If they can change the operating system to eliminate security checks, they need only reboot the computer to run their modified version of the operating system. Making a computer fail or "crash" is simple to accomplish, even remotely, using one of thousands of different attacks. They would subsequently have complete access to the system.
This is one of the many ways in which a seemingly small security failure can be exploited to gain full control of a computer system. File permissions and NTFS are absolutely required to secure a computer against inappropriate use.
Volumes that are formatted with FAT or FAT32 file systems do not support security descriptors, so all users have full control of these files. For this reason, you should not use FAT or FAT32 volumes on computers connected to a domain.
How Do Permissions Work?
Every file and folder on an NTFS volume has a security descriptor containing an ACL, which is comprised of any number of ACEs. An ACE is a simple combination of
-
An action that can be taken on the object
-
Whether the action is being permitted or denied
-
The SID of the security principal to which the ACE applies
For example, an ACE might combine the Read action with the Finance security group SID, thus forming a permission. Because this ACE is contained in the ACL attached to a file called Fiscal Year Projections.xls, it is inherently joined to that file, so the relationship is established between the secured resource, the permitted activity, and the permitted user. The security principal represented by the SID in the ACE is able to perform the action on the secured resource, which is specified in the ACE. In Figure 4.1, you can see how a match between any SID in an access token and an ACE allows access.
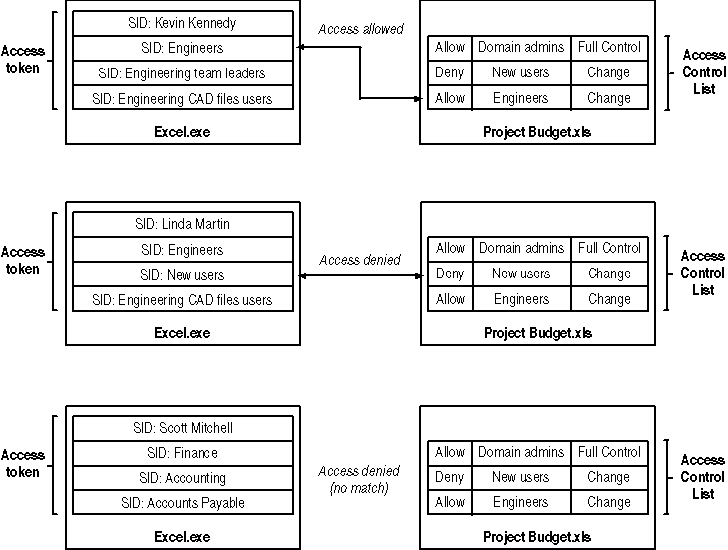
Figure 4-1. An ACE containing the SID allows access
Determining Security Requirements
When you need to create permissions, you can list your security requirements in plain language and then convert them to specific permissions. For example, here are some requirements:
"Members of the Finance Department should have the ability to read, write, and delete files in the Accounting folder."
To satisfy these requirements, you first need to create a group called Finance Department containing all the user accounts of users in that department. Next, you need to create an ACL containing an ACE that specifies that the Finance Department security group should have Read, Write, and Delete entries in the security descriptor for the Accounting folder. The Read, Write, and Delete permissions are combined into a single permission called Modify, which is appropriate in this case. (The Modify permission is described in Table 4.1.)
Using Standard File System Permissions
To secure all the resources in your network, you need to survey managers to determine exactly which users require what type of access to which documents. After you have this information, you can create meaningful security groups and use them to secure the directory structure of your networked resources.
Table 4.1 lists the standard permissions for files and folders. Standard permissions are used to define a user's or group's access to a secured resource, and they provide most of the flexibility required in most cases.
| Permission | Use |
| Full Control | Allows full access to the resource with no restrictions |
| Modify | Allows users to read, write, create, and delete files, and change file attributes, but does not allow them to change permissions on files or take ownership |
| Read & Execute | Allows users to read files and to execute them if they are executables or scripts |
| Read | Allows users to read the contents of files and their attributes, but does not allow executables to be launched |
| Write | Allows users to write and append data to files |
| List Folder Contents | Allows users to display the contents of a directory (folders only) |
Special Permissions
The standard file system permissions are actually combinations of more atomic permissions called special permissions. In some rare cases, such as serving Web pages or preventing accidental access to a database file, you might need finer control of how resources can be used than standard file system permissions allow. Table 4.2 lists the special permissions you can use to accomplish fine-tuning of permissions for files and folders.
Avoid using special file system permissions unless there is no other way to accomplish a specific security goal. Because the use of special file system permissions is unusual, other administrators might not consider looking at them when they are debugging security problems.
| Permission | Use |
| Full Control | All special permissions combined |
| Traverse Folder /Execute File | Allows users to change directories into the folder, but does not allow them to list the folder's content; for files, it allows execution of executables and scripts |
| List Folder/Read Data | Allows users to display the contents of a folder or read a file |
| Read Attributes | Allows users to display the file or folders attributes, such as its compression flag, archive flag, and read only flag |
| Read Extended Attributes | Allows users to display the file or folder's extended attributes. |
| Create Files/Write Data | Allows users to create files in the directory or overwrite files |
| Create Folders /Append Data | Allows users to create folders within the folder or append data to the file |
| Write Attributes | Allows users to change a file or folder's file system attributes |
| Write Extended Attributes | Allows users to change a file or folder's extended attributes |
| Delete Subfolders and Files | Allows users to delete files or folders within the folder |
| Delete | Allows users to delete the resource |
| Read Permissions | Allows users to enumerate the permissions for a resource |
| Change Permissions | Allows users to change the permissions on the resource |
| Take Ownership | Allows users to change the ownership information for the resource |
Cumulative Permissions
The effective permissions allowed by an ACL for a specific user are the sum of all permissions that apply to all the SIDs in the user's access token. For example, assume that David is a member of both the Bookkeeping and Accountants groups. If Bookkeeping has Read permission to the Accounts Payable folder and Accountants has Change permission for the same folder, David has both Read and Change permissions to the folder. This occurs because the security reference monitor scans the ACL and accumulates all permissions allowed by all the SIDs in the user's access token, which contains the group SIDs as well as the user SID. When the security reference monitor has accumulated all permissions, it allows the requested type of access if it appears anywhere in the ACL for any of the SIDs in the user's access token.
Deny Access Control Entries
Users can also be denied a specific type of access using an ACE. Deny ACEs take priority over all Allow ACEs for the type of access specified. Therefore, if a Deny ACE matches any of a user's SIDs in an ACL, the specified access to the secure resource will be denied, even if it is explicitly allowed by another ACE.
Explicit Allow permissions applied directly to a resource will have priority over a Deny ACE inherited from a parent folder. This contradicts the purpose of Deny ACEs and is a side effect of the way that Windows 2000 manages inherited permissions.
For example, in addition to the group memberships previously described, user David is also a member of the New Employees group. New Employees has a Deny Write ACE appearing in the Accounts Payable folder. Irrespective of his accumulated permissions, the Deny ACE blocks access and prevents writing files into the folder.
Avoid using Deny ACEs if you can accomplish the same goal by removing a user from a security group or splitting a security group into two groups with different allowed access. Remember that a SID with no ACE allows no access, so Deny ACEs are usually not necessary. Deny ACEs are usually used to temporarily restrict access to specific users or certain groups during periods of probation.
Empty ACLs
If an ACL is empty, then no user has access to the file. However, the account having the ownership right always retains the ability to change permissions, and so can add ACEs to the ACL irrespective of the permissions.
Nonexistent ACLs
If an ACL does not exist (which is not the same as being empty), then all users have full access to the file. This occurs when the file system driver does not support ACLs, as is the case with the FAT and FAT32 file systems.
Inheritance
When a file is created, its ACL is copied from the ACL of the containing directory. For this reason, it is said to "inherit" its permissions from the containing directory.
In Windows 2000, secured resources can be set to use both their own permissions and the permissions of the containing folder. With this setting, the security reference monitor scans the containing folder's ACL and the resource's ACL to establish the entire set of permissions. When permissions on the containing folder are changed, they apply immediately to all contained folders and files without being copied into each file individually, which makes the management of permissions much simpler.
Moving and Copying Files
An ACL is created containing the permissions of the parent folder whenever a file is created on an NTFS volume. This applies to all copy operations. Because a copy is a new file, the copy inherits the permissions of the folder to which it is copied, not the permissions of the original file. Copying a file does not copy the permissions of the original file.
Moving a file or folder is a different process. If you move a file or folder between volumes, the move operation is accomplished by copying the file to the new volume and then by deleting the original file or folder. Because it's a copy operation, permissions are reset on the file or folder when it is moved.
However, if you move a file or folder within the same volume, no copy is performed. Rather, the directory entry for the file name is moved to the new directory this is why moves within the same volume are immediate no matter how large the file is. Because the file has not been copied, its permissions remain unchanged. Moving a file within the same volume does not affect its permissions.
You can use the Xcopy command from the command prompt to copy files along with their permissions and owner information. The Xcopy /o switch specifies that permissions and ownership information should be copied along with files and is appropriate whenever permissions must be maintained during a move or copy operation.
Establishing Permissions Best Practices
Use permissions to secure all the computers in your organization against improper use. Permissions are the most important single security component of Windows 2000, and they are the foundation of all other security measures because they prevent the operating system from being changed. You cannot properly secure a Windows 2000 computer without understanding how to apply permissions properly.
Applying Base Permissions
The first and most basic practice is to apply meaningful permissions. The default permission for an NTFS-formatted volume is to allow the Everyone group Full Control permission. This allows anonymous users, guest users, and literally anyone who can connect to the computer to read and write files on it, and it is no more secure than an unsecured FAT32 volume.
Whenever you format an NTFS volume, replace the Everyone group Full Control permission with at least the Authenticated Users group Full Control permission. In this way, as new folders and files are created or copied into the volume, they will inherit these base permissions. The base permissions on file servers should be Authenticated Users: Change and Domain Administrators: Full Control.
Managing Permissions Changes Through a Single Folder
Windows creates the correct necessary permissions for the system drive of a computer, and beyond replacing the Everyone Full Control permission on the root of the C drive, you should not change permissions on folders you don't create. The best way to manage custom permissions that you've set is to create a single folder in each volume and customize permissions and shares within that folder.
Create a single folder on a volume within which all shared access to files will occur, and disable shared access to any other parts of the computer. Then set that single folder's NTFS permissions to the most restrictive allowable for the group of people who will access the computer remotely. For example, if the computer is a file server that will serve the engineering department, grant the Engineering security group and the Domain Administrators group Full Control permissions. When folders and shares are created inside this folder, you won't have to worry about base permissions because they're already set properly, and you won't have to worry about other folders on the computer's disk outside this area because there will be no remote access to them.
Remember, to gain full access to a file, users with Read access to the file can copy it to another volume where they have full control (or to a FAT32 volume where permissions are not checked). However, they will not be able to copy it back, so as long as the original copy is the only copy trusted to contain the true contents, this risk implies only the theft of data. Use audit policy to determine when users read specific files of high importance, as shown in Lesson 3 of this chapter.
Mimicking Your Organizational Unit Structure in Folders and Security Groups
Map your organizational hierarchy to your shared directory folder structure. For example, create shares for each of your division- or department-level organizational units (OUs), such as accounting, marketing, engineering, and so on. After you've created the shares, create security groups that are analogous to those OUs and apply those security groups as the base permissions to the folders with the same names. Create a security group that provides Full Control for Power Users of the folder, and a security group that provides Change control for typical users. Power users, such as team leaders and department heads, can then manage permissions inside their own shared folders.
The reason for creating shares at a departmental level is that departments are highly likely to be moved as a unit as the company grows and servers are outgrown. For example, when the finance department is large enough to require its own server, you can easily move the department's files and folders along with the share structure intact to another server and re-map network drives for those users using Group Policy. If you use Microsoft distributed file system (Dfs), the shared folder locator service for Windows 2000, the change from many shared folders on a single server to many servers with a single shared folder can be completely transparent.
By mapping your OUs to analogous security groups and shared folders, you make it easy to visually determine what permissions ought to be on a shared folder.
Matching your OU structure is an excellent way to start assigning permissions. However, you don't have to be strict or rigorous about mimicking OUs with security groups. Security groups should be flexible and created on an ad hoc basis to solve immediate security issues as they arise.
Editing Existing Permissions
A wide-ranging permissions problem can be difficult to fix using Microsoft Windows Explorer. For example, if you have an existing shared folder structure where the Everyone Full Control permission is granted in many places, but where other permissions that must be retained are also present, you cannot simply go to the root of the drive and set new permissions, because those permissions will replace the unique permissions of interior folders and files.
You can use the command-prompt Cacls command to grant or remove specific ACEs without affecting or replacing other entries. Use this tool to fix permissions on volumes that contain existing data. Audit permissions on your servers on a quarterly basis to be certain that some users haven't accidentally been provided with wide access. Use the Cacls command to check for inappropriate permissions and to replace them.
Creating a Security Group with Full Control Access to All Resources
To correctly troubleshoot security problems and to perform some administrative functions, you will need unfettered access to files and resources without expending the time and effort required to take ownership. Set up one security group that has Full Control access to every resource on your network. This group should be a universal security group in Active Directory. Membership in this group should be severely restricted most of the time it might contain no members at all. You can add an individual administrator when access is required. Use the restricted groups feature to prevent users from being made members of this group.
Troubleshooting Permissions Problems
The security provided by permissions is a double-edged sword while necessary for security purposes, permissions can cause problems that can be extremely difficult to troubleshoot in production systems. For example, applications can fail to start correctly or can be unable to store documents. Some applications might not report Access Denied error messages correctly and might fail when they attempt to use resources to which the user has no access.
Determining Whether a Permissions Problem Exists
The first step in troubleshooting permissions is to determine whether the problem has to do with permissions. First, make the user who is experiencing the problem a temporary member of a security group with universal access to all resources (such as Domain Admins), and then have the user log on with this new temporary membership. One of three things will happen that can guide your troubleshooting efforts:
-
If the problem disappears when the user logs on with full access, you have a permissions problem.
-
If the problem changes in nature or the error messages change, you have at least two different issues and one of them is permissions.
-
If the error indications do not change, there is no permissions problem.
Now that you know if you're dealing with a permissions problem, remove the user from membership in your universal access group.
Finding the Problem Resources
Remember that, although the problem might be a permissions problem, it might not be a file or folder access problem. Registry keys can also be secured, so keep in mind that your permissions problem can be a registry permissions problem. Applications that rely on Active Directory services can also behave unexpectedly if you have increased the security of Active Directory objects. These troubleshooting principles remain the same no matter what type of secured resource you're having problems with.
Once you know that you have a permissions problem, the next step is to determine which resources are too restricted. When a user is attempting to load a document into a Microsoft Office program, this is simple: it's the file. However, when applications fail to run correctly without providing useful error messages, you can have difficulty determining exactly what is going wrong.
To determine which files or other restricted resources are causing the access problem, you need to narrow the scope of likely suspects, and then enable access failure auditing on those files. Then have the user attempt to use the resource, and check the audit log to see which files the user has attempted to access. Establishing auditing is covered in Lesson 3 of this chapter.
You can shorten this process by downloading the File Monitor tool from www.sysinternals.com. (At publication time, this was a free download.) The File Monitor tool shows all file access on the system and makes it simple to see which files a program is attempting to open. To find permissions problems, run this utility, and then run the application you are having problems with. The related Registry Monitor tool does the same thing for registry access.
Determining the Problem
Once you know which files are causing the error, you need to determine what the user's effective permissions to the file are. Start with the file or folder in question and determine the contents of its ACL by logging on as the administrator and viewing the file's security properties. Record all the group SIDs in the ACL, paying special attention to any Deny ACE. Once you know all the group SIDs, determine the membership of those groups until you've tracked down all the users with access.
You will find one of two results: either the user does not have membership in a group that has appropriate access or the user is a member of a group that has a specific Deny ACE on the resource. After you know exactly why the user does not have appropriate access, you can solve the permissions problem.
Don't add users to existing security groups to solve security-related problems. Existing groups are likely to have wide access to resources beyond those required to solve the immediate problem. Determine the full scope of the problem and create a new resource security group with the access required to solve the specific permissions problem. Then you can add account groups to the resource group to eliminate the permissions problem for several groups of users without inappropriately increasing access to other resources. This is a prime example of why separating account and resource groups makes security administration more flexible.

In practice, managing permissions is quite easy the interface is intuitive and simple. In this practice, you will use the recommended method of separating users and resources into two types of security groups and make the account groups members of the resource groups. While slightly more convoluted than simply securing resources using account groups, this method scales very well to larger networks and actually simplifies security administration after the initial configuration.
You will notice that resource groups parallel the folder structure and that account groups parallel the Active Directory structure. Keeping this parallelism intact throughout your network will keep security administration simple in any size of network.
Exercise 1: Setting Permissions on Files and Folders
In this exercise, you create a set of secured folders for each of the OUs in the Fabrikam corporation. You use global security groups to contain user accounts, and you secure the folders using resource security groups. To provide access to users, you then make the global security groups containing the user accounts members of the resource groups that are used to secure the folders. To accomplish this, you need to create a number of security groups and folders. You will use these groups and folders in other lessons.
To create a security group
-
Start the Active Directory Users And Computers management console.
-
Expand domain.fabrikam.com and Departments.
-
Click Design, and then click New Group on the toolbar.
-
Type Design Users in the Group Name and Group Name (Pre-Windows 2000) boxes as shown in Figure 4.2, and click OK.
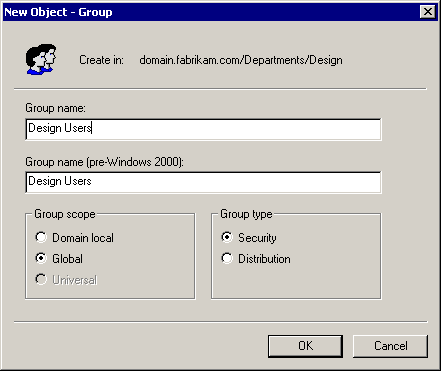
Figure 4-2. Naming a security group
-
Double-click the Design Users group.
-
Click the Members tab, and click Add.
-
Double-click the following users: Syed Abbas, Kim Abercrombie, Humberto Acevedo, and Pilar Ackerman.
-
Click OK to finish adding members, and then click OK to confirm.
To create numerous security groups
-
Create a global security group called Engineering Users in the Engineering Department OU with the following members: Amy E. Alberts, Francois Ajenstat, Jay Adams, Kim Akers, and Terry Adams.
-
Create a global security group called Finance Users in the Finance Department OU with the following members: Gary E. Altman, Gregory F. Alderson, Michael Allen, Michelle Alexander, and Sean P. Alexander.
-
Create a global security group called Human Resources Users in the Human Resources OU with the following member: Nancy Anderson.
-
Create a global security group called Information Technology Users in the Information Technology OU with the following members: Chris Ashton, John Arthur, Karen Archer, Pamela Ansman-Wolfe, and Zainal Arifin.
-
Create a global security group called Marketing Users in the Marketing OU with the following member: Chris Ashton.
To create a resource group
-
In the Active Directory Users And Computers management console, expand domain.fabrikam.com and Departments.
-
Click Design, and click New Group on the toolbar.
-
Type Design Folder in the Group Name and Group Name (Pre-Windows 2000) boxes (see Figure 4.2).
-
Select the Domain Local scope as an optimization because this group will contain only users from this domain, and click OK.
-
Double-click the Design Folder resource group, and click the Members tab.
-
Click Add, and double-click the Design Users global security group to add its members to the resource group.
-
Click OK, and then click OK again.
To create numerous resource groups
-
Create a domain local security group called Engineering Folder in the Engineering OU. Add the Engineering Users global security group as a member of this group.
-
Create a domain local security group called Finance Folder in the Finance OU. Add the Finance Users global security group as a member of this group.
-
Create a domain local security group called Human Resources Folder in the Human Resources OU. Add the Human Resources Users global security group as a member of this group.
-
Create a domain local security group called Information Technology Folder in the Information Technology OU. Add the Information Technology Users global security group as a member of this group.
-
Create a domain local security group called Marketing Folder in the Marketing OU. Add the Marketing Users global security group as a member of this group.
To create a secure folder
-
In Windows Explorer, double-click My Computer, and double-click the C drive.
-
Right-click in the C drive window, and choose New Folder.
-
Type Departments to name the folder.
-
Right-click the Departments folder, and choose Properties.
-
Click the Security tab. Figure 4.3 shows the Security tab for the Departments Properties dialog box.
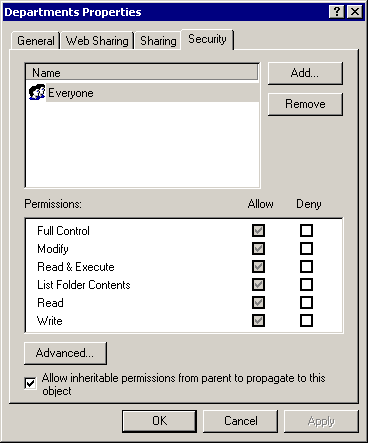
Figure 4-3. The Security tab
-
Clear the Allow Inheritable Permissions check box, and click Remove in the message box that appears. Notice that the ACL list now contains no ACEs.
-
Click Add. The Select Users, Computers, Or Groups dialog box appears.
-
Double-click Domain Admins and Domain Users, and then click OK to close the Select Users, Computers, Or Groups dialog box.
-
Click Domain Admins, and select the Full Control check box in the Allow column.
-
Click Domain Users, and select the Modify check box in the Allow column.
-
Click OK to finish setting permissions.
To create numerous secure folders
-
In Windows Explorer, double-click the Departments folder.
-
In the Departments folder, create a folder called Design. In the folder's Properties, clear the Inherit Permissions check box, and click Copy to copy the inherited permissions. Remove the Domain Users ACE, and add an ACE to allow the Design Folder group Full Control.
-
In the Departments folder, create another folder called Engineering. In this folder's properties, clear the Inherit Permissions check box, and click Copy to copy the inherited permissions. Remove the Domain Users ACE, and add an ACE to allow the Engineering Folder group Full Control.
-
In the Departments folder, create a folder called Finance. In this folder's properties, clear the Inherit Permissions check box, and click Copy to copy the inherited permissions. Remove the Domain Users ACE, and add an ACE to allow the Finance Folder group Full Control.
-
In the Departments folder, create a folder called Human Resources. In this folder's properties, clear the Inherit Permissions check box, and click Copy to copy the inherited permissions. Remove the Domain Users ACE, and add an ACE to allow the Human Resources Folder group Full Control.
-
In the Departments folder, create a folder called Information Technology. In this folder's properties, clear the Inherit Permissions checkbox, and click Copy to copy the inherited permissions. Remove the Domain Users ACE, and add an ACE to allow the Information Technology Folder group Full Control.
-
In the Departments folder, create a folder called Marketing. In this folder's properties, clear the Inherit Permissions check box, and click Copy to copy the inherited permissions. Remove the Domain Users ACE, and add an ACE to allow the Marketing Folder group Full Control.
Exercise 2: Troubleshooting Permissions Problems
After you implement the scenario in the previous exercise, the user named Chris Ashton reports that he has access to the Information Technology folder, which is inappropriate. This exercise shows how to troubleshoot permissions problems.
To determine effective permissions
-
In Windows Explorer, browse to C:\Departments\Information Technology.
-
Right-click the Information Technology folder, and choose Properties. Click the Security tab to view the folder's ACL, as shown in Figure 4.4.
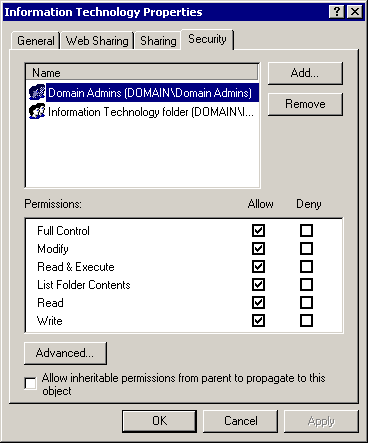
Figure 4-4. The Information Technology folder's ACL
The information contained in the ACL is correct Chris Ashton does not have a specific SID giving him access. Therefore, his SID must be contained in the Information Technology Folder resource group.
-
Close Windows Explorer.
-
Open the Active Directory Users And Computers management console.
-
Browse to the Information Technology OU.
-
Double-click the Information Technology Folder security group, and click the Members tab, shown in Figure 4.5.

Figure 4-5. The security group's Members tab
The information contained in this folder is correct; there are no inappropriate SIDs listed. Therefore, the security problem must be located in a group that is a member of this group.
-
Click Cancel.
-
Double-click the Information Technology Users security group, and select the Members tab.
Chris Ashton is incorrectly listed as a member of this group.
-
Select Chris Ashton, and click Remove. Click Yes to confirm the removal, and then click OK to close the Properties dialog box.
When user Chris Ashton logs off and logs on again, his new access token will not contain the SIDs necessary to access the Information Technology folder.

-
What does Windows attach to a secured resource to manage permissions?
-
What is an access control list?
-
If a user has Read and Write permission because of a membership in one group, has Full Control because of membership in a second group, and has a Deny Write ACE because of membership in a third group, what are the user's effective permissions?
-
If a resource has no ACL, what are the effective permissions?
Lesson Summary
-
Windows secures resources by attaching a security descriptor that contains an ACL to each resource. ACLs contain ACEs that specify exactly which security principals are allowed to perform specific actions upon the secured resource.
-
Permissions are managed by the NTFS driver. FAT volumes do not support permissions, so all users have full control of resources stored on a FAT volume. For this reason, you should use FAT volumes only for backward compatibility.
-
The standard file system permissions are Full Control, Modify, Read & Execute, Read, Write, and List Folder Contents.
-
Permissions are cumulative a user can access a file in any way that is specified by the ACL for any of the SIDs in the user's access token. For example, if membership in one group provides Write access, while membership in another provides Read access, the user's effective permissions are Read and Write access.
-
Deny ACEs have priority over Allow ACEs. If a Deny ACE exists for any type of access, access will be denied regardless of the number or type of existing ACEs that allow the specific type of access.
-
If an ACL is empty, all users will have no access. The owner can still use the ownership right to set permissions, however. If there is no ACL because the file is stored on a file system that does not support ACLs, then all users have full control.
-
When files or folders are created inside a folder, they inherit the permissions settings of the parent folder. When you copy a file, this rule is respected, and the copy receives a copy of the permissions of the recipient folder. When you move a file within the same volume, this rule is not respected, and the original permissions are retained. This occurs because file move operations do not re-create the file they simply change the directory entries.
EAN: 2147483647
Pages: 82