Sharing Resources Using a Resource Pool
Typically, when you create a project file, you set up and schedule your tasks and then add resources and assign tasks to them. Often however, resources are assigned to tasks in multiple projects. You might be the manager of these different projects and use the same resources in all of them. Or multiple project managers might share the same resources for their projects.
To prevent conflicts between projects and avoid resource overallocation among multiple projects, you can create a resource pool. A resource pool is a project file that's devoted to maintaining information about resources, including their availability, costs, and current usage or allocation.
Any project manager who wants to use the resources in the resource pool file can link the project file to the resource pool file and make the project file a sharer file . When you link a project file to the resource pool file, the resource names and other information appear in your project file. You can then assign those resources to tasks as if you originally created them in this project file.
| |
Using this local resource pool for multiple projects is similar in concept to using the enterprise resource pool. If you're set up for enterprise project management using Project Professional and Project Server, your enterprise resource pool consists of all resources identified as part of the organization. With the enterprise resource pool, you can check skill sets, availability, costs, and other resource information to find the right resources for your project.
Because of this access to the enterprise resource pool, local resource pool functionality is disabled whenever you work with enterprise projects.
| Cross-References | For more information about the project administrator setting up the enterprise resource pool, see "Creating the Enterprise Resource Pool". For information about project managers using the enterprise resource pool, see "Building Your Enterprise Project Team". |
| |
Setting Up a Resource Pool
Resource pools are easier to manage in the long run if you have a project file whose only job is to serve as the resource pool file. However, if all the resources you need for the pool are already in a project you're executing, for example, you can use that as your resource pool file as well.
To create a resource pool in its own dedicated project file, follow these steps:
-
On the Standard toolbar, click New.
A new project window appears.
-
Click View, Resource Sheet.
-
Enter the information for all work or equipment resources you want to be included in the resource pool.
This information includes at least the resource name , maximum units, and standard rate. If different from the default, also enter the cost per use, cost accrual method, and calendar. Enter the initials , group , and overtime rate if applicable to your projects.
-
If you want material resources to be a part of your resource pool, enter at least the material resource names, identify them as material resources; then enter the material labels and the unit costs.
-
 On the Standard toolbar, click Save. Select the drive and folder in which you want to store the resource pool file.
 If other project managers will be using this resource pool, make sure that you save the file in a location to which you all have access, such as a central file server or a shared folder.
-
Enter a name for the resource pool file in the File Name box and then click the Save button.
Give the resource pool file a name that identifies it as such; for example, ResPool.mpp or Marketing Resources.mpp .
Cross-References For more information about entering resource information, see Chapter 6, "Setting Up Resources in the Project."
If you already have resource information in an existing project file, you can use it to create your resource pool file and cut down on your data entry. One method for doing this is to copy the existing project file and then delete the task information from the new copy. To do this, follow these steps:
-
Open the project file that contains the resource information you want to use.
-
Click File, Save As.
-
Select the drive and folder in which you want to store the resource pool file.
-
Enter a unique name for the resource pool file in the File Name box and then click the Save button.
-
Display the Gantt Chart or other task sheet.
-
Click the Select All box in the upper-left corner of the sheet, above the row1header.
The entire sheet is selected.
-
Press the Delete key.
All task information is deleted.
-
Display the Resource Sheet and check the resource information.
Update any information as necessary, including adding or removing resources.
-
On the Standard toolbar, click Save.
Another method of using existing resource information is to copy and paste information from the existing project files to the new resource pool file. To do this, follow these steps:
-
Open the project file that contains resource information you want to copy.
-
Display the Resource Sheet.
-
Select resource information by selecting the row headers.
To select adjacent resource rows, drag from the first to the last row header. Or click the first row, hold down the Shift key, and then click the last row.
To select nonadjacent resource rows, click the first row header. Hold down the Ctrl key and then click all other rows you want to select.
Be sure to select the row headers, not just the task names. Selecting row headers copies all the necessary information ”including maximum units and costs ”associated with the resource, even if that information isn't displayed in the sheet.
-
 On the Standard toolbar, click Copy.
 -
On the Standard toolbar, click New.
A new project window appears.
-
Display the Resource Sheet.
-
 On the Standard toolbar, click Paste.
 The resource information you copied from the other project file is inserted into the appropriate fields in the Resource Sheet.
-
Click File, Save As.
-
Select the drive and folder in which you want to store the resource pool file.
Enter a name for the resource pool file in the File Name box and then click Save on the Standard toolbar.
Linking a Project to Your Resource Pool
After the resource pool is set up, you can link project files to it. The project file that uses a resource pool is called the sharer file . As long as the resource pool and the sharer file are open at the same time, the resources in the resource pool file appear in the sharer file as if they were originally entered there. Even if you have resources in your project file, you can still use resources from the resource pool.
To link your project to a resource pool, follow these steps:
-
Open the resource pool file.
-
Open your project file that you want to share resources from the resource pool.
In this project file, click Tools, Resource Sharing, Share Resources (see Figure 14-14).
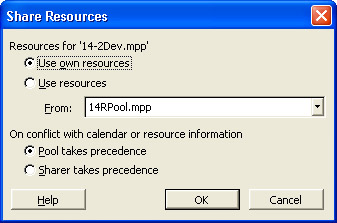
Figure 14-14: Use the Share Resources dialog box to specify that you want your project file to use the resource pool. -
Select the Use Resources option.
-
In the From list, click the name of the resource pool file. All open files are displayed in this list.
-
Specify how you want any resource information conflicts to be handled.
If you want the resource pool information to be the final authority in a conflict, select the Pool Takes Precedence option. This is the default, and it is the recommended option.
If you want the resource information in the sharer file (your project file) to be the final authority, select the Sharer Takes Precedence option.
-
Click OK. Your project file is now designated as a sharer file of the resource pool, thereby linking the two.
Now all resource information in the resource pool appears in your project file (see Figure 14-15), and any resource information in your project file is added to the resource pool.
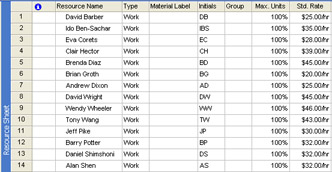
Figure 14-15: With the resource pool and sharer file linked, the resource information for both files is merged.
| |
If the Resource Sharing and Share Resources commands are grayed-out, it indicates that you are working with an enterprise project. Enterprise projects do not use local resource pools. They use the enterprise resource pool instead.
To access the enterprise resource pool, click Tools, Build Team From Enterprise.
| Cross-References | For more information about working with the enterprise resource pool, see "Building Your Enterprise Project Team". |
Even if your organization is set up for enterprise project management, you can still create a local (non-enterprise) project using a local resource pool. Start a new project file. When you click File, Save, the Save To Project Server dialog box appears. Click Save As File. The Save As dialog box appears, in which you can save the project on your own computer, making it a local rather than enterprise project. With this project, you can create and use a local resource pool.
| |
| |
Typically, any open project files are shown in the Use Resources From list in the Share Resources dialog box. Sharer files are the exception, however. You are never given the choice to use a sharer file as a resource pool.
| |
You can now work with your project file and the resources as usual, including assigning resources from the pool to tasks. Be sure to save both the sharer file and the resource pool file because you're saving the link between the two. You're also saving any resource information from your sharer file as additional resources in the resource pool.
| Note | You can make a regular project file into a resource pool file. Open the project file you want to use as a resource pool file. Also open the project file that is to become the sharer file. In the sharer file, click Tools, Resource Sharing, Share Resources. Select the Use Resources option and then select the other project file in the From list. Although making a regular project file into a resource pool can be convenient at first, keep in mind that when the project ends, the assignments will still be a part of the resource pool file, even though they're no longer relevant. |
The next time you open your sharer file, you'll be prompted to open the resource pool also (see Figure 14-16).
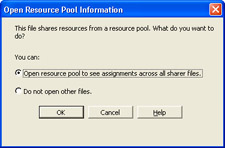
Figure 14-16: If you choose to open the resource file, you'll be able to see all resources, including their assignments, in your sharer file.
Click OK to open the resource file. It's opened with read-only privileges. If you select the Do Not Open Other Files option, the resources you're using from the resource pool do not appear.
If you open a resource pool file before opening any of its sharer files, you are prompted to select whether you want read-only or read-write privileges in the resource pool file (see Figure 14-17).
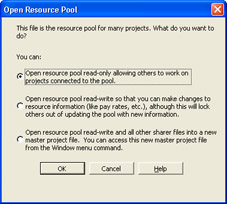
Figure 14-17: You see this alert whenever you directly open a resource pool file. Specify whether you want to open the resource pool as read-only or read-write.
Select the first option to open the resource pool as a read-only file. This is the default, and you should use this option in most cases. You can still update assignment information when working with a read-only resource pool.
Select the second option to open the resource pool as a read-write file. Choose this option when you need to explicitly change basic resource information such as cost or group information. Only one user can open a resource pool as a read-write at a time.
Select the third option to open the resource pool as a read-write file along with all of its sharer files. These files will be combined into a master project file.
| |
Suppose that you already linked your project file to a resource pool, thereby making the file a sharer file. But when you close the resource pool, the resources no longer show up in your sharer file.
Open the resource pool, and the resources appear again.
| |
Checking Availability of Resource Pool Resources
Display the Resource Usage view or the Resource Graph in the resource pool file to check the availability of resources across all sharer projects. In these views, you can see all the assignments for all the resources in the resource pool. You can see the amount of time they're assigned, if they're overallocated, or if they have time available to take on more assignments.
| Cross-References | For more information about checking resource allocation, see "Monitoring and Adjusting Resource Workload". |
| |
When reviewing assignments across multiple projects in the Resource Usage view of the resource pool file, there's no way to discern which assignments are from which projects.
If you want to see the projects responsible for each assignment, add the Project field to the sheet portion of the Resource Usage view. Click the Work column heading, for example, and then press the Insert key. In the Field Name box of the Column Definition dialog box, click Project and then click OK. The Project field is listed. The project filename for each assignment is listed (see Figure 14-18).
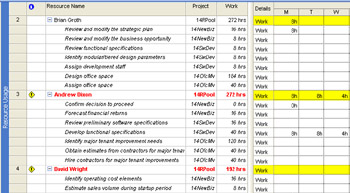
Figure 14-18: Add the Project field to the Resource Usage view to see the source of resources and their assignments.
| |
When assigning resources to tasks, you can also use the filters in the Assign Resources dialog box to find resources with the right skills and availability (see Figure 14-19).
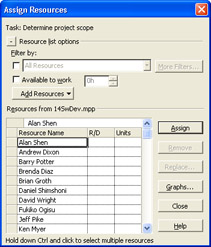
Figure 14-19: Check resource availability while making assignments using the Assign Resources dialog box.
For example, you can find only those resources from the resource pool who are associated with a particular defined group. Or you can list only material resources. You can also specify that you just want to see a list of resources who have at least 16 hours of availability across all the projects to which they're assigned.
| Cross-References | For more information about filtering resources and reviewing availability graphs, see "Assigning Work Resources to Tasks". |
You can see more availability information about a resource by selecting the name in the dialog box and then clicking the Graphs button. Review the Work, Remaining Availability, or Assignment Work graphs.
Updating Resource Pool Information
If you need to change resource-specific information ”such as cost information, notes, maximum units, working time calendar, and so on ”you need to open the resource pool file with read-write privileges and change the information. After you save these changes, the next time any users of the sharer files open the resource pool or refresh their resource pool information, they'll see the updated information.
If you're changing resource assignments, there's more flexibility. You can open the resource pool file with read-only privileges, access all your resource information, and change assignment information as needed. When you start to save the sharer file, a message appears, asking if you want to update the resource pool with your changes (see Figure 14-20). Click OK. Even though the resource pool is read-only, it's updated with your changes at that moment. Any other users of the resource pool will see the changes the next time they open the resource pool or when they refresh the open resource pool.
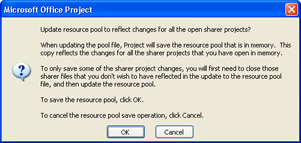
Figure 14-20: This message appears when you're working with a read-only resource pool and you make changes that affect resources in the pool.
Another way to update the resource pool after making assignment changes is to click Tools, Resource Sharing, Update Resource Pool.
If you're working with a sharer file and the resource pool that others also use, it's a good idea to periodically refresh the resource pool to make sure that you have the latest changes to resource and assignment information. Click Tools, Resource Sharing, Refresh Resource Pool.
| |
Sometimes project managers find that Microsoft Project runs slower when there are large resource pools linked with large or complex project files.
If you experience system performance problems such as these, open the sharer file without the resource pool file. If you can get by without the resource information, you'll be able to work faster.
Another alternative is to divide your project into a master project with subprojects. Then, link the resource pool with the smaller subprojects .
| |
Disconnecting a Resource Pool from a Project Plan
If you no longer need the resource pool and the sharer file to be linked, you can disconnect them, as follows :
-
Open both the resource pool and the sharer file.
-
Display the sharer file.
-
Click Tools, Resource Sharing, Share Resources.
-
Select the Use Own Resources option.
The resources assigned to tasks in the sharer project remain in the project file. Any assignment information for these resources is removed from the resource pool file.
You can also disconnect the link from within the resource pool, as follows:
-
Open the resource pool.
-
Click Tools, Resource Sharing, Share Resources (see Figure 14-21).
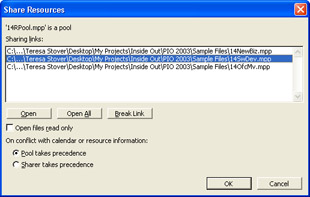
Figure 14-21: In the resource pool, the Share Resources dialog box shows the path of all sharer files. -
In the Sharing Links box, click the name of the sharer file that you want to disconnect from the resource pool.
-
Click the Break Link button.
EAN: 2147483647
Pages: 268