Publishing Project Information to the Web
With the pervasive use of the World Wide Web and company intranets , you might find it very useful to publish your project information as a Web page, which is made much easier in Microsoft Project since the addition of the Export Wizard.
| Note | Project reports cannot be converted to HTML because they are designed for previewing and printing only and cannot be saved. This goes for the built-in reports as well as any custom reports you have created. |
Follow these steps to publish the project information:
-
Open the project plan containing the information you want to publish.
It is not necessary to set up the views or fields you want to publish. You'll do this as part of the export process.
-
Click File, Save As Web Page.
The Save As dialog box appears.
-
In the Save In box, select the drive or folder where you store your HTML files.
If you have access to it, select the actual folder for your intranet Web site files.
-
In the File Name box, name your new html file.
-
Be sure that Web Page (*.html; *.htm) appears in the Save As Type box.
-
Click Save.
The Export Wizard opens.
-
Read the welcome page of the Export Wizard and then click Next.
-
On the Map page, click New Map and then click Next.
The Map Options Page opens.
-
Under Select The Types Of Data You Want To Export, select the Tasks check box. Under HTML Options, select Export Header Row/Import Includes Headers. Click Next.
The Task Mapping page opens.
-
In the Destination HTML Table Title box, give the table a name or just use the default, for example, "Task_Table1."
-
In the Export Filter box, click All Tasks.
-
Click the Base On Table button and then choose the table that you want exported, for example, the Entry table.
This process fills in the From: Microsoft Project Field and To: HTML Table Field columns . The Preview area shows what the HTML table will look like (see Figure 12-42). Click Next.
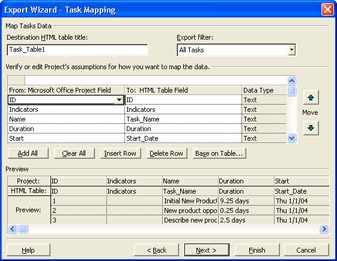
Figure 12-42: On the Task Mapping page, specify which fields should be exported to the Web page. -
The End Of Map Definition page opens.
If you want to save this map for future use, click Save Map. Save the map if you expect to repeat this same export operation from time to time.
-
Click Finish.
Your customized table of the selected view is now saved as an HTML Web page. You can view it in a Web browser to see how it looks. You'll see that Microsoft Project has added some title and project information, including the project name and project start and finish dates (see Figure 12-43).
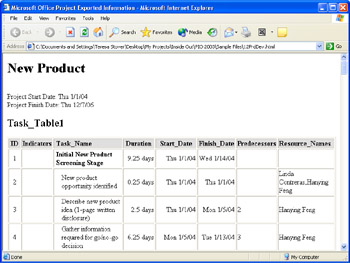
Figure 12-43: Review the project HTML Web page in a Web browser.
| Tip | Automatic Web page formatting Summary tasks are shown in bold and subtasks retain their indentation as in Microsoft Project. The table is sized to fit the Web page, so task names will be text wrapped as necessary. |
After you save your newly built HTML Web page, you're ready to upload it to your Web server.
EAN: 2147483647
Pages: 268