Rearranging Your Project Information
The ability to switch from one view to another, to switch tables in a sheet view, and to add or remove fields in a view gives you tremendous versatility in how you see your project information. You can take it a step further by sorting, grouping, and filtering the information in a view.
Sorting Project Information
By sorting information in a table, you can arrange it in alphabetical or numerical order by a particular field. For example, you might sort your tasks by start date so you can see tasks that are due to start next week. Or you might sort your tasks by duration so you can see the tasks with the longest durations and how you might break them up and bring in the project finish date.
You can also sort resources. For example, in the Resource Sheet, you might have originally entered all resources as they came on board, but they might be easier for you to manage if they were in alphabetical order. You can easily sort by the resource name. Better yet, you can sort by department or group name, and then by resource name .
To sort items in a sheet view, do the following:
-
Display the sheet view whose information you want to sort.
-
Click Project, Sort.
-
In the submenu that appears, commonly used sort fields are presented. For example, if you're working in the Gantt Chart, you can sort by Start Date, Finish Date, Priority, Cost, or ID. If you're working in the Resource Sheet, you can sort by Cost, Name, or ID.
-
If you want to sort by a different field than what's presented in the submenu, click Sort By. The Sort dialog box appears (see Figure 4-19).
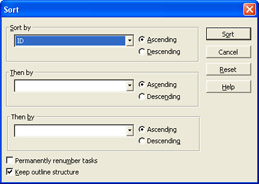
Figure 4-19: Use the Sort dialog box to choose the fields you want to sort by. -
Under Sort By, click the name of the field you want to sort by and then specify whether you want the sort to be ascending (lowest to highest) or descending (highest to lowest ). If you want to sort within the sort, add another field in one or both of the Then By boxes.
-
Make sure that the Permanently Renumber check box is cleared. You will likely want to clear this check box in the majority of the cases. However, if you really want this sort to be permanent and you're certain that you won't ever want to return to the original order of the tasks or resources, go ahead and select this check box. The ID numbers for the tasks or resources are changed, and the tasks or resources will be sorted by order of the ID numbers when you don't have any other sort order applied.
-
Click Sort.
| |
If you select the Permanently Renumber Tasks or Permanently Renumber Resources check box for the current sort operation, the check box remains selected for your subsequent sort operation. This is true whether your next sort operation is for resources or tasks. This can be a problem if you want to do a temporary sort ”which is likely to be the case most of the time ”and you're not in the habit of looking at that check box.
To prevent unwittingly jumbling up your project plan, whenever you do a permanent renumber sort, immediately open the Sort dialog box again, clear the Permanently Renumber check box, and then click Reset.
| |
To return a sorted sheet view to its original order, click Project, Sort, and then click By ID.
| Note | If you choose to permanently renumber your tasks or resources according to a new sort order, remember that this renumbering will affect the order of tasks and resources in all other task or resource views. This is not the case with temporary sorting operations. |
Grouping Project Information
Think of grouping as a more sophisticated kind of sorting, in which a graphical layout is applied to the sheet to segregate the groupings you've chosen . For example, suppose you group your task sheet by complete and incomplete tasks. Tasks that are 0 percent complete (not started yet) are grouped first and marked by a yellow band (see Figure 4-20). Tasks that are 1 “99 percent complete (in progress) are grouped next, bounded by another yellow band . Tasks that are 100 percent complete are grouped last.
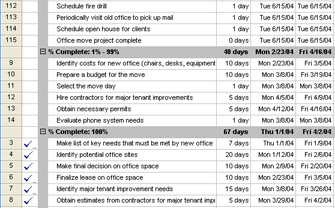
Figure 4-20: Groups graphically separate categories of information in a view.
The grouping band shows the title of the group, for example, Percent Complete: 0% or 100% Complete. Where appropriate, the grouping band also rolls up information summarized from the group, such as the total duration for the grouping, the earliest start date for all tasks in the grouping, the latest finish date for all tasks in the grouping, and so on.
| |
All built-in task groups appear on the Group By submenu on the Project menu when a task view is showing. The following is a complete list of these built-in task groups:
-
Complete And Incomplete Tasks
-
Constraint Type
-
Critical
-
Duration
-
Duration Then Priority
-
Milestones
-
Priority
-
Priority Keeping Outline Structure
| |
You can also group resources in a resource sheet. For example, you might want to group resources by their department or code or by resource type (work or material).
| |
All built-in resource groups appear on the Group By submenu on the Project menu when a resource view is showing. The following is a complete list of these built-in task groups:
-
Assignments Keeping Outline Structure
-
Complete And Incomplete Resources
-
Resource Group
-
Standard Rate
-
Work vs. Material Resources
| |
You can also group nodes in the Network Diagram view (see Figure 4-21).
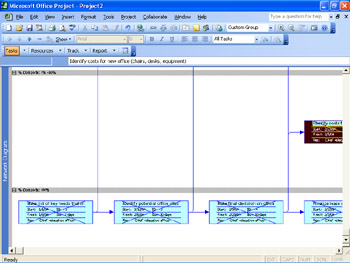
Figure 4-21: Nodes are collected and rearranged when you group them by a particular category.
To group task or resource information in a sheet view or Network Diagram, follow these steps:
-
Display the view whose information you want to group.
-
Click Project, Group By.
-
In the submenu that appears, click the grouping you want.
To remove a grouping, click Project, Group By and then click No Group.
| Tip | Use the Group By tool on the Standard toolbar You can also use the Group By tool on the Standard toolbar. With a sheet view displayed, click the grouping you want to apply. When you want to restore the view to its original order, click the arrow in the Group By tool and select No Group. |
You can customize built-in groups and create entirely new groups as well. You can group by fields, including custom outline codes that you create.
| Cross-References | For more information about groups, see "Customizing Groups". |
Filtering Project Information
When you filter a view, you're excluding information you don't need to see so you can focus on what you do need to see. For example, if you want to see only tasks that use a particular resource so you can more closely analyze the workload, you can apply the Using Resource filter. Or if you're about to attend a status meeting and you want to discuss tasks that are either in progress or not started, you can apply the Incomplete Tasks filter to a task sheet.
| |
The most commonly used task filters appear on the Filtered For submenu of the Project menu. All built-in filters are accessible in the More Filters dialog box. The following is a complete list of the built-in task filters:
-
Completed Tasks
-
Confirmed
-
Cost Greater Than
-
Cost Overbudget
-
Created After
-
Critical
-
Date Range
-
In Progress Tasks
-
Incomplete Tasks
-
Late/Overbudget Tasks Assigned To
-
Linked Fields
-
Milestones
-
Resource Group
-
Should Start By
-
Should Start/Finish By
-
Slipped/Late Progress
-
Slipping Tasks
-
Summary Tasks
-
Task Range
-
Tasks With A Task Calendar Assigned
-
Tasks With Attachments
-
Tasks With Deadlines
-
Tasks With Estimated Durations
-
Tasks With Fixed Dates
-
Tasks/Assignments With Overtime
-
Top Level Tasks
-
Unconfirmed
-
Unstarted Tasks
-
Update Needed
-
Using Resource In Date Range
-
Using Resource
-
Work Overbudget
You can also apply filters to a resource sheet. If you want to examine all resources that are running over budget, for example, you can apply the Cost Overbudget filter. Or if you want to see only your material resources, you can apply the Resources “ Material filter to a resource sheet.
| |
| |
The most commonly used resource filters appear on the Filtered For submenu of the Project menu. All built-in filters are accessible in the More Filters dialog box. The following is a complete list of the built-in resource filters:
-
Confirmed Assignments
-
Cost Greater Than
-
Cost Overbudget
-
Date Range
-
Group
-
In Progress Assignments
-
Linked Fields
-
Overallocated Resources
-
Resource Range
-
Resources “ Material
-
Resources “ Work
-
Resources With Attachments
-
Resources/Assignments With Overtime
-
Should Start By
-
Should Start/Finish By
-
Slipped/Late Progress
-
Slipping Assignments
-
Unconfirmed Assignments
-
Unstarted Assignments
-
Work Complete
-
Work Incomplete
-
Work Overbudget
| |
To filter information in a view, follow these steps:
-
Display the view whose information you want to filter. You can filter information in all views.
-
Click Project, Filtered For.
-
If the filter you want is listed on the submenu, click it. If the filter is not in the submenu, click More Filters and then find and click it in the More Filters dialog box (see Figure 4-22). Click Apply.

Figure 4-22: The More Filters dialog box lists all built-in filters. -
Some filters require you to enter more information. For example, if you choose the Should Start/Finish filter, you need to enter start and finish dates and click OK.
Tip Apply a highlighting filter By default, a filter excludes tasks or resources that do not meet the conditions of that filter. If you prefer, you can instead have the filter highlight tasks or resources that do meet the filter conditions. Click Project, Filtered For, More Filters. Click the filter you want and then click the Highlight button.
To remove a filter and show all tasks or all resources again, click Project, Filtered For and then click All Tasks.
| Tip | Use the Filter tool on the Formatting toolbar You can also use the Filter tool on the Formatting toolbar. Display the view you want to filter; then use the tool to click the filter you want to apply. When finished, click the arrow in the Filter tool and select All Tasks (or All Resources). |
Using AutoFilter, you can quickly filter by a value in a particular field. To do this, follow these steps:
-
Display the sheet view whose information you want to autofilter.
-
 On the Formatting toolbar, click AutoFilter. The AutoFilter arrows appear in each column heading in the sheet view.
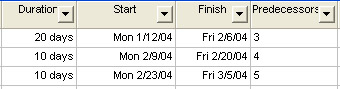
-
Click the arrow in the column whose information you want to filter by and then click the value you want to filter by.
For example, suppose you are displaying the Gantt Chart with the Entry table applied. If you want to filter for all tasks scheduled to start next month, click the AutoFilter arrow in the Start column and then click Next Month.
When an AutoFilter is applied, the column heading changes color .
-
To show all tasks or resources again, click the AutoFilter arrow in the applied column heading and then click All.
The AutoFilter arrows remain handy in the column headings for all views throughout your project plan until you turn AutoFilter off. With AutoFilter on, you can always quickly filter tasks or resources in a sheet. If you want to turn AutoFilter off, click the AutoFilter button again.
| |
It's easy to apply a filter, work with your project information for a while, and then forget that the filter is applied. Then, when you look for certain tasks or resources that you know are there, you can't see them.
Check whether a filter is applied. Click the Project menu and look at the Filtered For command. If it says Filtered For: All Tasks Or All Resources, you know you're seeing it all. If it says Filtered For: Critical, for example, you know you have a filter applied. Click All Tasks or All Resources to show your information again.
When you have an AutoFilter applied, the Project menu might still indicate that you're showing all tasks or resources. If the Project menu indicates that you're displaying everything (but you're not), check whether AutoFilter is on. If it is, review your column headings and find the one that's blue. Click the arrow, and then click All to show all tasks or resources.
| |
| Note | You can customize built-in filters and create entirely new filters as well. You can also create custom AutoFilters. For more information, see "Customizing Filters". |
| |
In Microsoft Project online Help, you can get more information about all available views, tables, filters, and groups. To do this, follow these steps:
-
Click Help, Microsoft Project Help.
-
In the Project Help pane, click Table Of Contents.
-
Click Viewing Project Information.
-
Click categories and topics you want to see.
| |
EAN: 2147483647
Pages: 268