Sharing Customized Elements Among Projects
If you customize elements ”such as tables, views, fields, or filters ”in one project, you will probably want to use those elements in a new project. Customized elements are stored in the project in which you create them, but you can copy these elements to other projects or templates using the Organizer. If you want a customized element available to every new project, use the Organizer to copy the element to the global template. In addition, you can use the Organizer to rename or remove elements from a project or template.
| Cross-References | For information about using the global template, see "Working with the Project Global Template". To use the enterprise global template, see "Standardizing Enterprise Project Elements". |
Working with the Organizer
The Organizer includes tabs for every type of customizable element in Microsoft Project. By clicking a tab, you can see the elements of that type that are available in two project files. These project files can be active projects or templates, so you can copy customized elements between active projects or from a project to a template, or even restore the original element from a template to a project.
You can copy, delete, or rename customizable elements including the following:
-
Views
-
Working times calendars
-
Reports
-
Toolbars
-
VBA modules and macros
-
Import and export maps
-
Forms
-
Fields
-
Tables
-
Groups
-
Filters
To open the Organizer, click Tools, Organizer. An Organizer button to open the Organizer dialog box is also available in the following dialog boxes:
-
More Views
-
More Groups
-
More Tables
-
Custom Reports
-
More Filters
-
Customize Forms
Copying Customized Elements
No matter which type of element you copy, the procedure is the same. You choose a source file that contains the element you want to copy, choose a destination file into which you want to copy the element, and then copy the element.
Follow these steps to copy an element from a project to the global template:
-
Open the project that contains the element you want to copy.
-
Click Tools, Organizer to open the Organizer dialog box (see Figure 25-30).
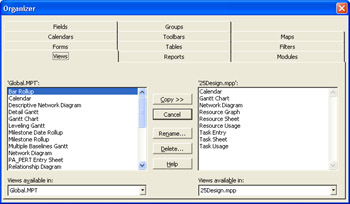
Figure 25-30: Copy customized elements between projects and templates, or rename and delete existing elements. -
Click the tab for the type of element you want to copy.
-
In the <Element> Available In box on the right side of the dialog box, click the project that contains the element you want to copy.
<Element> stands for the name of the current tab.
-
Click the name of the element you want to copy from the list of elements on the right side of the dialog box.
-
Click Copy. If an element with the same name already exists in the global template, Project asks you to confirm that you want to replace the element in the global template. Click Yes to replace the element in the global template with the one from the source project.
To copy the element with a different name, click Rename and then type a new name.
To copy an element between two projects, do the following:
-
Open both the source and destination projects.
-
Click Tools, Organizer to open the Organizer dialog box.
-
Click the tab for the type of element you want to copy.
-
In the <Element> Available In box on the right side of the dialog box, click the source project.
-
In the <Element> Available In box on the left side of the dialog box, click the destination project.
-
Click the name of the element you want to copy from the list of elements on the right side of the dialog box.
-
Click Copy. If an element with the same name already exists in the destination, Microsoft Project asks you to confirm that you want to replace the element in the destination project. Click Yes to replace the element in the destination project with the one from the source project.
To copy the element with a different name, click No. Then click Rename and enter a new name.
Caution You can't rename some built-in elements. In addition, you can't rename fields in the Organizer. You must change field names in the Customize Fields dialog box.
| |
Microsoft Project treats toolbars differently from other customizable elements. Toolbars apply to the application instead of a particular project, so they are stored in the global template by default. When you modify a toolbar, the modified version appears, no matter which project you open.
If you want to share a customized toolbar with someone else, copy it from the global template to a project file and then send the project file to that person. They can use the Organizer to copy the toolbar to their global template.
| |
Removing Customized Elements
Although customized elements can simplify your work, extraneous elements in projects and templates can be distracting. When you copy a customized element to the global template, you no longer need it in the project in which you created it. If you created a customized element by accident , you can remove it using the Organizer. To do this, follow these steps:
-
Open the project that contains the element you want to delete.
-
Click Tools, Organizer to open the Organizer dialog box.
-
Click the tab for the type of element that you want to delete.
-
In the <Element> Available In box on the right side of the dialog box, click the project that contains the element you want to delete.
<Element> stands for the name of the current tab.
-
Click the name of the element you want to remove from the list of elements on the right side of the dialog box.
-
Click Delete. In the confirmation box, click Yes to delete the element.
Renaming Customized Elements
You can rename customized elements using the Organizer. For example, you should rename a customized element in your project if you want to copy it to the global template without overwriting the original element in the global template. You can't rename some built-in elements. Fields are renamed in the Customize Fields dialog box.
Do the following to rename a customized element:
-
Open the project that contains the element that you want to rename.
-
Click Tools, Organizer to open the Organizer dialog box.
-
Click the tab for the type of element that you want to rename.
-
In the <Element> Available In box on the right side of the dialog box, click the project that contains the element you want to rename.
<Element> stands for the name of the current tab.
-
Click the name of the element in the list of elements on the right side of the dialog box.
-
Click Rename.
The Rename dialog box appears.
-
Type the new name for the element.
Restoring Customized Elements to their Default State
If you forget that changes you make to a table in a view modify that table's definition, you might customize a standard table accidentally . You can reverse the changes you made, but if you made a lot of changes before you realized your mistake, it's easier to restore the standard table. You can restore standard elements by copying them from the global template into your active project using the Organizer.
Follow these steps to restore a standard element:
-
Open the project to which you want to restore a standard element.
-
Click Tools, Organizer to open the Organizer dialog box.
-
Click the tab for the type of element that you want to restore.
Tip Restoring the table that appears in the current view You can't restore a table if it appears in the current view. Either switch to a view that does not use that table, or right-click the All Cells box (the blank cell above the ID numbers ) and click another table name on the shortcut menu.
-
In the <Element> Available In box on the right side of the dialog box, click the project to which you want to restore the standard element.
<Element> stands for the name of the current tab. The global template appears on the left side of the dialog box by default.
-
Click the name of the element you want to restore in the list of elements in the global template on the left side of the dialog box.
-
Click Copy. When the confirmation dialog box appears asking you to confirm that you want to replace the element in the project, click Yes.
EAN: 2147483647
Pages: 268
- Article 110 Requirements for Electrical Installations
- Article 332 Mineral-Insulated, Metal-Sheathed Cable Type MI
- Article 374 Cellular Metal Floor Raceways
- Article 427: Fixed Electric Heating Equipment for Pipelines and Vessels
- Example No. D8 Motor Circuit Conductors, Overload Protection, and Short-Circuit and Ground-Fault Protection