Analyzing Resource Information
The Resources area is a key location for managers needing to keep a close eye on the performance of the enterprise resource pool. In the Resource Center, you can review resource assignments, their current or future workload allocation, and their current or future availability for additional work.
Reviewing Resource Assignments
To review resource assignments, follow these steps:
-
In the Project Web Access navigation bar, click Resources.
The Resource Center appears.
-
In the side pane, click View Resource Assignments.
The View Resource Assignments page appears (see Figure 24-8).
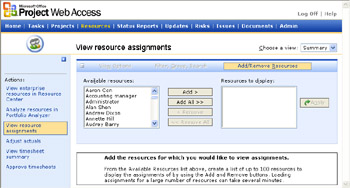
Figure 24-8: Select the resources for whom you want to review assigned tasks . -
In the Available Resources box, click the names of the resource whose assignments you want to review.
Use your Shift or Ctrl keys to select multiple resources as needed.
-
Click the Add button.
The selected resources are added to the Resources To Display box.
-
Click the Apply button.
A view appears, showing all tasks assigned to the selected resources.
Reviewing Resource Availability
To review resource availability, follow these steps:
-
In the Project Web Access navigation bar, click Resources.
The Resource Center appears.
-
In the side pane, click View Enterprise Resources In Resource Center.
All enterprise resources are displayed.
-
Scroll through the table to find the resource whose availability you want to check.
Click in the Choose A View box to switch to a different resource view if necessary.
Click View Options or Filter, Group, Search above the table to arrange the resources in the table to make it easier for you to find and work with the resources.
-
Select the resource whose availability you want to check and then above the table click View Availability.
-
In the Choose A View box, select a resource view that shows resource availability the way you need. Default views include the following:
-
Assignment Work By Resource
-
Assignment Work By Project
-
Remaining Availability
-
Work
-
| |
You can use Project Web Access to design a status report for other project resources to complete and submit to you periodically. You set up the time period and the headings. At the designated time periods, the individuals write their status report and submit it to the project server. You can review the status reports individually or have the project server compile them for an integrated project status report.
| |
You need to request the status report only when you first set it up. Resources see automated reminders in their Project Web Access Home page when a status report is coming due.
To set up a narrative status report, follow these steps:
-
In your Web browser, log on to Project Web Access and then click Status Reports in the navigation bar (see Figure 24-9).
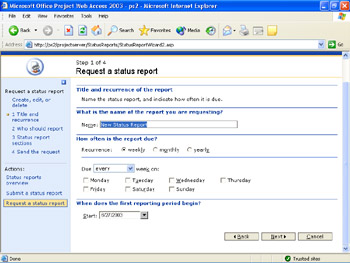
Figure 24-9: Click Request A Status Report to design a narrative periodic status report. -
In the side pane, click Request A Status Report.
-
Complete the options on the page and then click Next.
-
Work through the succeeding pages to design the status report the way you need (see Figure 24-10).
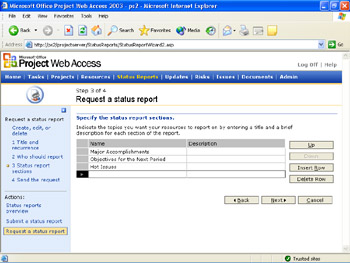
Figure 24-10: Specify the major topics for the status report. -
Click Next after each page.
-
On the final page, click Send.
The status report request, details, and schedule are sent to your specified resources.
EAN: 2147483647
Pages: 268