Managing Users and System Security
To allow people throughout the organization to use the Microsoft Project enterprise and workgroup features they need, you first need to identify them as users of your project server. At the same time, you also specify the users' permissions that enable them to carry out their category of project responsibilities.
Establishing User Accounts and Permissions
Project Server is loaded with a set of built-in user groups , each of which is associated with a set of permissions having to do with various aspects of enterprise project management and workgroup collaboration. Consider using the built-in groups and permission sets as a starting point. As you and your organization gain more experience with Project Server and start to get a better idea about how you want to implement enterprise and workgroup features, you can make adjustments and customizations.
The built-in user groups, also known as roles , are as follows :
-
Administrators
-
Executives
-
Portfolio Managers
-
Project Managers
-
Resource Managers
-
Team Leads
-
Team Members
Each of the user groups is associated with a security template that includes the set of permissions most likely to be needed by someone in that user group .
In addition to setting the permissions for a new user, you also set the categories of information that can be accessed by that user. Although you can create your own categories, the built-in categories are as follows:
-
My Direct Reports
-
My Organization
-
My Projects
-
My Resources
-
My Tasks
| |
Table 21-1 shows the category permissions as set using the built-in templates according to a user's group, or role.
| Category Permissions | Admin | Exec | Portfolio Mgr | Project Mgr | Resource Mgr | Team Leader | Team Member |
|---|---|---|---|---|---|---|---|
| Adjust Actuals | X | ||||||
| Approve Timesheets For Resources | X | ||||||
| Assign Resource | X | X | |||||
| Build Team On Project | X | X | X | ||||
| Create New Task Or Assignment | X | X | X | X | X | ||
| Edit Enterprise Resource Data | X | X | |||||
| Open Project | X | X | X | ||||
| Save Project | X | X | X | ||||
| See Enterprise Resource Data | X | X | X | X | |||
| See Projects In Project Center | X | X | X | X | X | X | X |
| See Projects In Project Views | X | X | X | X | X | X | |
| See Resource Assignments In Assignment Views | X | X | X | X | X | ||
| View Risks, Issues, and Documents | X | X | X | X | X | X | X |
| |
To create a new user account in Project Web Access and set the user's permissions, follow these steps:
-
In the vAdmin page of Project Web Access, click Manage Users And Groups in the left pane.
The Users page appears (see Figure 21-3).

Figure 21-3: Click Manage Users And Groups to open the Users page and add a new user account. -
Above the table, click Add User.
The Add User page appears (see Figure 21-4).
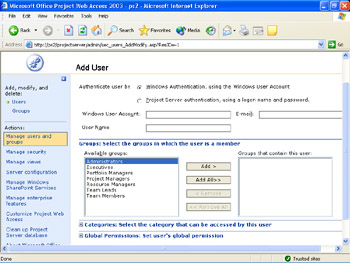
Figure 21-4: In the Add User page, specify the new user's authentication, group, and permissions. -
Next to Authenticate User By, select the option for this user's authentication method.
Windows Authentication users can log on to Project Web Access using the same user ID and password they use to log on to your organization's Windows network.
Project Server Authentication users log on to Project Web Access using the user ID you set up on this page. They can then set their password in Project Web Access.
If you have added enterprise resources, they are automatically added as Project Web Access users authenticated by Project Server.
-
If you select the Windows Authentication option, complete the Windows User Account, User Name , and E-Mail fields.
In the Windows User Account box, enter the person's Windows account in the format of domain\username .
In the E-mail box, enter the person's e-mail address in the format of someone@microsoft.com .
In the User Name box, enter the person's first and last names .
-
If you select the Project Server Authentication option, enter the person's User Name.
The first time these users log on to Project Web Access, they'll be prompted to set a password.
-
Under Groups, click the group that this user belongs to and then click Add.
A user can be a member of more than one group.
-
Click the Categories heading to expand the Categories section (see Figure 21-5).
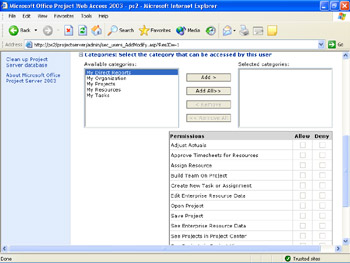
Figure 21-5: In the Categories section, specify the items that can be accessed by this user and then start setting permissions. -
In the Available Categories box, select the data that should be available for access by this user and then click Add.
A user can access multiple categories as appropriate to his responsibilities.
-
Select the check boxes for the permissions you want to set for this user.
It's easiest to set permissions with a template that corresponds to the user's group and then make any individual adjustments as necessary. To do this, under the permissions table, click the Set Permissions With Template button and then click the user's group, for example, Project Manager or Team Lead. The check boxes in the permissions table are completed as appropriate to the selected group (see Figure 21-6).
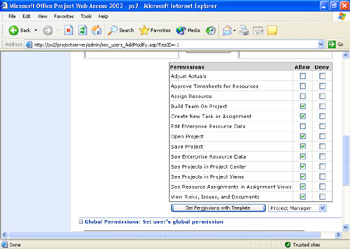
Figure 21-6: These are the permissions set by the built-in Project Manager security template.To set a permission, select the check box under the Allow column. To deny a permission, clear the check box under the Allow column. You can also select the check box under the Deny column, but it's not necessary ”just one or the other is sufficient.
-
Click the Global Permissions heading to expand the Global Permissions section (see Figure 21-7).
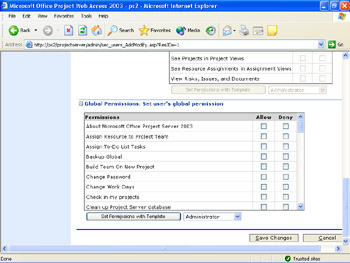
Figure 21-7: In the Global Permissions section, specify the permissions you want to allow or deny for this user. -
Select the check boxes for the global permissions you want to set for this user. Be sure to scroll to see all the permissions ”it's a long list.
As with the category permissions, it's much easier to use the template for the user's group and then make any individual adjustments as necessary. Under the global permissions table, click the Set Permissions With Template button and then click the user's group, for example, Team Member or Resource Manager. The check boxes in the global permissions table are completed as appropriate to the selected group.
-
When finished, click the Save Changes button at the bottom of the page.
After you set up the user accounts, team members and other Project Web Access users just need to use their Web browser to go to the designated URL for your project server location. They enter their user name (and password if necessary), and their own view of Project Web Access appears.
| Cross-References | Team members and resource managers needing information about using Project Web Access should refer to Chapter 23, "Participating on a Team Using Project Web Access." |
| Cross-References | Upper managers using Project Web Access should refer to Chapter 24, "Making Executive Decisions Using Project Web Access." |
| |
Table 21-2 shows the global permissions as set using the built-in templates according to a user's group, or role.
| Global Permissions | Admin | Exec | Portfolio Mgr | Project Mgr | Resource Mgr | Team Leader | Team Member |
| About Microsoft Office Project Server 2003 | X | X | |||||
| Assign Resource To Project Team | X | X | X | ||||
| Assign To-Do List Tasks | X | X | X | X | X | X | |
| Backup Global | X | ||||||
| Build Team On New Project | X | X | X | X | |||
| Change Password | X | X | X | X | X | X | X |
| Change Work Days | X | X | |||||
| Check In My Projects | X | X | X | X | X | X | X |
| Clean Up Project Server Database | X | ||||||
| Connect To Project Server Using Microsoft Project 2002 Or Earlier | X | ||||||
| Create Accounts From Microsoft Office Project | X | X | |||||
| Create Accounts When Delegating Tasks | X | X | |||||
| Create Accounts When Requesting Status Reports | X | X | |||||
| Create Administrative Projects | X | X | |||||
| Create And Manage To-Do List | X | X | X | X | X | X | |
| Customize Project Web Access | X | ||||||
| Delegate Task | X | X | |||||
| Go Offline From Project Web Access | X | X | X | X | X | X | X |
| Hide Task From Timesheet | X | X | X | ||||
| Integration With External Timesheet System | X | X | X | X | X | X | X |
| Log On | X | X | X | X | X | X | X |
| Manage Enterprise Features | X | X | |||||
| Manage Rules | X | X | |||||
| Manage Security | X | ||||||
| Manage Server Configuration | X | ||||||
| Manage Status Report Request | X | X | X | X | X | ||
| Manage Task Changes | X | X | |||||
| Manage Users And Groups | X | ||||||
| Manage Views | X | X | |||||
| Manage Windows SharePoint Services | X | ||||||
| New Project | X | X | X | ||||
| New Project Task | X | X | X | ||||
| New Resource | X | X | X | ||||
| New Task Assignment | X | X | X | ||||
| Open Project Template | X | X | X | ||||
| Publish To-Do List To All Users | X | X | X | X | X | X | |
| Publish/Update/Status | X | X | X | ||||
| Read Enterprise Global | X | X | X | X | |||
| Save Baseline | X | X | |||||
| Save Enterprise Global | X | X | |||||
| Save Project Template | X | X | X | ||||
| Set Personal Notifications | X | X | X | X | X | X | X |
| Set Resource Notifications | X | X | X | X | X | X | |
| Submit Status Report | X | X | X | X | X | X | |
| Timesheet Approval | X | X | |||||
| User Defined 1 | X | X | X | X | X | X | X |
| User Defined 2 | X | X | X | X | X | X | X |
| User Defined 3 | X | X | X | X | X | X | X |
| View Adjust Actuals | X | ||||||
| View Assignments View | X | X | X | X | X | X | |
| View Documents | X | X | X | X | X | X | X |
| View Home | X | X | X | X | X | X | X |
| View Issues | X | X | X | X | X | X | X |
| View Models | X | X | X | ||||
| View Portfolio Analyzer | X | X | X | ||||
| View Project Center | X | X | X | X | X | X | |
| View Project View | X | X | X | X | X | X | |
| View Resource Allocation | X | X | X | X | |||
| View Resource Center | X | X | X | X | |||
| View Risks | X | X | X | X | X | X | X |
| View Status Report List | X | X | X | X | X | X | |
| View Timesheet | X | X | X |
| |
Managing Security
System security is an all-important administrator responsibility. Anything that can be done to make it easier or more automatic is likely to be welcomed by project server administrators.
In Project Server, you can redefine the built-in groups, categories, permissions, and security templates that contribute toward the establishment of user profiles.
New Feature If your organization is set up with Active Directory, you can synchronize the Active Directory security groups with those in Project Server.
Creating a New Group
If your organization uses different roles from those identified as groups in Project Web Access (for example, Project Managers and Team Leaders), you can create your own. To do this, follow these steps:
-
In the Admin page of Project Web Access, click Manage Users And Groups in the left pane.
-
In the left pane, click Groups.
The Groups page appears (see Figure 21-8)
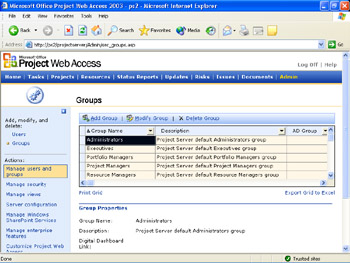
Figure 21-8: Use the Groups page to review, modify, add, or delete groups (roles) in Project Server. -
Above the table, click Add Group.
The Add Group page appears (see Figure 21-9).
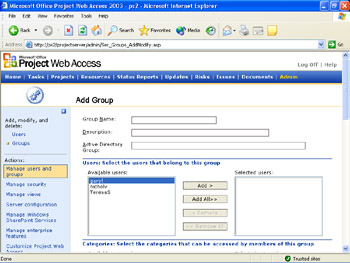
Figure 21-9: Use the Add Group to create a new group to reflect roles in your organization. -
Enter the group name and description in the first two boxes.
-
New Feature Under Users, click the users you want to add to the group and then click Add.
You can also add users after you've finished defining the group.
-
Under Categories, click any categories (for example, My Tasks or My Resources) that are appropriate to be accessed by members of this group and then click Add.
-
In the Selected Categories box, select each category in turn and then set the permissions for the category in the Permissions box. Repeat this process for each category in the Selected Categories box.
If you want to use a security template to set permissions for a category, click the Set Permissions With Template button and then select the template. Make any adjustments to the permissions as necessary for the selected category.
-
Under Global Permissions, select global permissions that you want to apply to your new group.
If you prefer to use a security template to set global permissions, click the Set Permissions With Template button and then select the template. Make any adjustments to the global permissions as necessary for the group.
-
When finished defining the new group, click the Save Changes button at the bottom of the page.
Tip Modify an existing group To edit an existing group, click Manage Users And Groups in the left pane of the Admin page. Click Groups in the left pane. In the table, click the group you want to change and then click Modify Group above the table. Work through the rest of the page in which you can add or remove users, change the categories associated with the group, or set options for Active Directory synchronization.
Synchronizing with Active Directory Security Groups
New Feature If your organization uses Active Directory, you can synchronize your project server security groups with the Active Directory ones, as follows.
-
In the Admin page of Project Web Access, click Manage Users And Groups in the left pane.
-
In the left pane, click Groups.
-
In the Groups page, scroll down to the Active Directory section (see Figure 21-10).
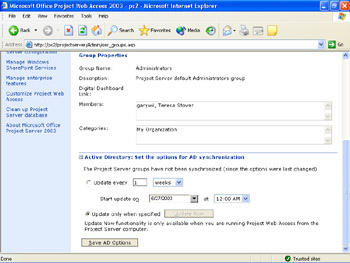
Figure 21-10: Use the Active Directory section on the Groups page to set Active Directory synchronization for security groups. -
In the Active Directory Group box, enter the name of the Active Directory security group.
-
Specify when Active Directory updates should take place.
If you select the Update Every option, specify the frequency at which your project server should be synchronized to changed in Active Directory, for example every week or every two months. Also, specify the date when updates should begin and the time at which the update should be done.
If you select the Update Only When Specified option, the Update Now button becomes available when you are running Project Web Access from the project server computer.
-
Click the Save AD Options button.
Customizing Categories
If the built-in categories and associated security templates don't fit the way your organization works with projects, you can customize them or create entirely new ones. To do this, follow these steps:
-
In the Admin page of Project Web Access, click Manage Security in the left pane.
The Categories page appears (see Figure 21-11).

Figure 21-11: Click Manage Security to open the Categories page and customize user categories and security templates. -
Click any of the categories in the table, such as My Direct Reports or My Tasks, to review the definition for that category in the boxes below the table.
-
To change an existing category, click Modify Category above the table.
To define a new category, click Add Category above the table.
-
In the page that appears, make any changes needed in the Category Name And Description section.
-
In the Users And Groups section, select the users and groups already identified that you want to be a part of the category and then click the Add button.
-
In the Permissions box, specify the permissions that users in this category should have.
-
In the Projects section, specify which projects the users in this category should be able to access: all projects in the Project Server database or just the selected projects.
Select or clear the project- related check boxes to further define the category.
-
In the Available Project Views box, specify the views that the users in this category should be able to see.
-
In the Resources section, specify which resources the users in this category should be able to access: all resources in the Project Server database or just the selected resources (see Figure 21-12).
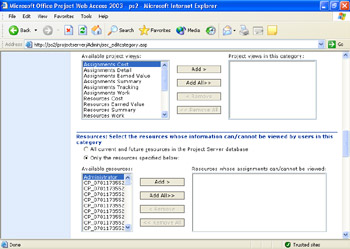
Figure 21-12: Specify the resources whose information can be accessed by users in this category.Select or clear the resource-related check boxes to further define the category.
-
In the Available Assignment Views and Available Resource Center Views boxes, specify the assignment and resource views that users in this category should be able to see.
-
In the Project Center Views section, specify the views that users in this category should be able to access. These views include Project Center views, any Portfolio Analyzer views, and any Portfolio Modeler models that have been defined.
-
When finished, click the Save Changes button at the bottom of the page.
Creating a New Security Template
You can set up your own security templates with entirely different sets of permissions. You can then assign the new set of permissions to users, groups, and categories in a single step. To create a new security template, follow these steps:
-
In the Admin page of Project Web Access, click Manage Security in the left pane.
-
In the left pane, click Security Templates.
-
Above the table, click Add Template.
-
Enter a name and description for your new security template.
-
If you want to base your new security template on an existing template, select a template from the Copy Template box.
Whether or not you base your new security template on another existing template, you'll need to modify the new template to change the permissions.
Modifying a Security Template
You can edit the permissions in an existing security template or set the permissions for a new security template you just created. To do this, follow these steps:
-
In the Admin page of Project Web Access, click Manage Security in the left pane.
-
In the left pane, click Security Templates.
-
In the table, select the name of the security template you want to modify.
-
Above the table, click Modify Template.
-
Next to each permission, select either the Allow check box or the Deny check box to specify the set of permissions for this template.
The permissions are organized by category, such as Collaboration and Status Reports. You can globally allow or deny all permissions in a category by selecting the Allow or Deny check box for the category.
-
When finished setting permissions for the security template, click the Save Changes button.
EAN: 2147483647
Pages: 268