Copying Project Elements Using the Organizer
In the course of working on a project over a year or so, you might have created a number of efficiencies for yourself. For example, you might have modified and saved a view to display all key cost information at a glance or created a report for a specific meeting you have every other week. Maybe you've created a set of macros to automate a number of repetitive task-tracking activities.
When you start a new project and you're looking at your new project file, you might think you need to do all that modifying, customizing, and creating all over again. Not so. Just as you can copy task information from one project to another, you can copy customized project elements such as tables, calendars, and fields from one project to another. You do this with the Organizer.
Some elements you change in your project also change your Microsoft Project global template, which is applied to all projects on your computer system. Many other elements just stay in the current project. You can use the Organizer to copy elements to the project global template, thereby making them available to all projects. You can also use the Organizer to copy elements from one project to another.
| Cross-References | For information about the project global template, see "Working with the Project Global Template". Project managers creating new projects based on the enterprise global template can refer to "Creating a New Enterprise Project". |
With the Organizer, you can copy the following project elements:
-
Views
-
Custom fields and outline codes
-
Tables
-
Toolbars
-
Groups
-
Forms
-
Filters
-
VBA modules and macros
-
Reports
-
Import/export maps
-
Base calendars
No matter which type of element you copy, the procedure is the same. You select a source file that contains the element that you want to copy, select a destination file into which you want to copy the element, and then copy the element.
Copying an Element from a Project to the Global Template
To copy an element from a project to the project global template, follow these steps:
-
Open the project that contains the element you want to copy.
-
Click Tools, Organizer. The Organizer dialog box appears (see Figure 15-13).
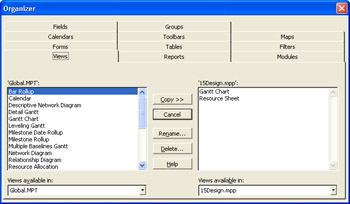
Figure 15-13: Use the Organizer to copy, rename, or delete customized elements between projects or between a project and the project global template. -
Click the tab for the type of element you want to copy; for example, Views or Reports.
-
In the <Element> Available In list on the right side of the dialog box, click the project that contains the element that you want to copy.
<Element> stands for the name of the current tab.
-
Click the name of the element you want to copy in the list of elements on the right side of the dialog box.
-
Click the Copy button.
If an element with the same name already exists in the project global template, a confirmation message appears. Click Yes if you want to replace the element in the project global template with the one from the source project.
To copy the element with a different name, click the Rename button, and then type a new name.
Copying an Element Between Two Projects
To copy an element between two projects, follow these steps:
-
Open both the source and destination projects.
-
Click Tools, Organizer.
-
In the Organizer dialog box, click the tab for the element you want to copy.
-
In the <Element> Available In list on the right side of the dialog box, click the source project.
-
In the <Element> Available In list on the left side of the dialog box, click the destination project.
-
Click the name of the element you want to copy in the list of elements on the right side of the dialog box.
-
Click the Copy button.
If an element with the same name already exists in the project global template, a confirmation message appears. Click Yes if you want to replace the element in the project global template with the one from the source project.
To copy the element with a different name, click the Rename button and then enter a new name.
Cross-References For more information about working with the Organizer, including renaming and deleting elements, see "Sharing Customized Elements Among Projects".
EAN: 2147483647
Pages: 268