Monitoring, Managing, and Troubleshooting Data Storage
| < Day Day Up > |
| Managing disk space and data storage in Exchange Server 2003 is not just a matter of clearing out old transaction logs it's a complicated process that you must master to be a successful Exchange administrator. We examine several key areas that relate to disk space and data storage management in the following sections. Common tasks include the following:
With the exception of creating and using mailbox store limits, which was discussed previously in Chapter 5, we briefly examine each of these items in the following sections. Deleting Stores and Storage GroupsYou might need to delete a store or an entire storage group for any number of reasons; however, the most common reason might be because of server decommissioning or the need to reduce loading on a server that will remain in operation. The actual process to delete a store or storage group is as simple as right-clicking on the desired object and selecting Delete from the context menu from within the Exchange System Manager. There are, however, several key points that you must keep in mind when attempting to delete stores and storage groups. Before you can delete a mailbox store, you must (obviously) move all mailboxes out of that store to another store. Before you can delete a public folder store that contains system folders, you must select a new public folder store to host these system folders. When deleting a public folder store that has the only replica of a public folder, this data will be lost unless it is replicated to another public folder store first. After you've deleted a store, you need to manually delete the associated database files named storename.stm and storename.edb. Before you can delete a storage group, you must delete any stores that exist within that storage group. After you've deleted a storage group, you need to manually delete the associated transaction log files.
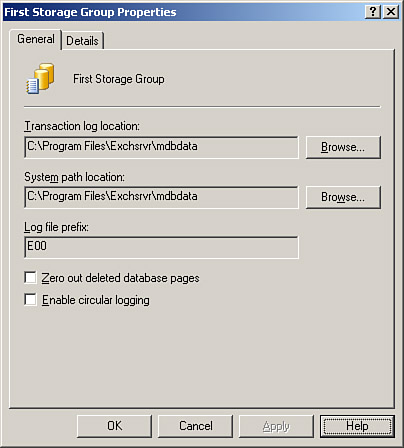
Configuring Circular LoggingWe've previously mentioned the topic of circular logging in Chapter 7, "Managing, Monitoring, and Troubleshooting Exchange Server Computers," but we really didn't talk about what it is until now. Circular logging, as its name implies, is a method of writing to the transaction log files that allows the data in a file to be overwritten once it has been committed to the database. Sounds great, doesn't it? Well, it's not as great as you might think. Read on. When circular logging is enabled, Exchange Server 2003 uses four transaction log files at a time, such as E0000011.log, E0000012.log, E0000013.log, and E0000014.log. When the fourth log is full, the Extensible Storage Engine (ESE) begins to reuse the first log file thus saving space by not creating another log file. Each of these log files is 5MB in size, so with circular logging enabled, you are only using 20MB of disk space per storage group for the transaction logs. Great, right? There is a downside to using circular logging, which is why it's disabled by default on all new installations of Exchange Server 2003. Transaction logs are not available for a long period of time when using circular logging, with the exact amount of time depending on how busy the particular storage group is. Should disaster occur and you need to perform a restoration of your database, you will quickly see the limitation of using circular logging only the most recent backup of the database can be restored, and no log replaying can occur as the database transaction logs have been overwritten. When circular logging is not used, the transaction logs can be replayed following the last restoration to get the database caught up with where it should be. As you learned in Chapter 7, these transaction logs are purged during backups if they have been committed to the database already (and thus no longer are needed for a replay). So, given this severe limitation on database restoration when using circular logging, why would anyone ever want to use it? Circular logging is a great solution for those storage groups that are in use on front-end servers and have no mailboxes or for storage groups that are only used for public folders. You should never use circular logging on a storage group that contains production mailboxes for which data recoverability is a key factor. To enable circular logging on a database, open its Properties dialog box by right-clicking on it and selecting Properties from the context menu. Select the Enable Circular Logging option, as shown in Figure 8.14. Figure 8.14. You should only enable circular logging for noncritical databases.
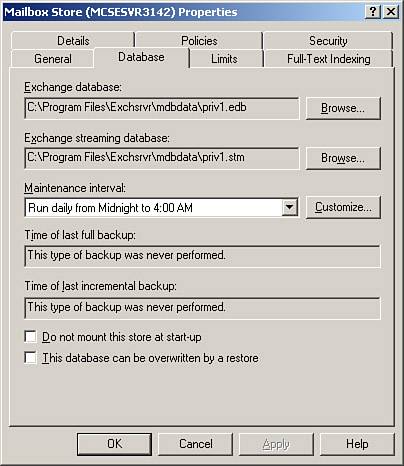
Moving Stores and Log FilesIf the hard disk currently holding a store or the transaction log files is running out of space and you cannot otherwise remedy the problem, you can opt to move items to help alleviate the problem. Another case in which you might want to move the transaction logs is to place them on a RAID 0+1 array as we discuss in the next section. Before moving a store or the transaction logs, you must be aware that user access will be interrupted during the moving period. When moving a store, only users on that store are affected. When moving the transaction logs, the entire storage group is affected. To move the location of a store, open its Properties dialog box by right-clicking on it and selecting Properties from the context menu. Switch to the Database tab, shown in Figure 8.15, and use the Browse buttons to change the location for the .edb and .stm files. Figure 8.15. You will need to move both store files.
To change the location where the transaction logs are stored, open the storage group Properties page, previously shown in Figure 8.14, and use the Browse button on the General tab to select a new location. Creating Exchange Server Storage SolutionsAs mentioned in the preceding section, moving the transaction logs to a different location than the actual database files is a fairly common way to increase storage space. This action also increases server performance and decreases response times by spreading the read/write work over more spindles, thus allowing each hard disk to do less work. But what does the ideal Exchange Server storage solution look like? There is no hard rule as to how you must configure your Exchange servers in regard to storage, but we provide one suggestion here that you should consider using as a guideline. Before getting into the details, you need to take a few moments to determine all the critical parts of an Exchange server in regard to hard disk usage. Would you consider the Windows Server 2003 operating system files important enough to place on a separate disk? What about the .edb and .stm files for each storage group? Are these database files so important that they need a RAID 5 solution perhaps? Do you want to move the SMTP queue to a dedicated disk to increase its performance? After you start to think about all of the component parts that actually make up an Exchange server, from a software and data standpoint, then you can start to create a storage plan for your servers. A sample Exchange server storage solution might look something like this:
As you can see by this list, the number of hard disks you might use in an Exchange server can grow to be quite large but then again, isn't your data worth the time and cost involved? Of course, don't forget that routine backups are also a key part of your storage solution, as discussed previously in Chapter 7.
Adjusting the Virtual Address SpaceAlthough not a disk storage task, configuring the virtual address space of your Exchange servers might be necessary to get the best performance out of them as you add memory. The virtual address space is that finite amount of memory that can be addressed by the store.exe process on the Exchange server and, in most cases, dictates the overall performance and scalability of the server. For most small and medium servers, Exchange can tune the virtual address space automatically to keep your servers running smoothly. On larger servers, however, you need to perform this action manually to achieve the best results. By default, 2GB of address space is reserved for Kernel mode and 2GB is reserved for User mode. If your Exchange Server 2003 computer has more than 1GB of RAM installed, you need to configure the boot.ini file so that it will have 3GB of User mode space available thus actually taking advantage of the additional RAM installed above 1GB.
To modify your boot.ini file if your Exchange Server 2003 computer has more than 1GB of RAM installed, add the /3GB and /USERVA=3030 parameters to it as shown in the following sample boot.ini file. [boot loader] timeout=15 default=multi(0)disk(0)rdisk(0)partition(1)\WINDOWS [operating systems] multi(0)disk(0)rdisk(0)partition(1)\WINDOWS="W2003, E2003, MCSESVR3142" /fastdetect /3GB |
| < Day Day Up > |
EAN: 2147483647
Pages: 171