Managing and Troubleshooting Client Connectivity
| < Day Day Up > |
| Even though you are the Exchange administrator responsible for managing and maintaining the Exchange organization, you will often find yourself faced with the task of helping users connect to the Exchange server. In addition, you will likely be asked to perform some configuration actions for users in their email client of choice. To that end, we examine some of the more common tasks you might find yourself performing. As well, we examine the new connectivity features of Exchange Server 2003 (with Outlook 2003 or OWA 2003) with which you need to be familiar. Supporting Outlook 2003As mentioned previously, Outlook 2003 has several new features that expand its functionality and ensure its place as the preferred messaging client for Exchange Server 2003. By default, Outlook 2003 is configured to use the new Cache mode of operation, by which the client does not require constant connectivity to the Exchange server. When a new Exchange account is created within Outlook, as shown in Figure 8.1, you have the option to disable the usage of Cache mode. Figure 8.1. You can opt to disable the new Cache mode during account setup.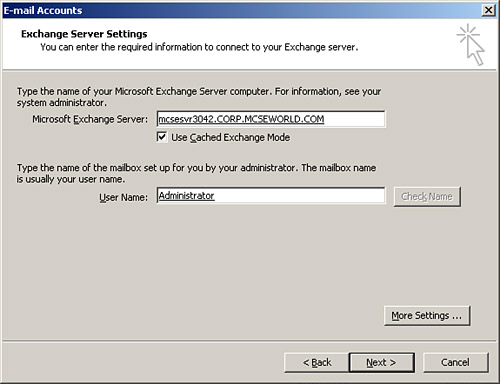 Cache mode is similar in many ways to the familiar Offline mode, especially when you consider the fact that both use an OST (Offline Folder file) to store data. The chief difference is that users working in Cache mode automatically have their OST file updated periodically as Outlook synchronizes with the Exchange server. All items are available to the user when working in Cache mode, including mail, calendaring, free/busy information, and address lists. A small balloon in the taskbar area informs the user of the status of synchronization, as shown in Figure 8.2, although you might only see this if there is a large amount of data to synchronize, such as after the initial user connection to the Exchange server, or if the synchronization is occurring over a slow connection. Figure 8.2. Outlook keeps you informed as to its status when working in Cache mode. Given that Cache mode is new to Exchange Server 2003 and Outlook 2003, you can expect that you will most likely be asked to help configure it correctly for your users. We discuss that in the next section. We also look at another new feature of Exchange Server 2003 and Outlook 2003, tunneling Remote Procedure Call (RPC) over HTTP, thus allowing remote users to work with Outlook natively instead of forcing them to use OWA. Configuring Outlook Cache ModeAs discussed previously, the default state for new Outlook accounts is to use Cache mode, thus improving both the user's experience and reducing the load on the Exchange server. You can, if desired, change this default during the creation of an Exchange account within Outlook, as shown in Figure 8.3. Figure 8.3. You can configure Outlook not to use the cached mode when creating a new Exchange Server account. The OST file is located in C:\Documents and Settings\%USER%\Local Settings\Application Data\Microsoft\Outlook directory, assuming that your operating system is installed on Volume C. When you are using Cache mode, you can change a few configuration settings to control how it functions. These settings are explained in Table 8.1 and are shown in Figure 8.4. Figure 8.4. By right-clicking on the Outlook connection status, you can change the Cache mode settings.
Configuring Outlook to Use RPC over HTTPAnother new feature in Exchange Server 2003 with Outlook 2003 is the ability to use RPC over HTTP for client connections. Previously, when clients wanted to make connections to your Exchange server using Outlook, they first needed to create a virtual private network (VPN) tunnel through the Internet to connect directly to the internal network. Using RPC over HTTP allows users to use Outlook (instead of OWA) over the Internet without needing a VPN connection data encryption is provided by using SSL for the HTTP connection. RPC over HTTP uses IIS Basic authentication, thus the requirement for SSL to secure the connection. As useful as RPC over HTTP is going to be in many organizations, it's not without a cost the cost of getting it set up correctly. It's not just a matter of selecting an option and running with it; there is a fair amount of configuration that you will need to perform, both on the client and server to get RPC over HTTP up and running. After you've done it, however, you'll likely begin to wonder how you ever lived without it. The requirements your organization must meet to use RPC over HTTP are detailed in the following list.
The procedure to configure RPC over HTTP is a long one that is made up of several distinct steps as outlined here:
Although this process is too lengthy to perform here, you should by now have a good understanding of each step involved. One of the more common questions people ask is why you must create an additional Outlook profile for RPC over HTTP connections. The reason behind this is so that users will be able to rapidly switch to using RPC over HTTP when they are away from the core network, and switch back to using standard RPC when they have reconnected to the network again this prevents users from having to make the somewhat confusing configuration changes required to enable RPC over HTTP on their end.
Supporting Outlook Web Access 2003Outlook Web Access (OWA) has been the standard for allowing remote users to connect to their Exchange mailboxes, and will likely continue to hold this position even with the availability of RPC over HTTP connectivity for Outlook. OWA in Exchange Server 2003 has received several key improvements as detailed here:
The Rich Experience OWA screen is shown in Figure 8.5, providing much of the same functionality as a standard Outlook session would. Figure 8.5. Outlook Web Access in Exchange Server 2003 is almost identical in appearance and usage to Outlook 2003.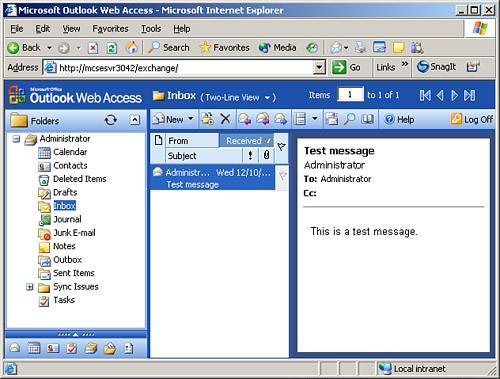 By default, OWA is installed and made available with the installation of Exchange Server 2003 in your organization. All your clients need to do is access the Exchange server at http://servername/exchange, as seen in the address bar in Figure 8.5. Should your users be accessing your OWA server over the Internet, you, of course, need to ensure that the correct Domain Name System (DNS) entries are in place on external DNS servers to allow clients to make connections to the OWA server.
Outlook Web Access and FirewallsThe discussion of Internet users accessing the OWA server brings up the issue of how (or rather where) to place the OWA server in relation to the rest of your protected internal network. To increase security (and performance) of the entire organization, you should consider creating an OWA front-end server. No special configuration is required to accomplish this, other than designating the server as a front-end server by selecting the This Is a Front-end Server option on the server Properties dialog box within the Exchange System Manager. Note that we've previously examined configuring front-end servers in Chapter 6, "Managing, Monitoring, and Troubleshooting the Exchange Organization." There are three basic strategies that you can implement in regard to the placement of your OWA server.
Securing Outlook Web AccessOf course, the single act of placing your OWA front-end server in a screened subnet between two firewalls is not enough to ensure communications security of OWA sessions. Because OWA is essentially nothing more than a special Web site, IIS is primarily responsible for providing security for OWA connections. To that end, you should consider configuring the security of the Exchange virtual server to be stronger than its default configuration. Figure 8.6. Placing the OWA front-end server in the DMZ between two firewalls provides the most secure implementation.
At a minimum, you should install an IIS server certificate to allow SSL-secured communications over port 443 with your OWA front-end server. This allows for the safe usage of Basic authentication, which sends user credentials in encoded clear text, without fear of capture and compromise. If your users are using Internet Explorer 5.0 or later, you can optionally implement Integrated Windows authentication, which uses Kerberos v5 to provide secure authentication. Note that communications between the front-end and back-end servers cannot be protected using SSL, as the front-end server uses only port 80 to communicate with the back-end server. To this end, you should consider implementing IPSec as discussed previously in Chapter 6. Authentication of the front-end server to the back-end server will be done using Kerberos, which is the default for Windows authentication. After you've installed the IIS server certificate and enabled SSL on the OWA front-end server, be certain to point users to the new OWA address of https://servername/exchange. As well, do not forget to disable unnecessary services on your front-end servers, as discussed previously in Chapter 6. |
| < Day Day Up > |
EAN: 2147483647
Pages: 171