| Now that you have an idea what Exchange address lists are and what you start out with by default, you are ready to move onto the tasks that you might commonly be expected to perform in regard to managing address lists. Some of the more common tasks that you should be able to perform include the following: Creating new global address lists Creating new custom address lists Creating new offline address lists Hiding address lists from users Forcing address list updates
We discuss each of these tasks in more detail in the following sections. Creating New Global Address Lists Before you create additional GALs, you must determine when or why you need to create them. Some common reasons for creating additional GALs include, but are not limited to the following: You need to provide address lists that are different than those provided by default, such as creating a GAL for each department in larger organizations with thousands of users. By providing a departmental GAL, you can simplify the process of locating users to send mail to as most mail messages are sent within a department. A departmental GAL can be created for each department thus enabling all departmental mail users to locate their common recipients faster. You need to prevent users from one department or company from seeing the users in another business unit or company. The default GAL includes all recipient objects across the entire Exchange organization; this might not be suitable in situations in which you have distinctly different business units or companies located within a single Exchange organization. You can thus create a GAL for each business unit or company and ensure that users will be selecting addresses that belong to other users within the same business unit or company.
When you are preparing to create additional GALs, you should keep the following points in mind: Only one GAL appears in a user's Outlook address book. This becomes important when multiple GALs are in existence. The following items explain the order in which a GAL shows up in Outlook: The GAL to which the user has access, the GAL in which the user is a member, and the GAL that is the largest. So if a user has access to and is a member of all GALs, the largest GAL (which is likely the default GAL) appears. You should configure the discretionary access control lists (DACLs) for each GAL so that only those users who need to be able to view the GAL can. Suppose that you have created departmental GALs you should give consideration to allowing each specific department access to only its departmental GAL. Use clear filtering criteria to establish the membership of each GAL. You should filter by the attributes that will create the GAL you need.
The actual process of creating a new GAL is fairly simple assuming that you have done your homework ahead of time and know which users you want to end up in the GAL when all is said and done. The key to creating any new address list is ensuring that all necessary recipient object attributes have been entered completely and correctly. For example, if an administrator does not actually take the time to fill out user information completely in a user's account, such as department, the LDAP query will not create the list as expected. To effectively use these types of lists, you have to make sure any information on which you'd want to query is accurately entered in the user account properties. To create a global address list, perform the following steps: - Open the Exchange System Manager.
- Locate the All Global Address Lists node inside the Recipients folder.
- Right-click the All Global Address Lists node and select New, Global Address List to open the dialog box shown in Figure 5.2.
Figure 5.2. Be certain to give the new GAL a meaningful name. 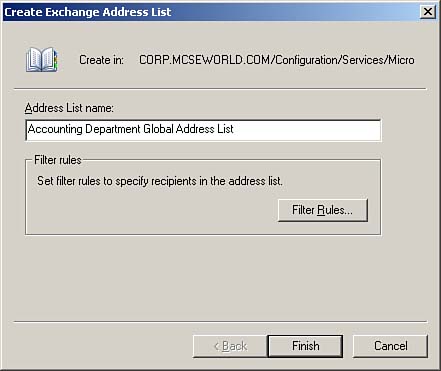
- Give the new GAL a meaningful name and then click the Filter button to build the LDAP query that will be used to populate the new GAL.
- On the General tab of the Exchange Recipients dialog box, you can select the types of recipients this new GAL will include, such as users, contacts, and so on.
- On the Storage tab of the Exchange Recipients dialog box, you can select the servers from which the mailboxes to be included in the new GAL should come.
- On the Advanced tab of the Exchange Recipients dialog box (shown in Figure 5.3), you can specify the conditions that will make up the LDAP query. As you can see in Figure 5.3, this new GAL is to include recipients whose department exactly matches "Accounting."
Figure 5.3. You can specify multiple attributes for your LDAP query. 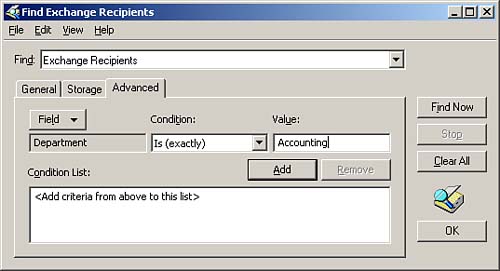
- Click OK when you are done adding attributes to the Exchange Recipients dialog box.
- Click Finish to create the new GAL.
Although you could create the LDAP query manually to retrieve the desired recipient objects for the GAL, it's always best to use the tools provided and let them build it for you. The following code represents this very simple LDAP query from the previous process that will display all types of Exchange recipients with the only filtering being that they must be part of the Accounting department. (&(&(&(& (mailnickname=*) (| (&(objectCategory=person)(objectClass=user) (!(homeMDB=*))(!  (msExchHomeServerName=*)))(&(objectCategory=person) (objectClass=user)(|(homeMDB=*) (msExchHomeServerName=*))) (&(objectCategory=person)(objectClass=contact)) (objectCategory=group) (objectCategory=publicFolder) (objectCategory=msExchDynamicDistributionList) )))(objectCategory=user) (department=Accounting))) (msExchHomeServerName=*)))(&(objectCategory=person) (objectClass=user)(|(homeMDB=*) (msExchHomeServerName=*))) (&(objectCategory=person)(objectClass=contact)) (objectCategory=group) (objectCategory=publicFolder) (objectCategory=msExchDynamicDistributionList) )))(objectCategory=user) (department=Accounting)))
Creating New Custom Address Lists You can create custom address lists in much the same way that you created a new GAL. The major difference, however, is that custom address lists are made available, by default, to all users and do not have the rules associated with them that GALs do, as far as determining which one is seen within Outlook. To create a custom address list, perform the following steps: - Open the Exchange System Manager.
- Locate the All Address Lists node inside the Recipients folder.
- Right-click the All Address Lists node and select New, Address List to open the Create Exchange Address List dialog box.
- Give the new address list a meaningful name, such as "Corporate Executives" for this example, and then click the Filter button to build the LDAP query that will be used to populate the new address list.
- On the General tab of the Exchange Recipients dialog box, you can select the types of recipients this new address list will include, such as users, contacts, and so on.
- On the Storage tab of the Exchange Recipients dialog box, you can select the servers from which the mailboxes to be included in the new address list should come.
- On the Advanced tab of the Exchange Recipients dialog box, you can specify the conditions that will make up the LDAP query. In this example, I am creating a list that contains corporate executives.
- Click OK when you are finished adding attributes to the Exchange Recipients dialog box.
- Click Finish to create the new address list.
Figure 5.4 shows the net result of the addition of the previous two address lists. Because the user has access to all GALs and is a member of one GAL, the largest GAL is displayed. You can also see the new custom address list, which does not follow the same rules as GALs do for display. Figure 5.4. Users can see multiple custom address lists, but only one GAL regardless of how many you create. 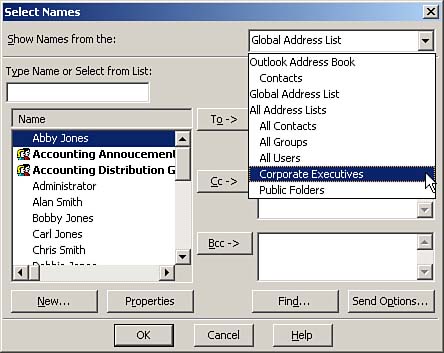
Creating New Offline Address Lists As discussed previously, Exchange creates a default offline address list based on the default GAL during installation. The purpose of the offline address list(s) is to allow users using offline folders (.OST files) to look up email addresses for the composition of email while not connected to the Exchange organization for example, while traveling to another state on business. The default offline address list can grow to be quite large and can be as difficult to search through as the default GAL. Therefore, you might create additional offline address lists for the same reasons you would create additional GALs. The only caveat that makes offline address lists somewhat different is that you must associate each one with a specific mailbox store this allows the offline users of that store to download it for usage offline. To create an offline address list, perform the following steps: - Open the Exchange System Manager.
- Locate the Offline Address Lists container inside the Recipients folder.
- Right-click the Offline Address Lists node and select New, Offline Address List to open the New Object - Offline Address List dialog box shown in Figure 5.5.
Figure 5.5. The creation of the new offline address list begins with naming it and selecting an Exchange server to store the list. 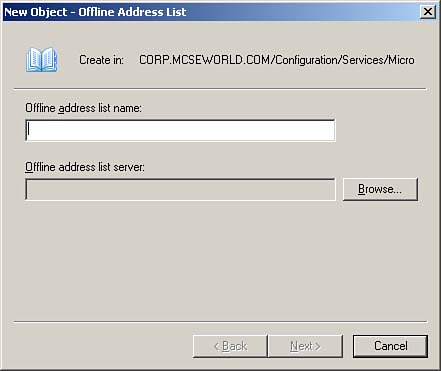
- Enter the name of the new offline address list and use the Browse button to locate the Exchange server that will be used to store the offline address list. Click Next to continue.
- In the next dialog box, shown in Figure 5.6, you are prompted to select which address lists will be included in the offline address list. By default, all GALs are listed; however, you can add or remove address lists as you need. Click Next to continue.
Figure 5.6. The offline address list will be created from the address lists of your choosing. 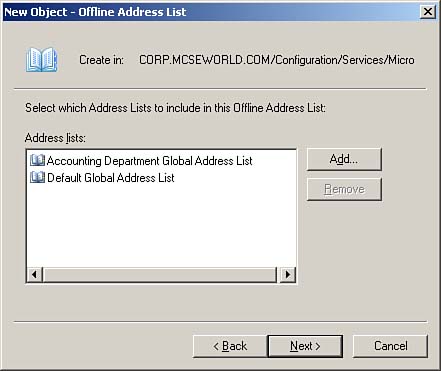
- The next dialog box warns that the new offline address list will not actually become available until the next store maintenance period is complete. By default, store maintenance is scheduled to occur daily between 1:00 a.m. and 5:00 a.m. to minimize the impact of this resource-intensive operation on user access to mailboxes. Click Next to continue.
- Click Finish after reviewing your selections to complete the creation of the new offline address list.
Hiding Address Lists from Users By using the Open Address List permission, you can prevent your users and groups from being able to view the contents of a custom address list. This permission, however, does not prevent them from being able to see the address list itself. To prevent users from being able to see the address list entirely, you need to create a nested custom address list system. The first step is to create an empty custom address list that will act as the container. On this empty "container" address list, you need to deny the desired users and groups the Open Address List permission. Under this empty "container" address list, you can then create your real address lists as desired. Figure 5.7 illustrates how this would look in the Exchange System Manager. Figure 5.7. To hide address lists from view, you need to create a nested address list hierarchy. 
In this example, the Corporate Executives address list is the top-level container and will have the appropriate permissions configured on it to hide the address lists below it. The Board Members, Executive Secretaries, and Vice Presidents address lists would all then be hidden from view of those users without the proper permissions. To configure address list permissions, perform the following steps: - Open the Exchange System Manager.
- Locate the address list for which you want to configure permissions and right-click on it. Select Properties from the context menu.
- Switch to the Security tab and click the Advanced button to open the Advanced Security Settings dialog box.
- Click the Add button to open the Select User, Computer, or Group dialog box. Locate the appropriate user or group for which you are configuring the permission and click OK.
- On the Permission Entry dialog box, shown in Figure 5.8, configure the required permissions. In this figure, we are configuring the Deny setting for the Open Address List permission.
Figure 5.8. You can configure the Deny setting on the Open Address List permission to hide address lists below the selected address list. 
- Click OK to close the Permission Entry dialog box.
- Click OK to close the Advanced Security Settings dialog box. If you have configured any Deny permissions, acknowledge the warning that is presented.
- Click OK to close the address list Properties dialog box.
Forcing Address List Updates From time to time, you might have the need to manually force an address list update before it would normally occur. The magic behind keeping address lists up-to-date is found with the Recipient Update Service (RUS). The Recipient Update Service is a service that is installed with Exchange Server and is responsible for building and maintaining all Exchange address lists. The RUS runs under the System Attendant service and polls Active Directory for updates to recipient information on a preconfigured schedule, which is set to one minute by default. If RUS finds new recipients, new address lists, or changes to existing address lists, it updates the affected address lists. In this way, RUS keeps all address lists current and up-to-date. RUS is also responsible for updating the email addresses of recipient objects based on settings that are configured in the recipient policies of your Exchange organization. This function is another reason you might find the need to force RUS to run manually. Recipient policies can be used to modify email addresses for recipients within the organization. There are two distinctly different instances of the Recipient Update Service that are created: Recipient Update Service (Enterprise Configuration) This RUS instance is responsible for updating the email addresses of recipient objects that are located in the configuration partition of Active Directory. These objects include the Exchange Information Store object, the System Attendant object, and the Message Transfer Agent (MTA) object. Recipient Update Service (Active Directory Domain) This RUS instance is created once in each Active Directory domain that has an installation of Exchange 2000 Server or Exchange Server 2003 located in it. This RUS instance is responsible for updating the email addresses for recipient objects that are located in Active Directory based on the changes made to recipient objects in that domain.
With the basics of the Recipient Update Service in hand, we now examine why and how you might manually force it to run. Typically, you manually update address lists if you do not want to wait for a regular update to occur, thus ensuring that all changes that have been made are reflected in the address lists. When manually running the Recipient Update Service, you can choose between two different actions: Update An update operation forces all address list memberships to be recalculated for recently modified Exchange recipients. You should use an update operation to make recently created mailboxes available immediately. Rebuild A rebuild operation forces all address list memberships to be recalculated. This is a more intensive operation and should typically only be performed when major changes have been made to the Exchange organization. Typical changes that would necessitate a rebuild operation include changing to SMTP addresses or changing the DNS domain name. You should perform a rebuild operation only during off-peak hours to minimize the impact on user mailbox access.
To manually run the Recipient Update Service, perform the following steps: - Open the Exchange System Manager.
- Open the Recipient Update Service node, as shown in Figure 5.9.
Figure 5.9. You will have at least two RUS instances in your Exchange System Manager. 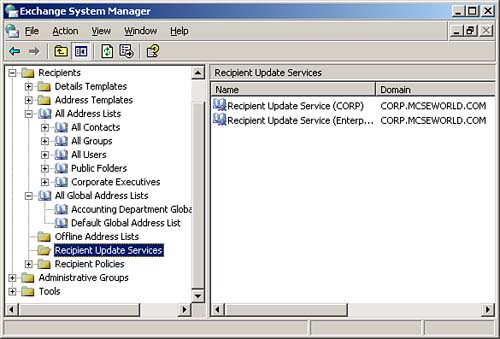
- Select the RUS instance you want to manually run and right-click on it. Depending on your needs, select either Update Now or Rebuild from the context menu.
|