Migration from and Coexistence with Exchange Server 5.5
| < Day Day Up > |
| There are many Exchange Server 5.5 sites still out there in the real world. For this reason, Microsoft has made migration from and coexistence with Exchange Server 5.5 an important part of the 70-284 exam. Exchange Server 5.5, like Exchange 2000 Server, is not supported on the Windows Server 2003 platform. Exchange Server 5.5 can exist in a Windows Server 2003 environment as a member server running on either Windows NT 4.0 or Windows 2000 Server. Unlike Exchange Server 2003, Exchange Server 5.5 has its own directory service. As Exchange was released before Windows 2000 Server, this directory service is entirely independent of Active Directory. Without special configuration using a tool called the Active Directory Connector, it is impossible to get the two different directory services to communicate with each other. Understanding how to get the two directory services communicating is a fundamental part of getting the two versions of Exchange to coexist. Coexistence is important because it is impossible to do a direct upgrade of an Exchange Server 5.5 installation to Exchange Server 2003. The only way you can do an upgrade-in-place is to go from Exchange Server 5.5 to Exchange 2000 Server and then from Exchange 2000 Server to Exchange Server 2003. Microsoft provides two alternatives for moving Exchange Server 5.5 organizations to Exchange Server 2003. The first option is to use the Exchange Server Migration Wizard, which is the simpler option, but which might not be practical if more than a few Exchange 5.5 servers need to be migrated. The Exchange Server Migration Wizard is covered later in this chapter. The second option is to create an environment in which Exchange Server 5.5 and Exchange Server 2003 can work side by side, gradually moving users from one environment to the other with a minimum of disruption. After a coexistence is established, users can be moved via the Move Mailbox tool. We cover setting up a coexistence next. Creating a Coexistence Using ExDeployExDeploy provides a checklist of tasks that should be performed when creating a coexistence between Exchange Server 5.5 and Exchange Server 2003. ExDeploy can be run from the Exchange Server 2003 splash screen. Rather than choosing to install a new Exchange Server 2003 organization as we did in Chapter 2, "Installing, Configuring, and Troubleshooting Exchange Server 2003 in a New Exchange Environment," this time select the Coexistence with Exchange 5.5 option, as shown in Figure 3.2. This enables you to join a new Exchange Server 2003 computer to an existing Exchange Server 5.5 organization. The coexistence with Exchange 5.5 checklist covers three different phases: Planning, AD Preparation, and Exchange Server 2003 installation. Figure 3.2. Selecting the Coexistence with Exchange 5.5 option in the Exchange Server Deployment Tools. The first step in the ExDeploy checklist is to ensure that Service Pack 3 or higher has been installed if a Windows 2000 platform is being used, or that Windows 2003 is being used. The second step in the checklist is to ensure that NNTP, SMTP, and the World Wide Web publishing service are installed and enabled on the server that will be running Exchange Server 2003. These steps are essentially the same as those you would have followed while installing Exchange Server 2003 for the first time in Chapter 2. DSScopeScan Tool GroupThings become different in the third step in the Exchange Server 2003 deployment tools checklist. Here, you run the DSScopeScan tool group. This tool group is used to find out information about the Exchange Server 5.5 organization prior to setting up a connection between it and a new Exchange Server 2003 system. The DSScopeScan tool must be run via an account that has Exchange Server 5.5 administrator permissions as it queries the organization for important information. The DSScopeScan tool group includes four separate tools. These are
The only way that you can ascertain if the DSScopeScan tools have run successfully is by examining the exdeploy.log log file. There is no simple dialog box that informs you if the DSScopeScan tools have executed without error. By default, the exdeploy.log log file is written to the c:\ExDeploy Logs directory. You can view the log using Notepad. You need to scan the log file manually to resolve any problems that the log indicates exist with your current configuration. The first part of the log lists information about the Exchange Server 5.5 organization or mentions that it was unable to connect to the Exchange 5.5 server you listed. Needless to say, you want the DSScopeScan tool group to be able to communicate with your Exchange Server 5.5 organization if you hope to have it coexist with Exchange Server 2003. The second part of the test looks for a global catalog or domain controller running Windows 2000 Service Pack 3 or higher in the current or adjacent site. After the DSScopeScan tools have run, you are asked to install and run DCDiag and NetDiag (these tools are covered in more length in Chapter 2). These tools check network connectivity as well as connectivity to domain controllers. Phase 2After you have completed these steps, you move on to phase 2 of the Coexistence with Exchange 5.5 section of the Exchange Server Deployment Tools (see Figure 3.3). Figure 3.3. Phase 2 of the coexistence checklist. The first step of phase 2 is to run ForestPrep. The second step of phase 2 is to run DomainPrep. Both of these tools' functions are described in Chapter 2. OrgPrepCheckThe third step of phase 2 is to run the OrgPrepCheck tool group. This tool group consists of two tools, OrgCheck and PolCheck, that perform the following functions. OrgCheck does the following:
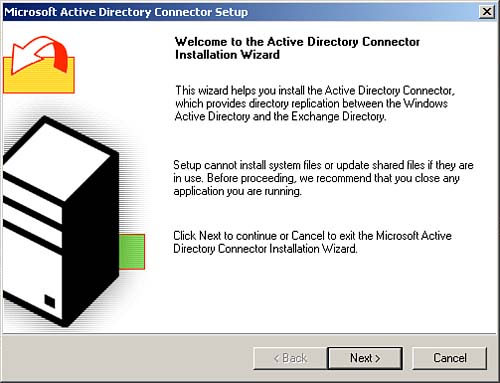
PolCheck examines all domain controllers in the local domain to ensure that they have the Manage Auditing and Security Logs permission set for the Exchange Enterprise Servers group. The OrgPrepCheck tool, like the DSScopeScan tool, writes output to the exdeploy.log log file. Checking this log file is step 4 of phase 2; you will find the relevant information at the end of the file. Active Directory ConnectorThe Active Directory Connector (ADC) allows communication between Active Directory and the Exchange Server 5.5 directory service (see Figure 3.4). Figure 3.4. Active Directory Connector Installation Wizard.
The account running the ADC installation routine requires Domain Administrator privileges only. This is in contrast to the situation that existed with the ADC in Exchange 2000 Server. In Exchange 2000 Server, the ADC had a slightly different set of schema extensions than the general Exchange 2000 schema extensions. The schema extensions for Exchange Server 2003 and the Exchange 2003 ADC are the same. Unlike the Exchange 2000 Server version of ForestPrep, the Exchange Server 2003 version of ForestPrep does not write Exchange Server 5.5 organizational information to Active Directory. A placeholder Exchange container is created and configuration information is written to Active Directory when you install the first Exchange Server 2003 instance in the forest. You must upgrade any prior ADCs to the Exchange Server 2003 ADC. You should perform this step before installing Exchange Server 2003 in the organization. The ADC can be installed on any computer in the domain. When you run the ADC installation program, you are asked which components you want to select. The two components are the Microsoft ADC Service Component and the ADC Management components. When performing this operation for the first time, you should install both components. After the ADC has finished installing, it should be run. The ADC Tools are shown in Figure 3.5. Figure 3.5. Active Directory Connector Tools.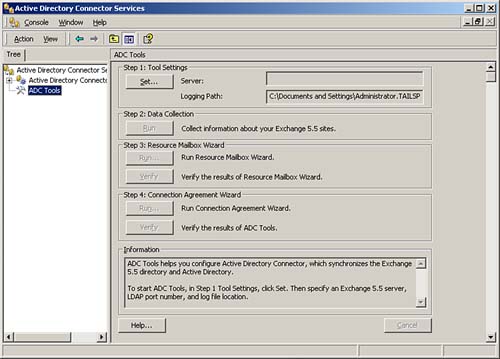 Running the ADC Tools consists of taking four steps. These steps are as follows:
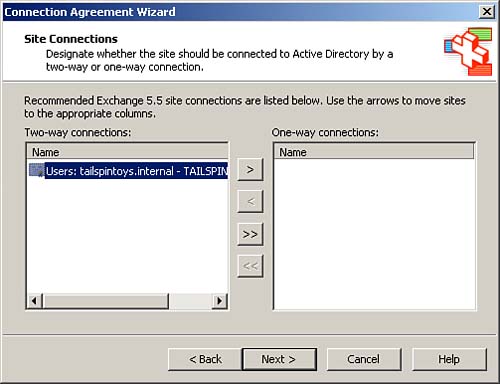
The Connection Agreement Wizard In-DepthWhen you run the Connection Agreement Wizard, you are asked to specify a location of the destination container for new objects. By default, you should choose the Microsoft Exchange System Objects container. If your domain is not running in native mode with the ability to support universal groups, you are issued a warning that security cannot be properly managed. Next, you are issued a list of recommended connections, as shown in Figure 3.7. These connections can be one-way or two-way. When planning a coexistence strategy, two-way connections are better because they allow users who connect to both Exchange Server 5.5 and Exchange Server 2003 to retain full functionality. Figure 3.7. Recommended connections in the Connection Agreement Wizard.
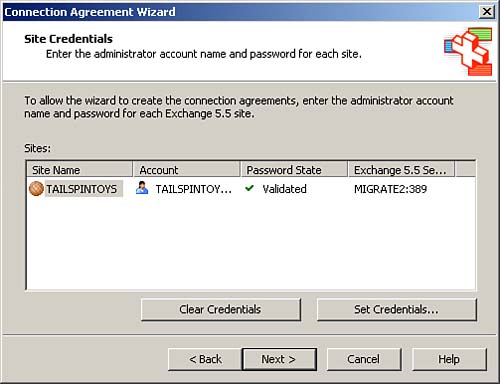
To create the Exchange Server 5.5 site connections to AD, you need to enter administrator credentials for those sites. This is done using the Set Credentials button, and the result is shown in Figure 3.8. Figure 3.8. Credentials for each site in the Connection Agreement Wizard.
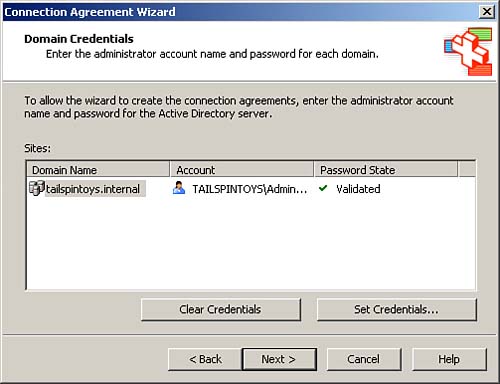
After the administrator credentials have been entered for the Exchange Server 5.5 sites, a similar process must be undertaken for all of the domains that will interact with those sites, as shown in Figure 3.9. Figure 3.9. Domain credentials in the Connection Agreement Wizard.
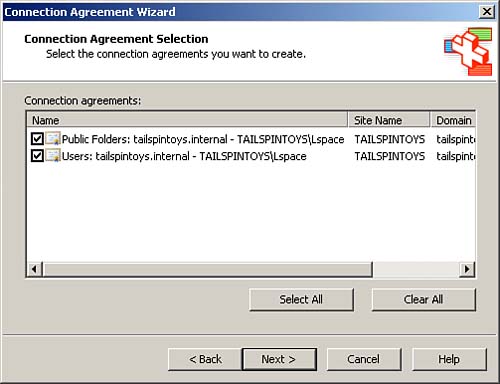
Next is the Connection Agreement Selection. By default, Public Folders and Users will be replicated between Active Directory and the Exchange Server 5.5 directory, as shown in Figure 3.10. Figure 3.10. Selecting the connection agreements to be created.
The final page of the Connection Agreement Wizard provides a summary of all of the decisions that you have made throughout the process of running the wizard. Click Next to finish. After you finish the wizard process, the connection agreements will be created. This can take some time depending on the configuration of your Exchange Server 5.5 site and the layout of your domain. Eventually, you are greeted with a screen informing you that the connection agreements were created successfully. After the Connection Agreement Wizard is run, the final task in the ADC Tools is to verify that all the tools have run correctly. This is performed by clicking the Verify button. It is important to note that replication between the Exchange Server 5.5 directory and AD might take some time. If you run the verification immediately, you are informed that some objects have not had a chance to replicate yet. Wait several minutes, and then attempt to verify again. If after some time the verification fails, you need to again run the Connection Agreement Wizard. After you have completed the verification process, you have finished phase 2 of the Coexistence with Exchange 5.5 checklist. SetupPrep Tool GroupPhase 3 of the Coexistence with Exchange 5.5 checklist of the Exchange Server Deployment Tools begins with running the SetupPrep tool group. The SetupPrep tool group contains three separate tools:
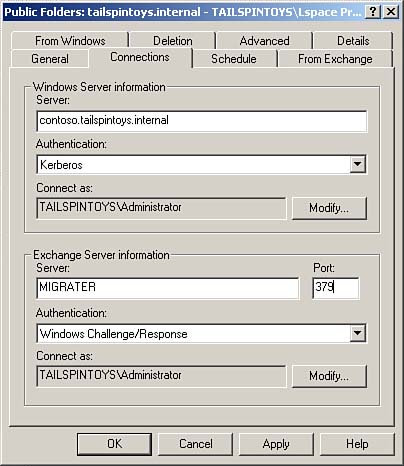
All tools output to the exdeploy.log log file. After you have run the SetupPrep tool group, check this log file for any problems. Step 3 is to install Exchange Server 2003 on a new server. This process is detailed in Chapter 2. The only significant difference is that you should select the option Join or Upgrade an Existing Exchange 5.5 Organization (see Figure 3.11). If you select Create a New Exchange Organization, the new organization will not interoperate with Exchange Server 5.5. To join the Exchange Server 5.5 organization, you need to enter the name of an Exchange 5.5 server running Service Pack 3 (or higher) that is located in your Exchange Server 5.5 organization. The same server that you have tested in prior tools can, of course, be used here. Setup then tests some prerequisite conditions and then you can continue with the installation. Figure 3.11. Join or Upgrade an Existing Exchange 5.5 Organization.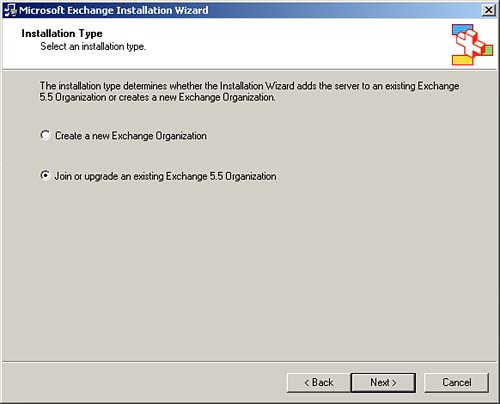 After the installation has completed, you need to alter your connection agreements to connect to the Exchange Server 2003 system that you have just installed. To do this, you need to run the ADC Manager. From there, you need to select a public folder or a user connection agreement. Right-click and select Properties. Go to the Connections tab, as shown in Figure 3.12. In the Exchange Server Information box, enter the name of the new Exchange Server 2003 system. Alter the port number to 379. The port must be altered to 379 because this is the port that Site Replication Services (SRS) uses. SRS is set to only respond to LDAP traffic on port 379. You are again asked to enter valid authentication credentials. You are then asked to perform a full replication the next time the connection agreement is run. You need to update all of the connection agreements in this manner. Figure 3.12. Connections tab.
The benefit of all of this is that the connection agreements now run against SRS rather than AD. This helps prevent problems with directory replication and viewing the global address list. Validating Exchange Server 5.5/Exchange Server 2003 CoexistenceThe final set of steps is to validate that Exchange Server 5.5 and the Exchange Server 2003 systems are coexisting correctly. The tools used to do this validation are
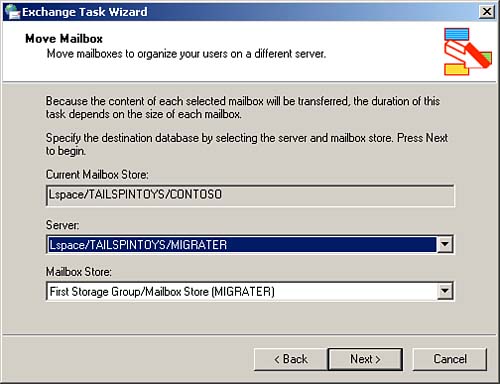
After these tools have executed, examine the exdeploy.log log file for any problems that might exist. After all of this is done, you will have added an Exchange Server 2003 computer to an Exchange Server 5.5 organization and configured them to coexist. Move Mailbox WizardAfter the two technologies are in coexistence, you will be able to move mailboxes from the Exchange 5.5 server to the Exchange 2003 server. To move mailboxes from an Exchange 5.5 server to an Exchange Server 2003 system, log onto the Exchange Server 2003 system that you have just installed and run the Exchange System Manager. Expand the Administrative Groups node and the Server node until you can view individual Exchange servers in your organization, as shown in Figure 3.13. Figure 3.13. Preparing to move a mailbox from Exchange Server 5.5 to Exchange Server 2003.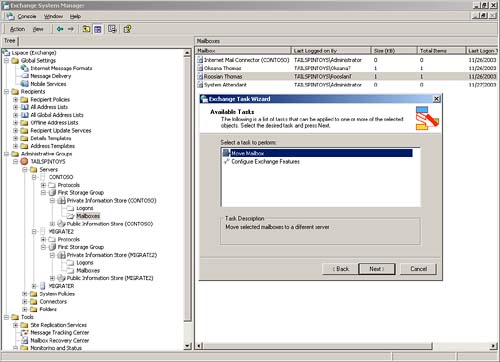 Exchange 5.5 servers are represented with white icons and Exchange Server 2003 servers are represented with gray icons. Expand the Exchange 5.5 server's storage group until you reach the Mailbox folder. Right-click on the mailbox you are interested in and select the Exchange Tasks option. This starts the Exchange Task Wizard. You are presented with the option of either moving a mailbox or configuring Exchange features. Select Move Mailbox and click Next. You are then presented with two drop-down lists (see Figure 3.14) that enable you to select the new Exchange Server 2003 system and mailbox store to which to move the mailbox. Next, you can select whether to create a failure report, or to skip corrupted items and create a failure report, with an option of setting a corrupted items threshold. Finally, you are asked at what time you want this process to occur. The default is immediately, but you can schedule this to occur at a later stage. For example, you would do this if the mailbox was currently in use. Figure 3.14. Selecting the moved mailbox's destination.
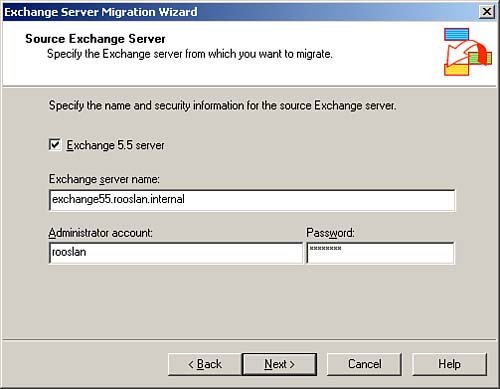
Using the Exchange Server Migration Wizard to Move from Microsoft Exchange Server 5.5 to Exchange Server 2003In many ways, the Exchange Server Migration Wizard is far less troublesome that the coexistence process. Rather than running innumerable tests, you simply point the Exchange Server Migration Wizard at an Exchange Server 5.5 or Exchange 2000 Server, enter the appropriate administrator credentials (as shown in Figure 3.15), and accounts and mail are transferred across. The Exchange Server Migration Wizard can be configured so that new user accounts are created in Active Directory for each account that is transferred across from the Exchange Server 5.5 organization. Figure 3.15. Preparing to migrate accounts from an Exchange 5.5 server.
This method is, in some ways, simpler than setting up a coexistence between an Exchange Server 5.5 organization and Exchange Server 2003 computer. After the Exchange Server Migration Wizard has run, you will be able to decommission the existing Exchange 5.5 server. |
| < Day Day Up > |
EAN: 2147483647
Pages: 171
- ERP Systems Impact on Organizations
- Challenging the Unpredictable: Changeable Order Management Systems
- The Second Wave ERP Market: An Australian Viewpoint
- Enterprise Application Integration: New Solutions for a Solved Problem or a Challenging Research Field?
- The Effects of an Enterprise Resource Planning System (ERP) Implementation on Job Characteristics – A Study using the Hackman and Oldham Job Characteristics Model