Hack 68 Combine Two Pictures
| < Day Day Up > |
| The camera doesn't always reproduce faithfully what the eye sees. But Photoshop CS can help make your photos look like the real thing. Just take two pictures instead of one . Sometimes, I need to take two pictures to tell one story. This often happens when I'm trying to recreate something that my eyes can see easily, but that camera limitations prevent me from reproducing photographically. In part, this is because our eyes see the world differently than cameras do. We can see deep, detailed shadows and brilliant highlights at the same time. Our cameras, on the other hand, make us choose between capturing one or the other, but not both. This is why many people become frustrated with photography and remark, while showing a disappointing print to someone, "Well, it didn't look like that when I took the picture." The adept digital photographer can overcome these limitations by taking two pictures of the same subjectexposing one for the light tones and the other for the dark tonesand then combining them in Photoshop 7 or CS. I use this technique all the time to create illustrations that more closely resemble what my eyes observed in real life. For example, take another look at the image shown in Figure 6-13 (last seen in Chapter 1) of a Flare Buster arm attached to the hot shoe of a digital camera. In real life, my eyes could see detail both in the camera and on the LCD monitor. But in the studio, the image on the monitor faded considerably, because the flash I used to illuminate the black camera wiped out the image on the LCD. Figure 6-13. The image on the LCD monitor faded because of the flash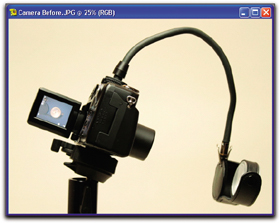 So I turned off the flash and took a second picture, exposing only for the LCD monitor, as shown in Figure 6-14. Figure 6-14. Second picture exposing only for the LCD monitor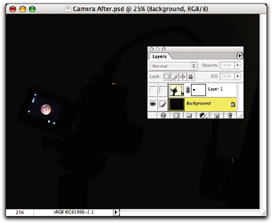 Now, we have to turn to Photoshop CS to complete the job. Open both images and select the entire first image (the bright one) by using Select Select the Brush tool in the Tools palette and select the diameter for the Brush. Make sure to select black as your painting color , as shown in Figure 6-15. Here comes the fun part. Paint on the areas of the picture where you want the bottom image to show through. As you paint, it magically appears. Now, I have good exposure for both the LCD monitor and the camera itself. Figure 6-15. Use the Brush tool to let the parts of the bottom image show through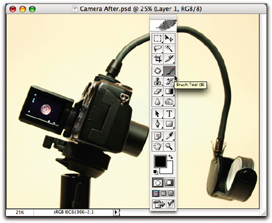 If you want to see the actual mask shown in red, hit the backslash (\) key to toggle on that option. I recommend you save your work as a Photoshop file ( .psd ) with the layers preserved. That way, you can go back to make adjustments, without having to start all over. You can use the Save As command to save the picture as a JPEG and flatten all the layers into one. This technique works best when the camera is mounted on a tripod and kept in the same position during both exposures. That way, you'll have perfect alignment when you paste one image on top of the other. Once you get the hang of it, you'll look at taking pictures in a whole new light. By knowing that you can use this technique to reproduce the shot as you saw it, you'll remember to take two pictures instead of just one. The first exposure is for the highlights; the second is for the shadows. Then, let Photoshop CS take it from there. |
 All. Copy the selection, click on the dark image to activate that window, and use the Paste command. When you do this, Photoshop automatically creates a second layer, as shown in Figure 6-14. Select Layer
 | < Day Day Up > |
EAN: 2147483647
Pages: 161