|   Every digital photographer knows that some pictures need a little sharpening, but few understand the best way to do it. Here's how . I could tell you about the years of trial and error in which I've experimented with different sharpening settings, the countless articles I've read on the subject, or the debates in which I've engaged with other knowledgeable photographers. Or, I could just show you what I've learned through all those experiences. I'll give you the shortcut. Regardless of whether you're using Photoshop 7, CS, or Elements, this hack works the same. The only sharpening tool I recommend is Unsharp Mask, which works its magic on the edges of the pixels by increasing their contrast. The more contrast, the sharper the image appears. You'll need to use this tool after scanning and when you sample down a picture [Hack #64] . Unsharp Mask can also help when your picture appears a little soft because of less-than -perfect photo technique. But it can improve things only so much, so always try to record the sharpest image you can.  | Apply Unsharp Mask as the last step in your image-adjustment process. If you apply it early, other adjustments could degrade its effect and you'll have to do it again. | |
First, open your image and choose Unsharp Mask from the Sharpen menu (Filter  Sharpen Unsharp Mask). Make sure the Preview box is checked. You'll see a close-up sample of your picture in the preview box, as shown in Figure 6-3. If you want to see a close-up of a different area of the picture, just click the mouse button and move the mouse around inside the preview pane. Sharpen Unsharp Mask). Make sure the Preview box is checked. You'll see a close-up sample of your picture in the preview box, as shown in Figure 6-3. If you want to see a close-up of a different area of the picture, just click the mouse button and move the mouse around inside the preview pane. Figure 6-3. Unsharp Mask in Photoshop Elements 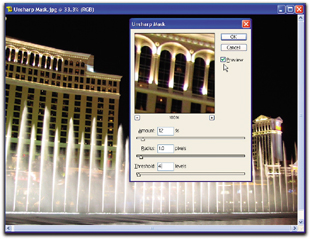
Enter these settings in the three fields of the dialog box: -
- Amount: 12%
-
Earlier, I mentioned that Unsharp Mask works its magic by increasing the contrast on the edges of the pixels. The Amount setting specifies the amount of contrast. Keep this setting low, around 12%. If the effect isn't strong enough, repeat the process. It's better to apply the filter three times at 12% than one time at 36%. -
- Radius: 1.0 pixels
-
As you apply these changes to the pixels in your image, they also affect the pixels adjacent to them. This is important to keep the picture looking natural and not too digital. The larger the number you set in the Radius field, the wider the band of adjustment that affects other pixels will be. You want to keep this setting at 1 or 2. Beyond that, your picture will lose too much detail. -
- Threshold: 4 levels
-
This setting looks at the amount of contrast between neighboring pixels and applies sharpening to them. If the setting is set to 0 (the lowest threshold), all the pixels in the picture get sharpened. If the setting is high20, for exampleonly areas of the image with substantial contrast between pixels get sharpened. A setting of 4 is a good starting point. If you leave the setting at 0, the default in Photoshop, every pixel edge will be sharpened. This can unduly increase image noise and make smooth areas, such as skin tones, look a little blotchy. The general range for this setting is between 2 and 20. Click OK and inspect your picture. If you feel it needs a bit more sharpening, repeat the process or use the keystroke combination Ctrl-F, which repeats the last filter you applied. These settings are designed to maintain as much quality as possible while still producing the desired sharpening effect. You can apply them two, three, or even four times to a picture, as necessary. |