Hack 62 Match Resolution to Output
| < Day Day Up > |
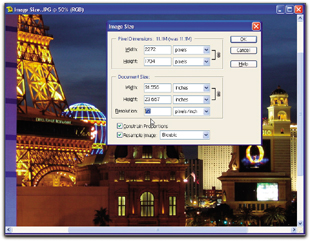
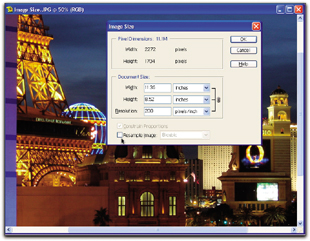
| Image resolution remains one of the great mysteries to hobbyist photographers; there's one setting for computer viewing and another for print output. Here's how it works . I can't resist starting this chapter with an anecdote. Usually, I wouldn't, but I feel that this story sets the tone for the entire chapter. About a year ago, after teaching a two- hour digital photography seminar, I was fielding questions from attendees while packing up my equipment. One gentleman approached me and said, "I have just one question for you. How do I change the resolution of my pictures without changing their dimensions? I know there's one little thing I need to do, but for the life of me, I can't remember what it is." This guy had patiently sat through an entire seminar, probably about stuff he already knew, just so he could ask this question afterward. I reopened my laptop, launched Photoshop, and showed him the magic box that he needed to uncheck. His eyes lit up, he grabbed my right hand, and he shook it vigorously. "Thank you, thank you!" he exclaimed and ran out the door. Most likely, he headed directly home and went to work. For me, that experience sums up Photoshop for digital photographers. You know there's some way to accomplish everything you want to do, but for the life of Moses, you can't figure out half of them. Or, as in the case of my student, you can't remember what you already know. How to adjust picture resolution for printing falls squarely into that category for many photographers. This hack will solve that problem for you. 6.2.1 Your Camera's ResolutionResolution is expressed in dots per inch (dpi) or pixels per inch (ppi). The higher the ppi, the more densely packed the pixels are, and the higher the resolution. Because of the inherent differences in various media, printing requires higher resolution than computer viewing. Your digital camera is basically a miniature computer that contains a built-in scanner. It scans its images at 72 ppi. That happens to be the same resolution at which most computers display their images. So, going from digital camera to computer is like going from apples to apples. If you were always going to view your pictures solely on a computer, that would be the end of this conversation. But chances are, you want to make prints too. Prints don't look so good at 72 ppi. The ideal printing resolution for photo quality starts at 200 ppi. So how do you get there from here? 6.2.2 Working with Image Size Open your picture in Photoshop and find the Image Size command. In Photoshop Elements, the path is Image You'll notice in the dialog box that Pixel Dimensions is the top section and Document Size is the middle area. Pixel Dimensions shows you the current size of the image at the current resolution. Chances are, the resolution is set to 72 ppi. The Document Size box shows how big a print you can make at the current resolution. As shown in Figure 6-1, I can make a 31" 23" print from this four-megapixel picture. Though that's technically true, it wouldn't look very good printed at 72 ppi. That's just not enough resolution. Figure 6-1. The Image Size dialog box in Photoshop Elements I want a photo-quality print, so I'm going to change the resolution. But first, here's the secret: before you do anything else, uncheck the box labeled Resample Image, as shown in Figure 6-2. Now, enter 200 in the Resolution box. You'll notice that your previously impressive 31" 23" print has shrunk to 8" 11". But it will look darn good. Figure 6-2. Changing the image's resolution If you resample images when adjusting them for printing, Photoshop will add more pixels. You don't want Photoshop to do that, because it doesn't add pixels at the same quality as your camera records them. That's why you turn off resampling. Notice that the file size (listed next to the Pixel Dimensions label) stays the same when Resample Image is turned off. That's your best clue that you're doing this right. I recommend you use the Save As command at this point and leave the original image alone. You can add print to the new filename to remind you that this version of the picture is for print output. 6.2.3 A Final Photo TipYou saw how drastically the print size shrunk when I changed the resolution from 72 ppi to 200 ppi. You can fudge this process a bit by using 150 ppi, and you'll still get good-looking prints. But the real point is to shoot at your camera's highest resolution so that you always have the option of making a reasonably sized print. The images in this hack were recorded with a four-megapixel camera set to the highest-quality settings for resolution and compression. I recommend you use those settings too, regardless of how many megapixels your camera has. You can always make copies of the image and size them down for other uses [Hack #64] . |
| < Day Day Up > |
EAN: 2147483647
Pages: 161
- ERP System Acquisition: A Process Model and Results From an Austrian Survey
- Enterprise Application Integration: New Solutions for a Solved Problem or a Challenging Research Field?
- Context Management of ERP Processes in Virtual Communities
- Intrinsic and Contextual Data Quality: The Effect of Media and Personal Involvement
- Relevance and Micro-Relevance for the Professional as Determinants of IT-Diffusion and IT-Use in Healthcare
 Resize