Hack 35 Light Painting and Colored Gels
| < Day Day Up > |
| With an inexpensive swatch book of theater lighting gels, some nightlight bulbs , and a couple of LED flashlights, you can create ethereal color effects. And the best part is that you don't need Photoshop or even a computer . Yes, you can manipulate photos in just about every way imaginable in Photoshop. But what if you don't like Photoshop, don't feel that comfortable with your image-editing skills, or just want to try something new? Alternatively, you can manipulate the picture as you actually capture it with the camera. Working with light painting and colored gels, such as the ones shown in Figure 3-10, is a great way to experiment with this type of creative shooting. Figure 3-10. Crystal with colored gel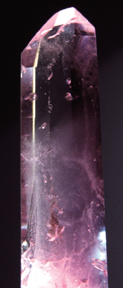 I use quartz crystals for my example because they're fun to manipulate with light, but just about any translucent or reflective subject has potential. My tools include theater lighting gels, nightlights, a photographer's light box, colored bulbs, and LED flashlights. One of my favorite combinations for experimentation is a regular nightlight bulb shining through Roscolux theater gels. For US$3.50 at Rose's Theatrical Supply (http://www.theatricalshop.com/rosesweb/gels.htm), you can get a Roscolux Swatch Book that contains a sample of every gel in their collection. For the crystal shots, I made a custom light stand out of a six-inch length of 2" 4" wood. I simply drilled two holesone downward from the top and one inward from the sideto form an L-shaped opening in the wood, as shown in Figure 3-11. The crystal sits on the top hole, and the nightlight bulb goes in the side hole. Now, I can put any color gel I want over the top hole, and that will be the color of light projected up through the crystal. Figure 3-11. Homemade light stand and filters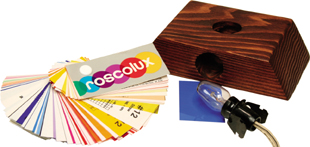 When you use this setup in a darkened room, the colored light shining up through the crystal is subtle and quite striking. If you want, while the shutter is open, you can add more effects, such as light painting. This is why nightlight bulbs, which are typically only four watts or so, are good for this type of project. The dim light creates long exposures that give you the opportunity to paint with other lights, such as flashlights with colored bulbs, while the shutter is open . Many of the new LED pocket lights that are available for US$10 or less have options for red, green, blue, and white bulbs. You can shop around at flashlight specialty shops , such as GlowBug.com (http://www.glowbug.com), to discover a whole new universe of creative lighting options. And when you're not painting with them, they make great additions to your keychain. 3.8.1 The SetupFind a work area where you can control the ambient lighting. Set up your prop lighting (such as the light stand I discussed earlier), colored gels, and subject. Mount your camera on a sturdy tripod. You can use Auto Exposure mode, but check you camera manual for how long the shutter will stay open with that setting. Some cameras have a Long Exposure mode; if yours does, you should use it. Most advanced cameras have Shutter Priority mode, which makes this work easier. You can set the shutter speed to three or four seconds, and the camera will handle the aperture settings for you. As you work, you'll have to lengthen the shutter exposure (such as 6, 8, or 10 seconds) to lighten the picture, or shorten the exposure (2 seconds or less) to darken it. Play with your settings until you get the effect you want. I like to use a remote release to trip the shutter, but if you don't have a remote, you can also use the self-timer. The main thing is that you don't want to jar the camera when you initiate the exposure. Even the slightest vibration during exposure will degrade your image. Speaking of picture quality, set the ISO on its lowest rating: 50 or 100. This ISO will produce nice, long exposures under these dim lighting conditions, giving you more time to play while the shutter is open. Now, dim the room lights and let your imagination run wild. Take the colored bulbs or flashlights and move them around in the scene while the shutter is open. You'll find that different speeds and angles create different types of brush strokes. Figure 3-12 is a good example of a broad stroke. Figure 3-12. Light painting behind crystal spheres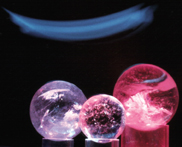 Review your work on the camera's LCD monitor, and make adjustments as you go along. At some point, you'll find the perfect combination of exposure and color for the subject you're shooting. There's no need to use Photoshop now. Just print it and enjoy! |
| < Day Day Up > |
EAN: 2147483647
Pages: 161