Hack 20 Secrets of Whiteboard Photography
| < Day Day Up > |
| Never rewrite anything you can digitize. If you've ever been tasked with copying a full whiteboard after an intense brainstorming session, you know what I mean . You've just finished participating in one of the most amazing brainstorming sessions of your career. The massive whiteboard, which covers an entire wall of the conference room, is covered with words, arrows, and diagrams. You're about to rush from the room to begin putting these plans into action when your boss says to you, "Robertson! Would you please copy down these notes and circulate them to everyone who attended the meeting?" Copy those notes?! Not even Leonardo Da Vinci could reproduce those drawings. Suddenly, an air of calm comes over you as you recall "Secrets of Whiteboard Photography" from Digital Photography Hacks . You pull your digital camera out from your backpack and go to work. Why rewrite something that's already been written, when you can photograph it, save it as a .jpg file, and circulate it to anyone with a browser on their computer? This hack will make more sense to you if you first understand how a camera sees the world. Most cameras are calibrated for capturing blue skies, green grass, and other middle tones. And, more often than not, your camera will try to convert anything on the extreme end of the exposure scale to those same middle tones. So the black cat becomes gray and the whiteboard becomes a murky beige color . So, job number one is to find your exposure compensation adjustment and set it to +1. That will tell your camera to overexpose the subject and make the whiteboard white, not gray. Then, turn up the room lights, open the shades, and turn off your camera's built-in flash. Those little strobes might be fine for blinding your best friend at her birthday party, but they're not so good for shooting whiteboards unless, that is, you don't care about reading the writing. Flashes tend to nuke white shiny surfaces. Now, take a test shot like the one shown in Figure 2-8. How do the colors look? Some cameras have excellent auto white balance settings and will compensate for most lighting situations. If the color looks off, you might want to override the auto setting. Figure 2-8. Tame whiteboard madness by taking a picture, not by rewriting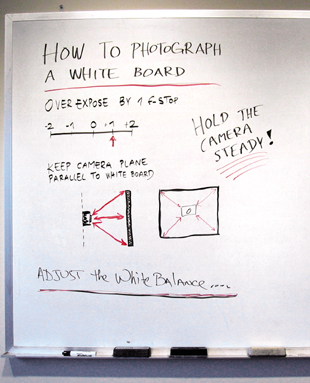 If the lights in the room are fluorescent, look for the fluorescent setting on the white balance and try a test shot with that. Often, the adjustment will greatly improve the color balance. In addition to fluorescent, you also have a preset for tungsten bulbs . Use the one that best suits the lighting in the room. Here is where the true art comes in: composing the shot. To avoid extreme distortion, where the whiteboard looks like a parallelogram from high school geometry, you must keep the plane of the camera parallel to the plane of the whiteboard. In most cases, this means nice and straight on the vertical axis (no tilting) and level on the horizontal axis (such as placing it on a table). This will minimize distortion and render the photo of the whiteboard closer to how it appeared during the meeting.
For large whiteboards, you might want to record the information in two or three shots so that it's readable on the computer screen and doesn't look like tiny tracks left by ants with dirty feet. You can zoom in on key concepts (and name the file accordingly later) or simply shoot the board in sections, moving from left to right. Use your judgment here. If your shots look a little blurry, that's probably because the room lights aren't bright enough for a decent shutter speed and you're getting what's known as camera shake . Most of the time, you can solve this problem by increasing the ISO setting from 100 (the default on most digicams) to 400 or even 800. That will give you a faster shutter speed, which should result in sharper images.
Now that you have the pictures in the camera, upload them to your computer and give each one a descriptive filename. You can send them as email attachments, but I find that rather inelegant. Instead, build a quick-and-dirty web page and post it on the company server. All you have to do now is send everyone the link. That way, they can look at the pages they want and use their browser's forward and back arrows to move from image to image.
This might sound like a lot of work, but actually, the shooting takes only a few minutes, and how long does it take to build a quick-and-dirty web page [Hack #50] ? Most image editors will do it for you as an automated process. Now that the notes are out of the way, you can get back to putting those great brainstorms into action. |

| < Day Day Up > |
EAN: 2147483647
Pages: 161