Hack 3 Walking-Stick Mount
| < Day Day Up > |
| A trusty walking stick is helpful for fording streams and navigating slippery trails. But why not use it to steady your camera, as well as your footing? In the wide world of walking sticks, there are basically two types: the ones you buy and the ones you make. Either version can become a steadying friend for your outdoor photography. A trip to the mountaineering store reveals that today's walking sticksor trekking poles as those in the know call themare lightweight, sturdy, and have comfortable grips. Most are constructed in collapsible sections, enabling the stick to fit nicely in a suitcase or be lashed onto the outside of your backpack . Most trekking poles have a rubber tip that provides good traction on paved walkways and a metal tip for digging into the side of hills. Leki (http://www.leki.com) is a popular supplier of trekking poles that range from US$50 to over US$100. Outdoor photographers should take a look at the Sierra Antishock (model TK2091-04), which has a removable wooden knob that exposes a camera mount, as shown in Figure 1-3. Figure 1-3. The Leki Sierra Antishock walking stick with camera mount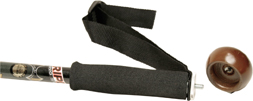 By attaching your camera to the walking stick, you can create the third leg of what I call the human tripod . You supply your two legs, and the walking stick becomes the third. Simply position your feet about shoulder's width apart, and then lean forward slightly on the walking stick while composing your picture in the camera's viewfinder. You'll find that this method is much easier for stabilizing the camera than trying to hold it with just your two hands. If you'd rather not spend the money on a Leki stick, you can make your own. First, make a quick trip to the hardware store for a 1/4" screw with 20 threads per inch. Get one about an inch or so long. Screw it into the tripod socket on the bottom of your camera. I recommend that you add a plastic washer to serve as a cushion between your camera and the walking stick. Slip the spacer on the screw and position it so that it's flush against the bottom of the camera. With a felt-tip pen, mark the screw right beneath the washer, and then remove both pieces from the camera. Drill a hole that's slightly smaller in diameter than the 1/4" screw in the top of your walking stick, and then twist the screw into the hole so that the mark you made is just below the top surface. Be careful not to damage the threads while doing this. Now, slip the plastic washer onto the post. It will serve as a cushion. Attach your walking stick to the tripod socket in the bottom of the camera. Do this with care the first time to ensure that you measured correctly, and don't damage the bottom of the camera by screwing the post too deep into the socket. If you miscalculated, sink the post further into the walking stick and try again. The post should fit snugly in the camera socket, but it shouldn't go too deep. If you want to add a crowning touch, add a decorative knob to the top of the stick to cover the post when the camera isn't attached. You can drill a hole in the knob and sink in a 1/4" nut so that the knob easily screws on and off. Regardless of whether you go the homemade route or opt for the slick Leki model, a walking stick that doubles as a camera stabilizer can help you take sharper pictures when you're in the great outdoors. |
| < Day Day Up > |
EAN: 2147483647
Pages: 161