Hack 100 Stack Images to Remove Noise
| < Day Day Up > |
| You can dramatically reduce image noise by taking multiple photos of the same scene and layering them in Photoshop . One of the main draws for switching to a digital SLR from a point-and-shoot digicam is the silky-smooth pictures they take. Short of taking the plunge into the digital SLR market, what can you do to get images like that with your current camera? The most basic step toward reducing noise in images is to use the lowest ISO the camera offers. You want to set the ISO manually rather than leaving it on automatic. Otherwise , the camera might sacrifice the best ISO setting for a faster shutter speed. Another common technique is to use postprocessing software to reduce image noise while protecting detail in the photograph. Most applications are good at this, but you can't push noise reduction too far or you will notice some loss of detail. Which brings us to the stacking technique : a noise-reduction approach that does wonders for reducing noise without any negative effect on image detail. How does this work and what is the catch? The catch is that it requires extra work on your part, both while you're shooting and during postprocessing, and you can use this technique only on certain types of scenes. This technique is based on the fact that most camera noise is random noise. If you take the same shot over and over again, most of the noise will be different from shot to shot. While none of these shots is any less noisy than the others, if you merge them together, you get a much cleaner image, as shown in Figure 8-37. On the left, the original image has noticeable noise in the sky and water. By stacking five shots, I've dramatically reduced noise, as shown in the image on the right. Figure 8-37. The original scene and the stacked image If you're having trouble understanding why there will be less noise with these layered shots, think of a political poll. For one poll, I ask 100 people who they intend to vote for. Then, I conduct a second poll and ask 10,000 people who they will vote for. Odds are, the second poll will be more accurate because of the larger sampling. This is similar to the technique for stacking photos to reduce noise. With five stacked images, I have more information and therefore better results. If you are shooting your kid's soccer game, this approach won't do you much good. But if you want to photograph a landscape or still life, you're in good shape. Your subject must be a static scene, and you need to mount your camera on a tripod, preferably using a remote release. Try not to touch the camera between shots, because any movement will blur the final results. If you can, set your camera to manual focus. Changes in focus can create subtle changes in the field of view. If your camera does not have manual focus per se, you can use the Infinity or Landscape mode that is identified by the mountains icon. The goal of all this is to use the same settings for each shot. Three to five shots is a reasonable number of photos to take, although every additional shot makes the result a little better. However, there is a point of diminishing returns, where you're just wasting your time and valuable space on your memory card. Here's a breakdown of your fieldwork :
8.16.1 Processing on the ComputerNow, what do you do once you have the photos on your computer? Although some applications can take a series of images and average them automatically, we can also work our magic in Photoshop Elements or CS. Here is the basic procedure:
At this point, you see only the top image. You need to adjust the opacity of each image layer so that they contribute equally to the final image. When you begin, all the layers are at 100%. You want to keep the bottom layer at 100%, but you want the next layer above it to be at 50%. Continue working your way up the layers, assigning the following opacity values to each subsequent layer: 33%, 25%, 20%, 16%, 14%, and 12%. You can continue this pattern for as many photos as you have, like so:
Figure 8-38 shows the Layers palette in action. For this demonstration, I have named the layers to match the opacity amount, but you don't have to do this. Just change the opacity in the box at the top-right corner of the palette. Figure 8-38. Stacked layers in Photoshop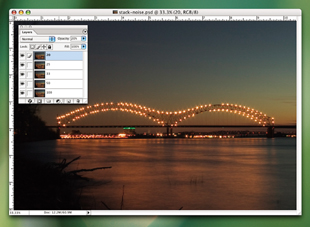 Flatten the photo into one layer and save it as a TIFF or JPEG file. Congratulations; you're done! Now, you can continue your curves, levels, and sharpening adjustments as you would for any other photo. 8.16.2 Other Things to ConsiderYou might have noticed that there is moving water in my sample shot. Some motionin particular, things that are flowing , such as water, cars , or cloudsis fine. As long as you like the end result, it is not a problem. The only thing to keep in mind is that the effective motion blur for the moving objects is determined by the combined exposure time of all the shots, as opposed to the time for an individual shot. For example, in the shot of the bridge shown in Figure 8-38, I used five 4-second exposures, so the final image has the motion blur of a 20-second exposure. So on long-exposure shots, why do certain pixels jump off the background on each shot? These are called hot or dead pixels. They are not eliminated because they are not random. If you're lucky, all of the pixels will be healthy on your camera and you won't have any of these troublesome spots to correct. Some cameras deal with this internally, and there are also some software solutions. As a last resort, you can fix them with the cloning tool during postprocessing. Digital photographers are not the first to use this stacking technique to clean up images. For a long time, astronomers have been capturing video through their telescopes and averaging hundreds of shots to get amazingly clean photos out of what would otherwise be a noisy image. With stars, you really don't want all that noise in the way. Of course, to do this with stars, your telescope needs to have a tracking system. 8.16.3 Final ThoughtsSo grab your tripod and a big memory card, and start shooting. The only problem is, once you see how nice these shots are, you might become addicted to this technique and want to use it on all your shots. For a variation on this technique, you can bracket your shots at different exposures to help expand the dynamic range of your photographs. David Goldwasser |
 All, copy the second photo to the clipboard, and close the second photo.
 | < Day Day Up > |
EAN: 2147483647
Pages: 161