Hack 96 Shoot the Moon
| < Day Day Up > |
| The moon is a fascinating photo subject, and with a little equipment and some experimentation, you can capture fantastic results . The moon enhances the mood of evening landscape compositions [Hack #37] , but it's also a great subject unto itself. With a little additional equipment and some hacking technique, your digital camera can get up close and personal with our favorite celestial body. This hack discusses two advanced techniques for taking pictures of the moon. The first focuses on adding telephoto-lens attachments to the front of your digital camera lens, or attaching a telephoto lens to your digital SLR. The second technique involves attaching your digital camera to the eyepiece of a telescope to really zoom in on lunar surface detail. But first, let's look at some standard lens attachments you can use for this project. 8.12.1 Getting Your Glass TogetherJob one is to use a lens with a focal length that is large enough to provide sufficient magnification. By doing so, the moon will be rendered as an acceptable size in your viewfinder. When we discuss digital-camera lenses, we often use the so-called equivalent focal-length terminology, denoting the focal length (in millimeters) of a 35mm film-camera lens that has the same angle of view. For example, an Olympus C-3050 digicam might list its zoom lens as 7-21mm, but in film-camera terms, it's a 35-105mm equivalent . This means that the lens gives the same range of angles as a 35-105mm lens on a 35mm film camera. To figure out how big the moon is going to look in your viewfinder, multiply the equivalent (or, in the case of a 35mm film camera, actual ) focal length by 0.033 (or divide it by 30 for the same result). The result is the percentage of your frame the moon will fill vertically. Table 8-1 provides some of the more common focal lengths and their respective vertical-frame-fill percentage. Table 8-1. Common focal lengths and their vertical frame fills
Obviously, size matters. While 200mm seems to be a reasonable minimum, the bigger the better. A few digital cameras have really long zooms (some models from Sony and Olympus go up to the equivalent of 400mm), sometimes even with image stabilization to avoid handheld camera shake. These long zooms can be used to shoot moon pictures right out of the box. Olympus makes a good TCON-300 attachment for their E-10 and E-20 cameras, extending the focal-length range to 420mm. Moreover, this attachment can be used with another one, TCON-14B, providing an effective focal length of 600mm (oh, my!), which renders a surprisingly nice image, as shown in Figure 8-29. Figure 8-29. Moon shot with Olympus E-20 and attachments Some other digital camerasmost notably, the Nikon CoolPix series, Canon G series, and Olympus 3000 modelshave a provision for attaching auxiliary lenses. Check for lens accessories from outfits such as EagleEye (http://www.eagleeyeuk.com/erol2row/erol.html) and Kenko (http://www.kenko-tokina.co.jp). If you have access to a digital SLR, such as the Canon Digital Rebel, you can beg, borrow , or buy long telephoto lenses to mount right on the body. If that option is available, it's the best way to go. 8.12.2 Making the Correct ExposureThe bright moon against a dark sky can fool your camera's automatic exposure system. So, it's best to go straight to manual exposure. Otherwise, your metering circuitry will average the exposure over the night sky (most of the frame) and the bright moon in the center, resulting in a hopelessly overexposed frame. Even if you have spot-metering, you won't avoid this problem, unless you are using a focal length of 400mm or higher. Also, the moon happens to be one of the easiest subjects to set the proper exposure for manually. Its distance from the sun is almost the same as earth's, and it has no clouds. Therefore, the daylight moonscape is illuminated much like an Arizona desert at high noon. We can use the sunny 16 rule here: with an aperture of f-16, set the shutter speed to the ISO speed setting. So if your ISO setting is 100, expose at 1/125 of a second. You might be asking, "Why use the same settings you'd use for a sunlit landscape? The moon is so far away from us, 384,000 km, and we know that the light decreases as a square of the distance!" Yes, but so does the moon's apparent size, so the amount of light per pixel remains the same, regardless of the distance from which we're shooting it. Remember, we are using the moon not as the source of illumination (we're using the sun for that) but as the subject of the picture. If we moved the moon twice as close to the earth, the exposure values would stay the same, although the moonlit scenes on the earth would be four times brighter. Got it?
Since the moon fills just a small part of the frame, your picture will probably need to be cropped. For this reason, image sharpness is important. To make sure you get the sharpest image possible, use a fast shutter speed and mount your camera to a tripod. If you don't have a tripod handy, try to get some support (a fence, top of a car, etc.) and shoot a number of frames to select the one with the least camera shake. Finally, if your camera has manual focusing, switch to manual and set the focus for infinity (or, in case of an SLR, focus manually). Be aware that some cameras allow you to manually focus past infinity when a lens attachment is used. 8.12.3 Postprocessing Your PicturesThe original picture from your camera should have a significant amount of detail, but it might need some postprocessing in an image editor to add the finishing touches. The moon's image suffers when it passes through the earth's atmosphere, which significantly degrades the contrast and, to a lesser extent, the sharpness as well. So you might want to play with your pictures a little in your favorite image editor to brighten them up. When you're ready to sharpen, which should be the final step, refer to [Hack #63] . Also, be prepared to see some chromatic aberration on the borderline between the sunlit moon's surface and the sky (that's where it's usually most visible). Chromatic aberration usually appears as a green tint. This is unavoidable, unless you are ready to cough up US$7,000 for a 600mm professional lens. If you find this effect objectionable , desaturate your picture to monochrome [Hack #74] . Instead of the color fringe, you'll have just a bit of softness, which is much less noticeable. 8.12.4 Get Outta Town!When using a long lens and a tripod, the detail in your picture will be affected by how clean the air is. There is one kilogram of air above you ( assuming you're close to sea level) per each square centimeter, and that's looking vertically (if the moon is 45 above the horizon, the light path through air is about 40% longer). This is roughly equivalent to a glass pane 4 meters thick or 10 meters of water! Humidity, dust, and density fluctuations all degrade the quality of your image, reducing contrast and sharpness. Therefore, observing some commonsense rules can greatly enhance the quality of your moon shots:
Remember that even if you can enhance the lost image contrast during postprocessing, you will enhance, to the same degree, the inherent image-sensor noise of your camera. The same goes for sharpness enhancement; therefore, the less postprocessing you need to apply to your image to make it presentable, the more presentable it will be. 8.12.5 Try a TelescopeMy friend Hong Zhao, from England, found an old telescope in her friend's closet. She dusted it off and used her Olympus C300Z (the same model is sold as the D-550 in the U.S.) to make the wonderful picture shown in Figure 8-30. Figure 8-30. Moon photographed with a digicam connected to a telescope (photo by Hong Zhao)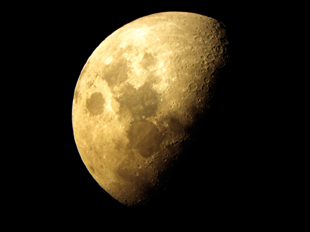 The programmed exposure was 1/50 at f-2.9 (full aperture) and the zoom was set at F=6.6mm (EFL=33mm)that is, at the wide end. At this focal length, the moon filled almost the whole frame height. The camera was held to the telescope eyepiece. The telescope itself was a homemade Newtonian type with a 16cm mirror and f-8 aperture, 20mm Kelner eyepiece, and no equatorial drive. The shooting location was Hampshire, Englandnot far from Londonand this is, I believe, Hong's first effort at astrophotography. The three-megapixel camera did a respectable job for this assignment. The only postprocessing required for this image was a little brightening and slight sharpening. This clearly demonstrates how much you gain by using a telescope, even a relatively simple one. If you have an old Meade or Celestron gathering dust, get it out and start playing. 8.12.6 Final ThoughtsReally, though, why shoot the moon? We're all looking at the same moon. Your pictures will be much like mine or anyone else's. If, however, you enjoy photography as much as I do, you will not need a rational answer. Instead you can respond, to quote George Mallory, "Because it's there." In other words, it's your shot of the moon, and you can do whatever you want with it. Shoot the moon for fun, and for bragging rights. Andrzej Wrotniak |

| < Day Day Up > |
EAN: 2147483647
Pages: 161