Sharing Folders with Other Users
Provided you are logged on as a member of the Administrators, Power Users, or Server Operators group, you can share folders on your own system with other users on your network.
To share a folder or drive:
- Open Windows Explorer, and display the icon for the folder or drive you want to share.
- Right-click the icon, and then choose Sharing from the shortcut menu.
- Select the Share This Folder option.
- Accept or change the proposed share name.
This takes you to the Sharing tab of the folder's properties dialog box, as shown in Figure 9-7.
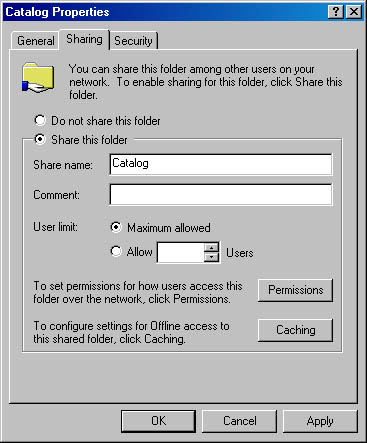
Figure 9-7. To share one of your own folders, choose the Sharing command from the folder's shortcut menu.
NOTE
If the folder is already shared, click New Share and then type the share name. Local drives always have a default administrative share whose share name consists of the drive letter and a dollar sign (for example, C$). This share name is not visible to others, and you can't set permissions for the default share—so you'll want to create a new share.
The share name is the name that other users will see in their own My Network Places folders. Windows initially proposes to use the folder's name as its share name. That's usually a good choice, but you're not obligated to accept it. If you already have a shared folder with that name, you'll want to pick a different name.
TIP
Hiding a Shared Folder from Casual BrowsersIf you append a dollar sign to the share name (for example, Catalog$), the folder is not visible to users who browse the network with My Network Places or Windows Explorer. Users whom you've entrusted with the name of your shared folder can still connect to it by typing its name—including the dollar sign—into the Map Network Drive dialog box or the Run dialog box.
- Type a description of the folder's contents into the Comment box.
- To limit the number of users who can connect to the shared folder concurrently, click Allow, and then specify a number.
Other users will see this description when they inspect the folder's properties dialog box in their My Network Places folder (or use Details view).
If network traffic seriously impacts your system's responsiveness, you might want to take advantage of this option. The default choice, Maximum Allowed, permits up to 10 concurrent users. (If you need to share a folder with more than 10 users at once, you must use Windows 2000 Server.)
SEE ALSO
For information about setting up caching for offline folders, see "Setting the Maximum Cache Size."
Assigning Permissions to a Shared Folder
The default permission associated with a new shared resource is Full Control to Everyone. That means that anyone on your network can do whatever they want to your files, including delete them. (If the shared folder resides on an NTFS volume, individual folders and files can have their own access restrictions, however.) You can place limits on what particular users or groups of users can do with your shared files by clicking the Permissions button in the dialog box shown in Figure 9-7. Then you'll see the dialog box shown in Figure 9-8.
CAUTION
When you share a folder, you also make that folder's subfolders available on the network. If the access permissions you give for the folder aren't appropriate for any of its subfolders, either reconsider your choice of access permissions or restructure your folders to avoid the problem.
To view or set permissions:
- In the Name list, select the name of the user or group you want to manage.
- Select Allow, Deny, or neither for each permission:
- Full Control. Allows users to read, write, rename, and delete files in the folder and its subfolders. In addition, users can take ownership of files on NTFS volumes.
- Change. Allows users to read, write, rename, and delete files in the folder and its subfolders, but not to create new files.
- Read. Allows users to read files but not write to them or delete them.
The shared folder permissions for the selected user or group appear in the Permissions box.
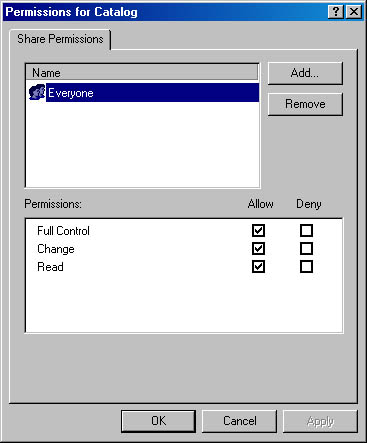
Figure 9-8. By default, all users have Full Control over files in a new shared folder—unless access has been restricted to files individually via NTFS. You can use this dialog box to set restrictions on the entire shared folder.
If you select neither Allow nor Deny, the user or group might inherit the permission through membership in another group that has the permission. If the user or group doesn't belong to another such group, the user or group is implicitly denied permission.
NOTE
To remove a name from the Name list, select it and click Remove. To add a name to the list, click Add to open the Select Users, Computers, Or Groups dialog box, where you can select the names of the users and groups you want to add. For more information about this dialog box, see "Securing Files."
SEE ALSO
For information about NTFS security, see Chapter 28, "Using NTFS Security."
Note that shared folder permissions apply only when the folder (and its files and subfolders) are accessed over a network. They don't protect files or folders when opened locally from the computer on which they reside. If the folder you're sharing is on an NTFS volume, the NTFS permissions protect the files locally, and they also apply to network users.
Solutions to Common File-Sharing ProblemsTo share a folder, you must be logged on as a member of the Administrators, Power Users, or Server Operators group. (Once a folder has been shared, however, the share is available to network users no matter who is logged on—or even when nobody is logged on.)
If the folder's properties dialog box doesn't have a Sharing tab, be sure your system is set up for sharing. First, check the properties dialog box for the network connection, and be sure that File And Printer Sharing For Microsoft Networks is installed and selected. For more information, see "Configuring a Network Connection." Then use the Services tool (right-click My Computer, choose Manage from the shortcut menu, expand Services And Applications, and click Services) and be sure the Server service is started.
EAN: 2147483647
Pages: 317